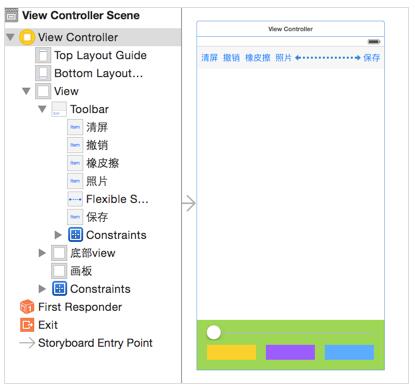
自定义画板DrawView,使用时可能是从xib中加载,也可能是手动创建,所以创建对象的方法需要实现两个:
#import <UIKit/UIKit.h> @interface DrawView : UIView/** 线宽 */@property (nonatomic, assign) NSInteger lineWidth; /** 颜色 */@property(nonatomic, strong) UIColor *pathColor; /** 图片 */@property(nonatomic, strong) UIImage *image; - (void)clear; - (void)undo;
- (void)awakeFromNib { [self setUp]; } - (instancetype)initWithFrame:(CGRect)frame { if (self == [super initWithFrame:frame]) {[self setUp];}return self;}setUp初始化方法,初始化时要做的事情就是给画板添加拖动手势,也可以将画笔路径的线宽在这里设置//自定义初始化方法- (void)setUp { //添加手势UIPanGestureRecognizer *pan = [[UIPanGestureRecognizer alloc]initWithTarget:self action:@selector(pan:)];[self addGestureRecognizer:pan]; //初始化时设置路径线宽_lineWidth = 2; }手指在画板上移动时开始绘制线条,这里因为原生的UIBezierPath类没有办法设置路径颜色,所以这里只能自定义Path类了 #import <UIKit/UIKit.h> @interface DrawPath : UIBezierPath @property (nonatomic, strong) UIColor *pathColor; @end手指移动时,绘制线条,路径是自定义的Path类
@interface DrawView () @property(nonatomic, strong)DrawPath *path;/** 保存所有路径的数组 */@property(nonatomic, strong) NSMutableArray *pathArr; @end //懒加载- (NSMutableArray *)pathArr {if (_pathArr == nil) { _pathArr = [NSMutableArray array]; }return _pathArr;}- (void)pan:(UIPanGestureRecognizer *)pan { //获取开始的触摸点CGPoint startP = [pan locationInView:self]; if (pan.state == UIGestureRecognizerStateBegan) { //创建贝塞尔路径_path = [[DrawPath alloc]init];_path.lineWidth = _lineWidth;_path.pathColor = _pathColor; //不能在手指抬起时将路径添加到数组,因为在遍历数组画线时路径还没有被添加到数组里面[_pathArr addObject:_path]; //设置起点[_path moveToPoint:startP]; } //连线[_path addLineToPoint:startP]; //重绘,调用drawRect方法[self setNeedsDisplay]; }画线实现drawRect方法,绘制线条或者图片时,是把数组中的路径全部画出来- (void)drawRect:(CGRect)rect { //把所有路径画出来for (DrawPath *path in self.pathArr) { if ([path isKindOfClass:[UIImage class]]) {//画图UIImage *image = (UIImage *)path;[image drawInRect:rect];}else {//画线[path.pathColor set];[path stroke];}} }当把图片添加到画板时- (void)setImage:(UIImage *)image { _image = image; [self.pathArr addObject:image]; //重绘调用drawRect才能在画板上显示图片[self setNeedsDisplay];}还可以把直接更新路径数组的操作封装在画板中- (void)clear {//清除[self.pathArr removeAllObjects]; [self setNeedsDisplay]; } - (void)undo {//撤销[self.pathArr removeLastObject]; [self setNeedsDisplay];}控制器中:@interface ViewController () <UIImagePickerControllerDelegate, UINavigationControllerDelegate>@property (weak, nonatomic) IBOutlet DrawView *drawView;@end实现几个按钮对画板的操作:
- (IBAction)clear:(id)sender { //清屏[_drawView clear]; } - (IBAction)undo:(id)sender { //撤销[_drawView undo]; } - (IBAction)eraser:(id)sender { //擦除 就是把路径的颜色设置为画板的背景色,假象_drawView.pathColor = _drawView.backgroundColor;_drawView.lineWidth = 20; } - (IBAction)changeLineWidth:(UISlider *)sender { //改变路径线宽_drawView.lineWidth = sender.value; } - (IBAction)changeColor:(UIButton *)sender {//改变路径颜色_drawView.pathColor = sender.backgroundColor; } - (IBAction)pickPhoto:(id)sender { //选择照片//弹出系统相册UIImagePickerController *picker = [[UIImagePickerController alloc]init]; //设置选择控制器的来源 UIImagePickerControllerSourceTypeSavedPhotosAlbum:照片库picker.sourceType = UIImagePickerControllerSourceTypeSavedPhotosAlbum; //设置代理picker.delegate = self; //modal出控制器[self presentViewController:picker animated:YES completion:nil]; } - (void)imagePickerController:(UIImagePickerController *)picker didFinishPickingMediaWithInfo:(NSDictionary<NSString *,id> *)info { //获取选择的图片UIImage *image = info[UIImagePickerControllerOriginalImage]; //创建一个处理图片的viewImageHandleView *handleView = [[ImageHandleView alloc]initWithFrame:self.drawView.bounds]; handleView.handleCompletionBlock = ^(UIImage *image){ _drawView.image = image;}; [self.drawView addSubview:handleView]; //将图片画在画板上handleView.image = image; //_drawView.image = image; //dismiss[self dismissViewControllerAnimated:YES completion:nil];//NSLog(@"%@", info); } - (IBAction)save:(id)sender { [UIView animateWithDuration:0.15 animations:^{//保存当前画板上的内容 //开启上下文UIGraphicsBeginImageContextWithOptions(_drawView.bounds.size, NO, 0); //获取位图上下文CGContextRef ctx = UIGraphicsGetCurrentContext(); //把控件上的图层渲染到上下文[_drawView.layer renderInContext:ctx]; //获取上下文中的图片UIImage *image = UIGraphicsGetImageFromCurrentImageContext(); //关闭上下文UIGraphicsEndImageContext(); //保存图片到相册UIImageWriteToSavedPhotosAlbum(image, self, @selector(image:didFinishSavingWithError:contextInfo:), nil); self.drawView.alpha = 0;} completion:^(BOOL finished) {[UIView animateWithDuration:0.15 animations:^{self.drawView.alpha = 1;}];}]; } //保存成功后的方法必须是这个,不能随便写- (void)image:(UIImage *)image didFinishSavingWithError:(NSError *)error contextInfo:(void *)contextInfo { NSLog(@"保存成功"); }从相册选择完图片后把图片显示在画板上了但是还没有渲染到layer,这时候需要对图片进行移动缩放旋转这些操作的话,但是UIImage是不能拉伸旋转这些操作的,UIImageView才可以,所以解决思路就是自定义一个view来专门处理对图片的操作,在自定义view上放一个UIImageView,从相册选择图片后获取的image设置给UIImageView,这样的自定义view上操作UIIamgeView。#import <UIKit/UIKit.h> @interface ImageHandleView : UIView/** 图片 */@property(nonatomic, strong) UIImage *image; /** block */@property(nonatomic, strong) void(^handleCompletionBlock)(UIImage *image);@end
#import "ImageHandleView.h" @interface ImageHandleView () <UIGestureRecognizerDelegate> /** image */@property(nonatomic, weak) UIImageView *imageView; @end @implementation ImageHandleView //防止图片上的触摸事件传递到画板- (UIView *)hitTest:(CGPoint)point withEvent:(UIEvent *)event { return _imageView;} - (UIImageView *)imageView { if (_imageView == nil) {UIImageView *imageV = [[UIImageView alloc]initWithFrame:self.bounds]; _imageView = imageV; //设置imgaeview允许与用户交互_imageView.userInteractionEnabled = YES; //添加手势[self setUpGestureRecognizer]; //把这个imageview添加到图片处理的view上[self addSubview:imageV]; }return _imageView;} #pragma mark - 添加手势- (void)setUpGestureRecognizer { //平移手势UIPanGestureRecognizer *pan = [[UIPanGestureRecognizer alloc]initWithTarget:self action:@selector(pan:)];[_imageView addGestureRecognizer:pan]; //旋转手势UIRotationGestureRecognizer *rotation = [[UIRotationGestureRecognizer alloc]initWithTarget:self action:@selector(rotation:)];rotation.delegate = self;[_imageView addGestureRecognizer:rotation]; //缩放手势UIPinchGestureRecognizer *pinch = [[UIPinchGestureRecognizer alloc]initWithTarget:self action:@selector(pinch:)];pinch.delegate = self;[_imageView addGestureRecognizer:pinch]; //长按手势UILongPressGestureRecognizer *longPress = [[UILongPressGestureRecognizer alloc]initWithTarget:self action:@selector(longPress:)];[_imageView addGestureRecognizer:longPress]; } #pragma mark - 处理平移手势- (void)pan:(UIPanGestureRecognizer *)pan { //获取手指的偏移量CGPoint tranp = [pan translationInView:self.imageView]; //设置imageview的形变self.imageView.transform = CGAffineTransformTranslate(self.imageView.transform, tranp.x, tranp.y); //复位[pan setTranslation:CGPointZero inView:self.imageView]; } #pragma mark - 处理旋转手势- (void)rotation:(UIRotationGestureRecognizer *)rotation { //设置imageview的形变self.imageView.transform = CGAffineTransformRotate(self.imageView.transform, rotation.rotation); //复位rotation.rotation = 0; } #pragma mark - 处理缩放手势- (void)pinch:(UIPinchGestureRecognizer *)pinch { //设置imageview的形变self.imageView.transform = CGAffineTransformScale(self.imageView.transform, pinch.scale, pinch.scale); //复位pinch.scale = 1; } #pragma mark - 处理长按手势- (void)longPress:(UILongPressGestureRecognizer *)longPress { //图片处理完成if (longPress.state == UIGestureRecognizerStateBegan) { //高亮效果[UIView animateWithDuration:0.25 animations:^{self.imageView.alpha = 0;} completion:^(BOOL finished) {[UIView animateWithDuration:0.25 animations:^{self.imageView.alpha = 1;} completion:^(BOOL finished) { //高亮时生成一张新的图片//开启位图上下文UIGraphicsBeginImageContextWithOptions(self.bounds.size, NO, 0); //获取位图上下文CGContextRef ctx = UIGraphicsGetCurrentContext(); //把控件的图层渲染到上下文[self.layer renderInContext:ctx]; //从上下文中获取新的图片UIImage *image = UIGraphicsGetImageFromCurrentImageContext(); //关闭上下文UIGraphicsEndImageContext(); //调用blockif(_handleCompletionBlock) {_handleCompletionBlock(image);} //移除父控件[self removeFromSuperview]; }]; }];} } #pragma mark - 手势代理方法 <UIGestureRecognizerDelegate>- (BOOL)gestureRecognizer:(UIGestureRecognizer *)gestureRecognizer shouldRecognizeSimultaneouslyWithGestureRecognizer:(UIGestureRecognizer *)otherGestureRecognizer { //yes表示同时支持多个手势return YES; } - (void)setImage:(UIImage *)image { _image = image; //把图片展示到UIImageView上self.imageView.image = image; } @end需要注意的是,当长按将操作过的图片绘制都画板上生成一张新的图片后,这时候需要把这个image设置给画板drawView,但是这时候就必须要在专门处理图片的view中去import画板view,这样耦合性太强。所以为了解耦,可以使用代理或者Block。我用了Block将刚刚生成的image先保存起来,在控制器中初始化imageHandleView之后再赋值给drawView。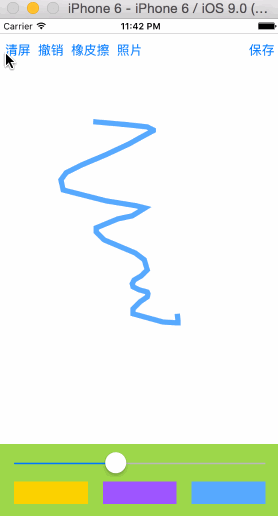
以上就是本文的全部内容,希望对大家学习iOS程序设计有所帮助。