首先,我们先分析功能的实现过程,首先我们需要先看大致的实现过程:
1.加载九宫格页面
2.实现按钮被点击及滑动过程中按钮状态的改变
3.实现滑动过程中的连线
4.绘制完毕后判定密码是否正确,
5.密码判定后实现跳转。
下面我们就来用代码实现上述五个过程。
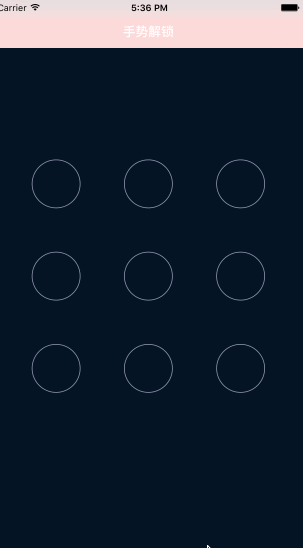
1.加载九宫格界面
1.1九宫格内控件的分布 3*3 ,我们可以自定义view(包含3*3个按钮),添加到viewController上。
//添加view中子控件-(void)awakeFromNib{//创建按钮for (int i=0; i<9; i++) {self.LineColor=[UIColor blueColor];UIButton *btn=[UIButton buttonWithType:UIButtonTypeCustom];btn.userInteractionEnabled=NO;//设置按钮属性[btn setBackgroundImage:[UIImage imageNamed:@"gesture_node_normal"] forState:UIControlStateNormal];[btn setBackgroundImage:[UIImage imageNamed:@"gesture_node_highlighted"] forState:UIControlStateHighlighted ];[btn setBackgroundImage:[UIImage imageNamed:@"gesture_node_error"] forState:UIControlStateDisabled];[self addSubview:btn];}}//布局view子控件-(void)layoutSubviews{[super layoutSubviews];CGFloat width=74;CGFloat height=74;CGFloat Margin=(self.bounds.size.width-3*width)/2;//遍历设置9个button的frame[self.subviews enumerateObjectsUsingBlock:^(__kindof UIView * _Nonnull obj, NSUInteger idx, BOOL * _Nonnull stop) {//通过tag设置按钮的索引标识obj.tag=idx;int row=(int)idx/3;int col=idx%3;obj.frame=CGRectMake(col*(Margin + width), row*(Margin +height), width, height);}];}1.2将定义好的view通过xib添加到viewController上// 加载xib文件+(instancetype)lockView{return [[[NSBundle mainBundle]loadNibNamed:@"MYblockView" owner:nil options:nil]lastObject];}然后加载到控制器上。//设置控制器view的背景图片self.view.backgroundColor=[UIColor colorWithPatternImage:[UIImage imageNamed:@"bg"]];MYblockView *blockView=[MYblockView lockView];blockView.center=self.view.center;//将blockview添加到viewController上[self.view addSubview:blockView];2.实现按钮被点击及滑动过程中按钮状态的改变
@property(nonatomic,strong)NSMutableArray *btnArr;//懒加载-(NSMutableArray *)btnArr{if (_btnArr==nil) {_btnArr=[NSMutableArray array];}return _btnArr;}2.2创建路径,绘制图形#pragma mark----绘制图形-(void)drawRect:(CGRect)rect{if (self.btnArr.count==0 ) {return;}//创建路径UIBezierPath *path=[UIBezierPath bezierPath];//遍历所有按钮进行绘制[self.btnArr enumerateObjectsUsingBlock:^(__kindof UIButton * _Nonnull obj, NSUInteger idx, BOOL * _Nonnull stop) {//第一个按钮,中心点就是起点if (idx==0) {[path moveToPoint:obj.center];}else{[path addLineToPoint:obj.center];}}];[path addLineToPoint:self.currentPoint];//设置路径属性path.lineWidth=10;path.lineCapStyle=kCGLineCapRound;path.lineJoinStyle=kCGLineJoinRound;[self.LineColor setStroke];//渲染[path stroke];} 2.3开始触摸#pragma mark-----开始触摸-(void)touchesBegan:(NSSet<UITouch *> *)touches withEvent:(UIEvent *)event{// 获取触摸对象UITouch *touch=touches.anyObject;//获取触摸点CGPoint loc=[touch locationInView:self];//遍历按钮,判定触摸点是否在按钮上[self.subviews enumerateObjectsUsingBlock:^(__kindof UIButton * _Nonnull obj, NSUInteger idx, BOOL * _Nonnull stop) {BOOL isContains=CGRectContainsPoint(obj.frame, loc);//如果在按钮上,将当前按钮保存在数组中,并改变按钮状态if (isContains&&obj.highlighted==NO) {[self.btnArr addObject:obj];obj.highlighted=YES;}else{obj.highlighted=NO;}}];}2.4滑动过程中,重绘#pragma mark----开始滑动-(void)touchesMoved:(NSSet<UITouch *> *)touches withEvent:(UIEvent *)event{//获取触摸对象UITouch *touch=touches.anyObject;//获取触摸点CGPoint loc=[touch locationInView:self];self.currentPoint=loc;//遍历按钮,如果按钮在滑动路径上,就改变按钮状态[self.subviews enumerateObjectsUsingBlock:^(__kindof UIButton * _Nonnull obj, NSUInteger idx, BOOL * _Nonnull stop) {BOOL isContains=CGRectContainsPoint(obj.frame, loc);if (isContains&&obj.highlighted==NO) {[self.btnArr addObject:obj];obj.highlighted=YES;}}];//重绘[self setNeedsDisplay]; }3.实现滑动过程中的连线和4.绘制完毕后判定密码是否正确#pragma mark----停止滑动结束-(void)touchesEnded:(NSSet<UITouch *> *)touches withEvent:(UIEvent *)event{//定义最后一个按钮UIButton *lastBtn=[self.btnArr lastObject];//将最后一个按钮中心点定义为相对滑动的当前点self.currentPoint=lastBtn.center;//重绘[self setNeedsDisplay];//判定密码self.password=[NSMutableString string]; [self.btnArr enumerateObjectsUsingBlock:^( UIButton * _Nonnull obj, NSUInteger idx, BOOL * _Nonnull stop) { [self.password appendFormat:@"%@",@(obj.tag)]; }];NSLog(@"%@",self.password);BOOL isOk;if ([self.delegate respondsToSelector:@selector(blockView:finishedWithPassword:)]) {isOk= [self.delegate blockView:self finishedWithPassword:self.password];}if (isOk) {[self.btnArr enumerateObjectsUsingBlock:^(UIButton* _Nonnull obj, NSUInteger idx, BOOL * _Nonnull stop) {obj.highlighted=NO;}];[self.btnArr removeAllObjects];[self setNeedsDisplay];NSLog(@"密码正确");}else{NSLog(@"密码错误");}} 注意:我们在密码判定过程中是通过根据先前布局按钮的时候定义的按钮tag值进行字符串拼接,密码传值是通过代理实现。#import <UIKit/UIKit.h>@class MYblockView;//声明代理@protocol MYblockViewDelegate <NSObject>@optional//代理方法-(BOOL) blockView:(MYblockView *)blockView finishedWithPassword:(NSString *)password;@end@interface MYblockView : UIView+(instancetype)lockView;//设置代理成员属性@property(nonatomic,weak)id<MYblockViewDelegate>delegate;@end5.密码判定后实现跳转。
else{//关闭用户交互self.userInteractionEnabled=NO;[self.btnArr enumerateObjectsUsingBlock:^(UIButton * _Nonnull obj, NSUInteger idx, BOOL * _Nonnull stop) {self.LineColor=[UIColor redColor];obj.highlighted=NO;obj.enabled=NO;[self setNeedsDisplay];dispatch_after(dispatch_time(DISPATCH_TIME_NOW, (int64_t)(1.0 * NSEC_PER_SEC)), dispatch_get_main_queue(), ^{//回复按钮状态 [self.btnArr enumerateObjectsUsingBlock:^(UIButton * _Nonnull obj, NSUInteger idx, BOOL * _Nonnull stop) { obj.enabled=YES; }];//恢复线条的颜色self.LineColor=[UIColor blueColor];[self.btnArr removeAllObjects];[self setNeedsDisplay];});}];NSLog(@"密码错误");}self.userInteractionEnabled=YES;}代理判定密码并实现跳转-(BOOL)blockView:(MYblockView *)blockView finishedWithPassword:(NSString *)password{if ([password isEqualToString:@"012"]) {UIViewController *two=[UIViewController new];two.view.backgroundColor=[UIColor greenColor];[self.navigationController pushViewController:two animated:YES];return YES;}else{return NO;}}最后设置控制器navigationbar属性 [self.navigationController.navigationBar setBackgroundColor:[UIColor redColor]];[ self.navigationController.navigationBar setTitleTextAttributes:@{NSForegroundColorAttributeName :[UIColor whiteColor] }];以上就是本文的全部内容,希望对大家的学习有所帮助。