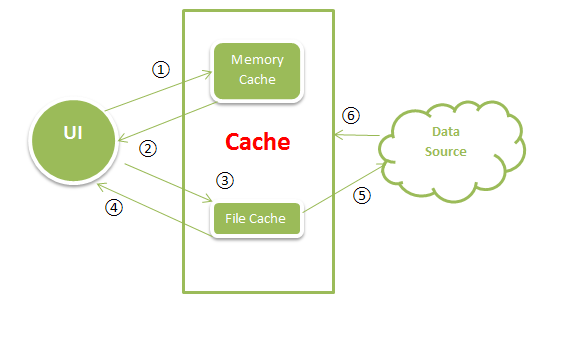
① UI:请求数据,使用唯一的Key值索引Memory Cache中的Bitmap。
② 内存缓存:缓存搜索,如果能找到Key值对应的Bitmap,则返回数据。否则执行第三步。
③ 硬盘存储:使用唯一Key值对应的文件名,检索SDCard上的文件。
④ 如果有对应文件,使用BitmapFactory.decode*方法,解码Bitmap并返回数据,同时将数据写入缓存。如果没有对应文件,执行第五步。
⑤ 下载图片:启动异步线程,从数据源下载数据(Web)。
⑥ 若下载成功,将数据同时写入硬盘和缓存,并将Bitmap显示在UI中。
接下来,我们回顾一下UIL中缓存的配置(具体的见《UNIVERSAL IMAGE LOADER.PART 2》)。重点关注注释部分,我们可以根据自己需要配置内存、磁盘缓存的实现。
File cacheDir = StorageUtils.getCacheDirectory(context,"UniversalImageLoader/Cache");ImageLoaderConfiguration config = newImageLoaderConfiguration .Builder(getApplicationContext()).maxImageWidthForMemoryCache().maxImageHeightForMemoryCache().httpConnectTimeout().httpReadTimeout().threadPoolSize().threadPriority(Thread.MIN_PRIORITY + ).denyCacheImageMultipleSizesInMemory().memoryCache(new UsingFreqLimitedCache()) // 你可以传入自己的内存缓存.discCache(new UnlimitedDiscCache(cacheDir)) // 你可以传入自己的磁盘缓存.defaultDisplayImageOptions(DisplayImageOptions.createSimple()).build();UIL中的内存缓存策略

LruMemoryCache.get(…)
我相信接下去你看到这段代码的时候会跟我一样惊讶于代码的简单,代码中除了异常判断,就是利用synchronized进行同步控制。
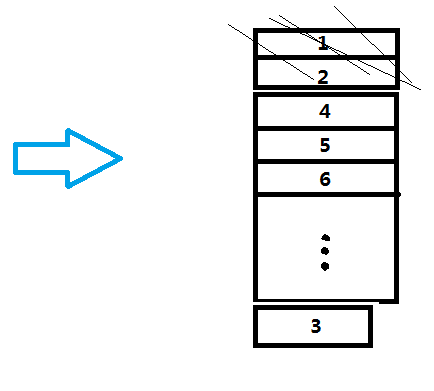
/*** Returns the Bitmap for {@code key} if it exists in the cache. If a Bitmap was returned, it is moved to the head* of the queue. This returns null if a Bitmap is not cached.*/@Overridepublic final Bitmap get(String key) {if (key == null) {throw new NullPointerException("key == null");}synchronized (this) {return map.get(key);}} 我们会好奇,这不是就简简单单将Bitmap从map中取出来吗?但LruMemoryCache声称保留在空间有限的情况下保留最近使用过的Bitmap。不急,让我们细细观察一下map。他是一个LinkedHashMap<String, Bitmap>型的对象。@Override public V get(Object key) {/** This method is overridden to eliminate the need for a polymorphic* invocation in superclass at the expense of code duplication.*/if (key == null) {HashMapEntry<K, V> e = entryForNullKey;if (e == null)return null;if (accessOrder)makeTail((LinkedEntry<K, V>) e);return e.value;}// Replace with Collections.secondaryHash when the VM is fast enough (http://b/).int hash = secondaryHash(key);HashMapEntry<K, V>[] tab = table;for (HashMapEntry<K, V> e = tab[hash & (tab.length - )];e != null; e = e.next) {K eKey = e.key;if (eKey == key || (e.hash == hash && key.equals(eKey))) {if (accessOrder)makeTail((LinkedEntry<K, V>) e);return e.value;}}return null;}代码第11行的makeTail()就是调整entry在列表中的位置,其实就是双向链表的调整。它判断accessOrder。到现在我们就清楚LruMemoryCache使用LinkedHashMap来缓存数据,在LinkedHashMap.get()方法执行后,LinkedHashMap中entry的顺序会得到调整。那么我们怎么保证最近使用的项不会被剔除呢?接下去,让我们看看LruMemoryCache.put(...)。@Overridepublic final boolean put(String key, Bitmap value) {if (key == null || value == null) {throw new NullPointerException("key == null || value == null");}synchronized (this) {size += sizeOf(key, value);//map.put()的返回值如果不为空,说明存在跟key对应的entry,put操作只是更新原有key对应的entryBitmap previous = map.put(key, value);if (previous != null) {size -= sizeOf(key, previous);}}trimToSize(maxSize);return true;}其实不难想到,当Bitmap缓存的大小超过原来设定的maxSize时应该是在trimToSize(...)这个函数中做到的。这个函数做的事情也简单,遍历map,将多余的项(代码中对应toEvict)剔除掉,直到当前cache的大小等于或小于限定的大小。private void trimToSize(int maxSize) {while (true) {String key;Bitmap value;synchronized (this) {if (size < || (map.isEmpty() && size != )) {throw new IllegalStateException(getClass().getName() + ".sizeOf() is reporting inconsistent results!");}if (size <= maxSize || map.isEmpty()) {break;}Map.Entry<String, Bitmap> toEvict = map.entrySet().iterator().next();if (toEvict == null) {break;}key = toEvict.getKey();value = toEvict.getValue();map.remove(key);size -= sizeOf(key, value);}}}这时候我们会有一个以为,为什么遍历一下就可以将使用最少的bitmap缓存给剔除,不会误删到最近使用的bitmap缓存吗?首先,我们要清楚,LruMemoryCache定义的最近使用是指最近用get或put方式操作到的bitmap缓存。其次,之前我们直到LruMemoryCache的get操作其实是通过其内部字段LinkedHashMap.get(...)实现的,当LinkedHashMap的accessOrder==true时,每一次get或put操作都会将所操作项(图中第3项)移动到链表的尾部(见下图,链表头被认为是最少使用的,链表尾被认为是最常使用的。),每一次操作到的项我们都认为它是最近使用过的,当内存不够的时候被剔除的优先级最低。需要注意的是一开始的LinkedHashMap链表是按插入的顺序构成的,也就是第一个插入的项就在链表头,最后一个插入的就在链表尾。假设只要剔除图中的1,2项就能让LruMemoryCache小于原先限定的大小,那么我们只要从链表头遍历下去(从1→最后一项)那么就可以剔除使用最少的项了。
至此,我们就知道了LruMemoryCache缓存的整个原理,包括他怎么put、get、剔除一个元素的的策略。接下去,我们要开始分析默认的磁盘缓存策略了。
UIL中的磁盘缓存策略
像新浪微博、花瓣这种应用需要加载很多图片,本来图片的加载就慢了,如果下次打开的时候还需要再一次下载上次已经有过的图片,相信用户的流量会让他们的叫骂声很响亮。对于图片很多的应用,一个好的磁盘缓存直接决定了应用在用户手机的留存时间。我们自己实现磁盘缓存,要考虑的太多,幸好UIL提供了几种常见的磁盘缓存策略,当然如果你觉得都不符合你的要求,你也可以自己去扩展
•FileCountLimitedDiscCache(可以设定缓存图片的个数,当超过设定值,删除掉最先加入到硬盘的文件)
•LimitedAgeDiscCache(设定文件存活的最长时间,当超过这个值,就删除该文件)
•TotalSizeLimitedDiscCache(设定缓存bitmap的最大值,当超过这个值,删除最先加入到硬盘的文件)
•UnlimitedDiscCache(这个缓存类没有任何的限制)
在UIL中有着比较完整的存储策略,根据预先指定的空间大小,使用频率(生命周期),文件个数的约束条件,都有着对应的实现策略。最基础的接口DiscCacheAware和抽象类BaseDiscCache
UnlimitedDiscCache解析
UnlimitedDiscCache实现disk cache接口,是ImageLoaderConfiguration中默认的磁盘缓存处理。用它的时候,磁盘缓存的大小是不受限的。
接下来我们来看看实现UnlimitedDiscCache的源代码,通过源代码我们发现他其实就是继承了BaseDiscCache,这个类内部没有实现自己独特的方法,也没有重写什么,那么我们就直接看BaseDiscCache这个类。在分析这个类之前,我们先想想自己实现一个磁盘缓存需要做多少麻烦的事情:
1、图片的命名会不会重。你没有办法知道用户下载的图片原始的文件名是怎么样的,因此很可能因为文件重名将有用的图片给覆盖掉了。
2、当应用卡顿或网络延迟的时候,同一张图片反复被下载。
3、处理图片写入磁盘可能遇到的延迟和同步问题。
BaseDiscCache构造函数
首先,我们看一下BaseDiscCache的构造函数:
cacheDir:文件缓存目录
reserveCacheDir:备用的文件缓存目录,可以为null。它只有当cacheDir不能用的时候才有用。
fileNameGenerator:文件名生成器。为缓存的文件生成文件名。
public BaseDiscCache(File cacheDir, File reserveCacheDir, FileNameGenerator fileNameGenerator) {if (cacheDir == null) {throw new IllegalArgumentException("cacheDir" + ERROR_ARG_NULL);}if (fileNameGenerator == null) {throw new IllegalArgumentException("fileNameGenerator" + ERROR_ARG_NULL);}this.cacheDir = cacheDir;this.reserveCacheDir = reserveCacheDir;this.fileNameGenerator = fileNameGenerator;}我们可以看到一个fileNameGenerator,接下来我们来了解UIL具体是怎么生成不重复的文件名的。UIL中有3种文件命名策略,这里我们只对默认的文件名策略进行分析。默认的文件命名策略在DefaultConfigurationFactory.createFileNameGenerator()。它是一个HashCodeFileNameGenerator。真的是你意想不到的简单,就是运用String.hashCode()进行文件名的生成。public class HashCodeFileNameGenerator implements FileNameGenerator {@Overridepublic String generate(String imageUri) {return String.valueOf(imageUri.hashCode());}}BaseDiscCache.save()public boolean save(String imageUri, InputStream imageStream, IoUtils.CopyListener listener) throws IOException {File imageFile = getFile(imageUri);File tmpFile = new File(imageFile.getAbsolutePath() + TEMP_IMAGE_POSTFIX);boolean loaded = false;try {OutputStream os = new BufferedOutputStream(new FileOutputStream(tmpFile), bufferSize);try {loaded = IoUtils.copyStream(imageStream, os, listener, bufferSize);} finally {IoUtils.closeSilently(os);}} finally {IoUtils.closeSilently(imageStream);if (loaded && !tmpFile.renameTo(imageFile)) {loaded = false;}if (!loaded) {tmpFile.delete();}}return loaded;}BaseDiscCache.get()protected File getFile(String imageUri) {String fileName = fileNameGenerator.generate(imageUri);File dir = cacheDir;if (!cacheDir.exists() && !cacheDir.mkdirs()) {if (reserveCacheDir != null && (reserveCacheDir.exists() || reserveCacheDir.mkdirs())) {dir = reserveCacheDir;}}return new File(dir, fileName);}总结