@Override protected void onCreate(Bundle savedInstanceState) {super.onCreate(savedInstanceState);setContentView(R.layout.activity_match_actionbar);//只对api19以上版本有效if (Build.VERSION.SDK_INT >= Build.VERSION_CODES.KITKAT) { setTranslucentStatus(true);}//为状态栏着色SystemBarTintManager tintManager = new SystemBarTintManager(this);tintManager.setStatusBarTintEnabled(true);tintManager.setStatusBarTintResource(R.color.statusbar_bg); } @TargetApi(19)private void setTranslucentStatus(boolean on) {Window win = getWindow();WindowManager.LayoutParams winParams = win.getAttributes();final int bits = WindowManager.LayoutParams.FLAG_TRANSLUCENT_STATUS;if (on) { winParams.flags |= bits;} else { winParams.flags &= ~bits;}win.setAttributes(winParams); }再在根布局添加以下两个属性:android:fitsSystemWindows="true"android:clipToPadding="false"这样就可以了,以上着色使用了SystemBarTint。

我的手机系统版本是4.4的,如果想做成QQ侧滑背景这样的效果,使用上面的方案就变成了这样

这样出来的效果就会很丑,于是才有了改进版的方案,不知QQ是否是这样做的。
除了上述的缺陷以外,还有一点看着不是很舒服,就是当我使用抽屉菜单或者滑动返回效果的时候是这样的

状态栏并没有阴影效果
我想要的效果是这样的

状态栏也会跟着一起滑动
第一种思路
自定义一个状态栏,不能添加“ android:fitsSystemWindows="true"
”这个属性,不然无法填充到状态栏,如下
<?xml version="1.0" encoding="utf-8"?><LinearLayout xmlns:android="http://schemas.android.com/apk/res/android"android:layout_width="match_parent"android:layout_height="match_parent"android:background="@color/colorAccent"android:orientation="vertical"> <Viewandroid:id="@+id/status_bar"android:layout_width="match_parent"android:layout_height="20dp"/> <FrameLayoutandroid:layout_width="match_parent"android:layout_height="match_parent"/></LinearLayout>在到代码中判断
@Override protected void onCreate(Bundle savedInstanceState) {super.onCreate(savedInstanceState);View statusBar = findViewById(R.id.status_bar);setContentView(R.layout.activity_test);//判断SDK版本是否大于等于19,大于就让他显示,小于就要隐藏,不然低版本会多出来一个if (Build.VERSION.SDK_INT >= Build.VERSION_CODES.KITKAT) { setTranslucentStatus(true); statusBar.setVisibility(View.VISIBLE); //还有设置View的高度,因为每个型号的手机状态栏高度都不相同}else{ statusBar.setVisibility(View.GONE);} } @TargetApi(19) private void setTranslucentStatus(boolean on) {Window win = getWindow();WindowManager.LayoutParams winParams = win.getAttributes();final int bits = WindowManager.LayoutParams.FLAG_TRANSLUCENT_STATUS;if (on) { winParams.flags |= bits;} else { winParams.flags &= ~bits;}win.setAttributes(winParams); }其实,这样已经解决了我上面提出的两个问题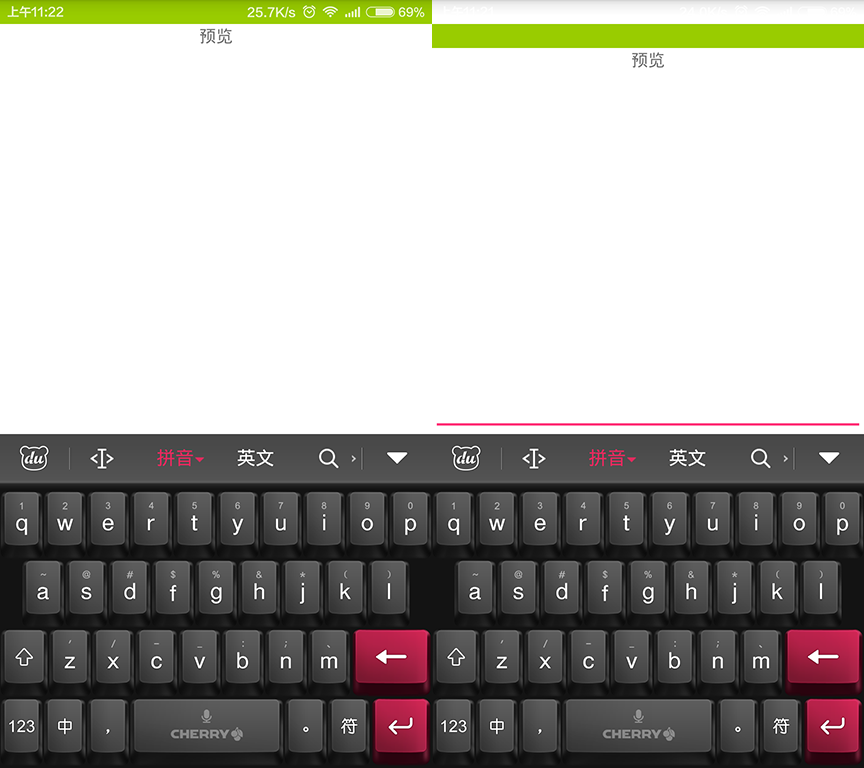
陷入了两难的境地,加还是不加都有问题,而且都特别明显,说了半天,来看看第二种方案。
<?xml version="1.0" encoding="utf-8"?><RelativeLayout xmlns:android="http://schemas.android.com/apk/res/android" xmlns:tools="http://schemas.android.com/tools" android:layout_width="match_parent" android:layout_height="match_parent" android:background="@android:color/holo_green_light" android:fitsSystemWindows="true" tools:context="com.saidtx.myapplication.TestActivity"> <ScrollViewandroid:layout_width="match_parent"android:layout_height="match_parent"android:layout_above="@+id/edit"android:background="@android:color/white"><LinearLayout android:layout_width="match_parent" android:layout_height="wrap_content"> <TextViewandroid:layout_width="match_parent"android:layout_height="wrap_content"android:gravity="center"android:padding="20dp"android:text="@string/previews"/></LinearLayout> </ScrollView> <LinearLayoutandroid:id="@+id/edit"android:layout_width="match_parent"android:layout_height="wrap_content"android:layout_alignParentBottom="true"android:background="@android:color/white"><EditText android:layout_width="match_parent" android:layout_height="wrap_content"/> </LinearLayout></RelativeLayout>关键在于下面两个属性,还有需要在其他子布局添加背景,不然就跟随了最外层的背景,代码部分还是采用网上通用方案,只是不需要自定义的状态栏了,也不需要计算状态栏的高度
android:fitsSystemWindows="true"android:background="@android:color/holo_green_light"最终效果
以上就是本文的全部内容,希望对大家的学习Android软件编程有所帮助。