
随着时间的增长,对应的x值也相应地线性渐变,当动画完成时,x的值就是我们设置的最终值40。如果x值线性渐变,那么x的变化速度就是匀速的。其实,我们也可以变速地改变x的值,这会我们可以一开始加速增加x的值,后面减速增加x的值,如下图所示:
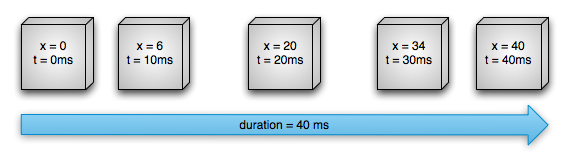
如上图所示,在前20ms,x值加速增大,在后20ms,x值增大的速度降低。
其实,每种改变x值速度的方式都叫做时间插值器TimeInterpolator,第一张图中使用的时间插值器叫做LinearInterpolator,第二张图中使用的时间插值器叫做AccelerateDecelerateInterpolator。动画开始后,时间插值器会根据对应的算法计算出某一时刻x的值,然后我们就可以用该计算出的值更新对象中x属性的值,这就是属性动画的基本工作原理。
属性动画中主要的类如下图所示:
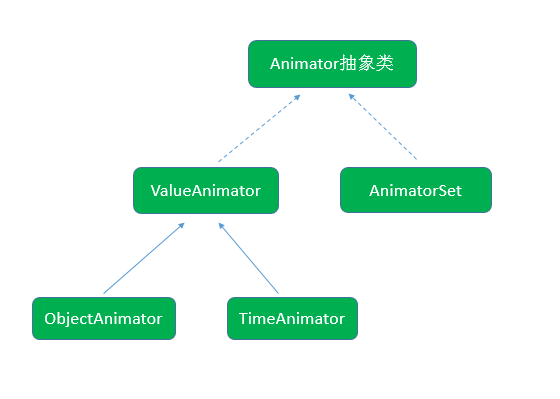
下面会对上述类分别进行讲解。
Animator
属性动画主要的类都在android.animation命名空间下,Animator是属性动画的基类,其是一个抽象类,该类定义了许多重要的方法,如下所示:
ValueAnimator valueAnimator = ValueAnimator.ofFloat(0f, 500f);valueAnimator.addUpdateListener(new ValueAnimator.AnimatorUpdateListener() {@Overridepublic void onAnimationUpdate(ValueAnimator animation) {float deltaY = (float)animation.getAnimatedValue();textView.setTranslationY(deltaY);}});//默认duration是300毫秒valueAnimator.setDuration(3000);valueAnimator.start();其效果如下所示: 
我们通过构造函数指定了动画的起始值为0,终止值为500,动画的默认持续时间是300毫秒,我们通过setDuration()方法设置为3000毫秒。该动画会在3秒内,将值从0到500动画渐变。ValueAnimator提供了一个addUpdateListener方法,可以通过该方法向其添加AnimatorUpdateListener类型的监听器。AnimatorUpdateListener有一个onAnimationUpdate方法,ValueAnimator会每隔一定时间(默认间隔10ms)计算属性的值,每当计算的时候就会回调onAnimationUpdate方法。在该方法中,我们通过调用ValueAnimator的getAnimatedValue()方法获取到当前动画计算出的属性值,然后我们将该值传入textView的setTranslationY()方法中,从而更新了textView的位置,这样就通过ValueAnimator以动画的形式移动textView。
//ValueAnimator.ofArgb()方法是在API Level 21中才加入的if(Build.VERSION.SDK_INT >= 21){//起始颜色为红色int startColor = 0xffff0000;//终止颜色为绿色int endColor = 0xff00ff00;ValueAnimator valueAnimator = ValueAnimator.ofArgb(startColor, endColor);valueAnimator.setDuration(3000);valueAnimator.addUpdateListener(new ValueAnimator.AnimatorUpdateListener() {@Overridepublic void onAnimationUpdate(ValueAnimator animation) {int color = (int)animation.getAnimatedValue();textView.setBackgroundColor(color);}});valueAnimator.start();}效果如下所示: 
我们将TextView的颜色通过动画从红色渐变到绿色。
//起始颜色为红色int startColor = 0xffff0000;//终止颜色为绿色int endColor = 0xff00ff00;ValueAnimator valueAnimator = ValueAnimator.ofObject(new TypeEvaluator() {@Overridepublic Object evaluate(float fraction, Object startValue, Object endValue) {//从初始的int类型的颜色值中解析出Alpha、Red、Green、Blue四个分量int startInt = (Integer) startValue;int startA = (startInt >> 24) & 0xff;int startR = (startInt >> 16) & 0xff;int startG = (startInt >> 8) & 0xff;int startB = startInt & 0xff;//从终止的int类型的颜色值中解析出Alpha、Red、Green、Blue四个分量int endInt = (Integer) endValue;int endA = (endInt >> 24) & 0xff;int endR = (endInt >> 16) & 0xff;int endG = (endInt >> 8) & 0xff;int endB = endInt & 0xff;//分别对Alpha、Red、Green、Blue四个分量进行计算,//最终合成一个完整的int型的颜色值return (int)((startA + (int)(fraction * (endA - startA))) << 24) |(int)((startR + (int)(fraction * (endR - startR))) << 16) |(int)((startG + (int)(fraction * (endG - startG))) << 8) |(int)((startB + (int)(fraction * (endB - startB))));}}, startColor, endColor);valueAnimator.setDuration(3000);valueAnimator.addUpdateListener(new ValueAnimator.AnimatorUpdateListener() {@Overridepublic void onAnimationUpdate(ValueAnimator animation) {int color = (int)animation.getAnimatedValue();textView.setBackgroundColor(color);}});valueAnimator.start();以上代码实现的效果与ofArgb实现的效果是一样的,都是将TextView从红色渐变到绿色,就不再附图了,但是我们可以在API Level 11及以后的版本中都可以使用以上ofObject的代码,通用性更强。float value1 = 0f;float value2 = 500f;final ObjectAnimator objectAnimator = ObjectAnimator.ofFloat(textView, "translationY", value1, value2);objectAnimator.setDuration(3000);objectAnimator.start();以上代码实现的效果与通过ValueAnimator的ofFloat方法实现的效果相同,此处不再附图,但是可以看出使用ObjectAnimator代码更简洁。在构造函数中,我们将textView作为target传递给ObjectAnimator,然后指定textView要变化的属性是translationY,最后指定渐变范围是从0到500。当动画开始时,ObjectAnimator就会不断调用textView的setTranslationY方法以更新其值。我们此处演示的是ObjectAnimator与View一起工作,其实ObjectAnimator可以与任意的Object对象工作。如果要更新某个对象中名为propery的属性,那么该Object对象必须具有一个setProperty的setter方法可以让ObjectAnimator调用。在ofFloat方法最后如果只填入了一个float值,那么ObjectAnimator需要调用对象的getXXX方法获取对象初始的属性值,然后从该初始的属性值渐变到终止值。
//ObjectAnimator.ofArgb()方法是在API Level 21中才加入的if(Build.VERSION.SDK_INT >= 21){int startColor = 0xffff0000;int endColor = 0xff00ff00;ObjectAnimator objectAnimator = ObjectAnimator.ofArgb(textView, "backgroundColor", startColor, endColor);objectAnimator.setDuration(3000);objectAnimator.start();}效果图参见ValueAnimator中对应的图片。 int startColor = 0xffff0000;int endColor = 0xff00ff00;ObjectAnimator objectAnimator = ObjectAnimator.ofObject(textView, "backgroundColor", new TypeEvaluator() {@Overridepublic Object evaluate(float fraction, Object startValue, Object endValue) {int startInt = (Integer) startValue;int startA = (startInt >> 24) & 0xff;int startR = (startInt >> 16) & 0xff;int startG = (startInt >> 8) & 0xff;int startB = startInt & 0xff;int endInt = (Integer) endValue;int endA = (endInt >> 24) & 0xff;int endR = (endInt >> 16) & 0xff;int endG = (endInt >> 8) & 0xff;int endB = endInt & 0xff;return (int)((startA + (int)(fraction * (endA - startA))) << 24) |(int)((startR + (int)(fraction * (endR - startR))) << 16) |(int)((startG + (int)(fraction * (endG - startG))) << 8) |(int)((startB + (int)(fraction * (endB - startB))));}}, startColor, endColor);objectAnimator.setDuration(3000);objectAnimator.start();AnimatorSet```//anim1实现TextView的旋转动画Animator anim1 = ObjectAnimator.ofFloat(textView, "rotation", 0f, 360f);anim1.setDuration(2000);//anim2和anim3TextView的平移动画Animator anim2 = ObjectAnimator.ofFloat(textView, "translationX", 0f, 300f);anim2.setDuration(3000);Animator anim3 = ObjectAnimator.ofFloat(textView, "translationY", 0f, 400f);anim3.setDuration(3000);//anim4实现TextView的伸缩动画Animator anim4 = ObjectAnimator.ofFloat(textView, "scaleX", 1f, 0.5f);anim4.setDuration(2000);//第一种方式AnimatorSet animatorSet = new AnimatorSet();animatorSet.playSequentially(anim1, anim2, anim4);animatorSet.playTogether(anim2, anim3);animatorSet.start();//第二种方式/*AnimatorSet anim23 = new AnimatorSet();anim23.playTogether(anim2, anim3);AnimatorSet animatorSet = new AnimatorSet();animatorSet.playSequentially(anim1, anim23, anim4);animatorSet.start();*///第三种方式/*AnimatorSet animatorSet = new AnimatorSet();animatorSet.play(anim1).before(anim2);animatorSet.play(anim2).with(anim3);animatorSet.play(anim4).after(anim2);animatorSet.start();*/```效果如下所示:

动画anim1用于旋转TextView,anim2用于在X轴方向偏移TextView,anim3用于在Y轴方向偏移TextView,anim4用于缩放TextView。我们在以上代码中提供了三种方式通过AnimationSet把这四个动画组合到一起,第二种方式和第三种方式被注释起来了。
其实有很多种办法实现上述效果,这里只介绍一下上述三种方式的思路。
在第一种方式中,调用了animatorSet.playSequentially(anim1, anim2, anim4),该方法将anim1、anim2以及anim4按顺序串联起来放到了animatorSet中,这样首先会让动画anim1执行,anim1执行完成后,会依次执行动画anim2,执行完anim2之后会执行动画anim3。通过调用animatorSet.playTogether(anim2, anim3),保证了anim2和anim3同时执行,即动画anim1完成之后会同时运行anim2和anim3。
在第二种方式中,我们首先创建了一个AnimatorSet变量anim23,然后通过anim23.playTogether(anim2, anim3)将anim2和anim3组合成一个小的动画集合。然后我们再把anim1、anim23以及anim4一起传入到animatorSet.playSequentially(anim1, anim23, anim4)中,这样anim1、anim23、anim4会依次执行,而anim23中的anim2和anim3会同时执行。该方式同时也演示了可以将一个AnimatorSet作为动画的一部分放入另一个AnimatorSet中。
在第三种方式中,我们使用了AnimatorSet的play方法,该方法返回AnimatorSet.Builder类型,animatorSet.play(anim1).before(anim2)确保了anim1执行完了之后执行anim2,animatorSet.play(anim2).with(anim3)确保了anim2和anim3同时执行,animatorSet.play(anim4).after(anim2)确保了anim2执行完了之后执行anim4。需要说明的是animatorSet.play(anim1).before(anim2)与animatorSet.play(anim2).after(anim1)是完全等价的,之所以在上面代码中有的写before,有的写after,只是为了让大家多了解一下API。
希望本文对大家学习属性动画有所帮助。