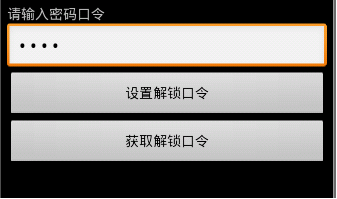
class ViewOcl implements View.OnClickListener{@Overridepublic void onClick(View v) {switch(v.getId()){case R.id.btnSet://步骤1:获取输入值String code = txtCode.getText().toString().trim();//步骤2-1:创建一个SharedPreferences.Editor接口对象,lock表示要写入的XML文件名,MODE_WORLD_WRITEABLE写操作SharedPreferences.Editor editor = getSharedPreferences("lock", MODE_WORLD_WRITEABLE).edit();//步骤2-2:将获取过来的值放入文件editor.putString("code", code);//步骤3:提交editor.commit();Toast.makeText(getApplicationContext(), "口令设置成功", Toast.LENGTH_LONG).show();break;case R.id.btnGet://步骤1:创建一个SharedPreferences接口对象SharedPreferences read = getSharedPreferences("lock", MODE_WORLD_READABLE);//步骤2:获取文件中的值String value = read.getString("code", "");Toast.makeText(getApplicationContext(), "口令为:"+value, Toast.LENGTH_LONG).show();break;}}}读写其他应用的SharedPreferences: 步骤如下public String read() {try {FileInputStream inStream = this.openFileInput("message.txt");byte[] buffer = new byte[1024];int hasRead = 0;StringBuilder sb = new StringBuilder();while ((hasRead = inStream.read(buffer)) != -1) {sb.append(new String(buffer, 0, hasRead));}inStream.close();return sb.toString();} catch (Exception e) {e.printStackTrace();} return null;}public void write(String msg){// 步骤1:获取输入值if(msg == null) return;try {// 步骤2:创建一个FileOutputStream对象,MODE_APPEND追加模式FileOutputStream fos = openFileOutput("message.txt",MODE_APPEND);// 步骤3:将获取过来的值放入文件fos.write(msg.getBytes());// 步骤4:关闭数据流fos.close();} catch (Exception e) {e.printStackTrace();}}openFileOutput()方法的第一参数用于指定文件名称,不能包含路径分隔符“/” ,如果文件不存在,Android 会自动创建它。创建的文件保存在/data/data/<package name>/files目录,如: /data/data/cn.tony.app/files/message.txt,<uses-permission android:name="android.permission.MOUNT_UNMOUNT_FILESYSTEMS"/><uses-permission android:name="android.permission.WRITE_EXTERNAL_STORAGE"/>案例代码:
// 文件写操作函数private void write(String content) {if (Environment.getExternalStorageState().equals(Environment.MEDIA_MOUNTED)) { // 如果sdcard存在File file = new File(Environment.getExternalStorageDirectory().toString()+ File.separator+ DIR+ File.separator+ FILENAME); // 定义File类对象if (!file.getParentFile().exists()) { // 父文件夹不存在file.getParentFile().mkdirs(); // 创建文件夹}PrintStream out = null; // 打印流对象用于输出try {out = new PrintStream(new FileOutputStream(file, true)); // 追加文件out.println(content);} catch (Exception e) {e.printStackTrace();} finally {if (out != null) {out.close(); // 关闭打印流}}} else { // SDCard不存在,使用Toast提示用户Toast.makeText(this, "保存失败,SD卡不存在!", Toast.LENGTH_LONG).show();}}// 文件读操作函数private String read() {if (Environment.getExternalStorageState().equals(Environment.MEDIA_MOUNTED)) { // 如果sdcard存在File file = new File(Environment.getExternalStorageDirectory().toString()+ File.separator+ DIR+ File.separator+ FILENAME); // 定义File类对象if (!file.getParentFile().exists()) { // 父文件夹不存在file.getParentFile().mkdirs(); // 创建文件夹}Scanner scan = null; // 扫描输入StringBuilder sb = new StringBuilder();try {scan = new Scanner(new FileInputStream(file)); // 实例化Scannerwhile (scan.hasNext()) { // 循环读取sb.append(scan.next() + "
"); // 设置文本}return sb.toString();} catch (Exception e) {e.printStackTrace();} finally {if (scan != null) {scan.close(); // 关闭打印流}}} else { // SDCard不存在,使用Toast提示用户Toast.makeText(this, "读取失败,SD卡不存在!", Toast.LENGTH_LONG).show();}return null;}第三种:SQLite存储数据db.executeSQL(String sql); db.executeSQL(String sql, Object[] bindArgs);//sql语句中使用占位符,然后第二个参数是实际的参数集除了统一的形式之外,他们还有各自的操作方法:
db.insert(String table, String nullColumnHack, ContentValues values); db.update(String table, Contentvalues values, String whereClause, String whereArgs); db.delete(String table, String whereClause, String whereArgs);以上三个方法的第一个参数都是表示要操作的表名;insert中的第二个参数表示如果插入的数据每一列都为空的话,需要指定此行中某一列的名称,系统将此列设置为NULL,不至于出现错误;insert中的第三个参数是ContentValues类型的变量,是键值对组成的Map,key代表列名,value代表该列要插入的值;update的第二个参数也很类似,只不过它是更新该字段key为最新的value值,第三个参数whereClause表示WHERE表达式,比如“age > ? and age < ?”等,最后的whereArgs参数是占位符的实际参数值;delete方法的参数也是一样
ContentValues cv = new ContentValues();//实例化一个ContentValues用来装载待插入的数据cv.put("title","you are beautiful");//添加titlecv.put("weather","sun"); //添加weathercv.put("context","xxxx"); //添加contextString publish = new SimpleDateFormat("yyyy-MM-dd HH:mm:ss").format(new Date());cv.put("publish ",publish); //添加publishdb.insert("diary",null,cv);//执行插入操作2.使用execSQL方式来实现
String sql = "insert into user(username,password) values ("Jack Johnson","iLovePopMuisc");//插入操作的SQL语句db.execSQL(sql);//执行SQL语句数据的删除
String whereClause = "username=?";//删除的条件String[] whereArgs = {"Jack Johnson"};//删除的条件参数db.delete("user",whereClause,whereArgs);//执行删除使用execSQL方式的实现String sql = "delete from user where username="Jack Johnson"";//删除操作的SQL语句db.execSQL(sql);//执行删除操作数据修改
ContentValues cv = new ContentValues();//实例化ContentValuescv.put("password","iHatePopMusic");//添加要更改的字段及内容String whereClause = "username=?";//修改条件String[] whereArgs = {"Jack Johnson"};//修改条件的参数db.update("user",cv,whereClause,whereArgs);//执行修改使用execSQL方式的实现String sql = "update user set password = "iHatePopMusic" where username="Jack Johnson"";//修改的SQL语句db.execSQL(sql);//执行修改数据查询
db.rawQuery(String sql, String[] selectionArgs);db.query(String table, String[] columns, String selection, String[] selectionArgs, String groupBy, String having, String orderBy);db.query(String table, String[] columns, String selection, String[] selectionArgs, String groupBy, String having, String orderBy, String limit);db.query(String distinct, String table, String[] columns, String selection, String[] selectionArgs, String groupBy, String having, String orderBy, String limit);上面几种都是常用的查询方法,第一种最为简单,将所有的SQL语句都组织到一个字符串中,使用占位符代替实际参数,selectionArgs就是占位符实际参数集;
c.move(int offset); //以当前位置为参考,移动到指定行 c.moveToFirst();//移动到第一行 c.moveToLast(); //移动到最后一行 c.moveToPosition(int position); //移动到指定行 c.moveToPrevious(); //移动到前一行 c.moveToNext(); //移动到下一行 c.isFirst();//是否指向第一条 c.isLast(); //是否指向最后一条 c.isBeforeFirst(); //是否指向第一条之前 c.isAfterLast();//是否指向最后一条之后 c.isNull(int columnIndex); //指定列是否为空(列基数为0) c.isClosed();//游标是否已关闭 c.getCount();//总数据项数 c.getPosition();//返回当前游标所指向的行数 c.getColumnIndex(String columnName);//返回某列名对应的列索引值 c.getString(int columnIndex);//返回当前行指定列的值实现代码
String[] params = {12345,123456};Cursor cursor = db.query("user",columns,"ID=?",params,null,null,null);//查询并获得游标if(cursor.moveToFirst()){//判断游标是否为空for(int i=0;i<cursor.getCount();i++){cursor.move(i);//移动到指定记录String username = cursor.getString(cursor.getColumnIndex("username");String password = cursor.getString(cursor.getColumnIndex("password"));}}通过rawQuery实现的带参数查询Cursor result=db.rawQuery("SELECT ID, name, inventory FROM mytable");//Cursor c = db.rawQuery("s name, inventory FROM mytable where ID=?",new Stirng[]{"123456"}); result.moveToFirst(); while (!result.isAfterLast()) { int id=result.getInt(0); String name=result.getString(1); int inventory=result.getInt(2); // do something useful with these result.moveToNext();}result.close();在上面的代码示例中,已经用到了这几个常用方法中的一些,关于更多的信息,大家可以参考官方文档中的说明。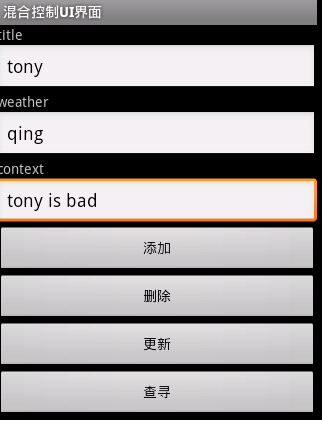
| 方法名 | 方法描述 |
|---|---|
| SQLiteOpenHelper(Context context,String name,SQLiteDatabase.CursorFactory factory,int version) | 构造方法,其中 context 程序上下文环境 即:XXXActivity.this; name :数据库名字; factory:游标工厂,默认为null,即为使用默认工厂; version 数据库版本号 |
| onCreate(SQLiteDatabase db) | 创建数据库时调用 |
| onUpgrade(SQLiteDatabase db,int oldVersion , int newVersion) | 版本更新时调用 |
| getReadableDatabase() | 创建或打开一个只读数据库 |
| getWritableDatabase() | 创建或打开一个读写数据库 |
import android.content.Context;import android.database.sqlite.SQLiteDatabase;import android.database.sqlite.SQLiteDatabase.CursorFactory;import android.database.sqlite.SQLiteOpenHelper;public class SqliteDBHelper extends SQLiteOpenHelper {// 步骤1:设置常数参量private static final String DATABASE_NAME = "diary_db";private static final int VERSION = 1;private static final String TABLE_NAME = "diary";// 步骤2:重载构造方法public SqliteDBHelper(Context context) {super(context, DATABASE_NAME, null, VERSION);}/* * 参数介绍:context 程序上下文环境 即:XXXActivity.this* name 数据库名字* factory 接收数据,一般情况为null * version 数据库版本号 */public SqliteDBHelper(Context context, String name, CursorFactory factory,int version) {super(context, name, factory, version);}//数据库第一次被创建时,onCreate()会被调用@Overridepublic void onCreate(SQLiteDatabase db) {// 步骤3:数据库表的创建String strSQL = "create table "+ TABLE_NAME+ "(tid integer primary key autoincrement,title varchar(20),weather varchar(10),context text,publish date)";//步骤4:使用参数db,创建对象db.execSQL(strSQL);}//数据库版本变化时,会调用onUpgrade()@Overridepublic void onUpgrade(SQLiteDatabase arg0, int arg1, int arg2) {}}正如上面所述,数据库第一次创建时onCreate方法会被调用,我们可以执行创建表的语句,当系统发现版本变化之后,会调用onUpgrade方法,我们可以执行修改表结构等语句。import android.content.Context;import android.database.Cursor;import android.database.sqlite.SQLiteDatabase;import com.chinasoft.dbhelper.SqliteDBHelper;public class DiaryDao {private SqliteDBHelper sqliteDBHelper;private SQLiteDatabase db;// 重写构造方法public DiaryDao(Context context) {this.sqliteDBHelper = new SqliteDBHelper(context);db = sqliteDBHelper.getWritableDatabase();}// 读操作public String execQuery(final String strSQL) {try {System.out.println("strSQL>" + strSQL);// Cursor相当于JDBC中的ResultSetCursor cursor = db.rawQuery(strSQL, null);// 始终让cursor指向数据库表的第1行记录cursor.moveToFirst();// 定义一个StringBuffer的对象,用于动态拼接字符串StringBuffer sb = new StringBuffer();// 循环游标,如果不是最后一项记录while (!cursor.isAfterLast()) {sb.append(cursor.getInt(0) + "/" + cursor.getString(1) + "/"+ cursor.getString(2) + "/" + cursor.getString(3) + "/"+ cursor.getString(4)+"#");//cursor游标移动cursor.moveToNext();}db.close();return sb.deleteCharAt(sb.length()-1).toString();} catch (RuntimeException e) {e.printStackTrace();return null;}}// 写操作public boolean execOther(final String strSQL) {db.beginTransaction(); //开始事务try {System.out.println("strSQL" + strSQL);db.execSQL(strSQL);db.setTransactionSuccessful(); //设置事务成功完成 db.close();return true;} catch (RuntimeException e) {e.printStackTrace();return false;}finally { db.endTransaction();//结束事务 } }}我们在Dao构造方法中实例化sqliteDBHelper并获取一个SQLiteDatabase对象,作为整个应用的数据库实例;在增删改信息时,我们采用了事务处理,确保数据完整性;最后要注意释放数据库资源db.close(),这一个步骤在我们整个应用关闭时执行,这个环节容易被忘记,所以朋友们要注意。public synchronized SQLiteDatabase getReadableDatabase() { if (mDatabase != null && mDatabase.isOpen()) { // 如果发现mDatabase不为空并且已经打开则直接返回 return mDatabase; } if (mIsInitializing) { // 如果正在初始化则抛出异常 throw new IllegalStateException("getReadableDatabase called recursively"); } // 开始实例化数据库mDatabase try { // 注意这里是调用了getWritableDatabase()方法 return getWritableDatabase(); } catch (SQLiteException e) { if (mName == null) throw e; // Can"t open a temp database read-only! Log.e(TAG, "Couldn"t open " + mName + " for writing (will try read-only):", e); } // 如果无法以可读写模式打开数据库 则以只读方式打开 SQLiteDatabase db = null; try { mIsInitializing = true; String path = mContext.getDatabasePath(mName).getPath();// 获取数据库路径 // 以只读方式打开数据库 db = SQLiteDatabase.openDatabase(path, mFactory, SQLiteDatabase.OPEN_READONLY); if (db.getVersion() != mNewVersion) { throw new SQLiteException("Can"t upgrade read-only database from version " + db.getVersion() + " to " + mNewVersion + ": " + path); } onOpen(db); Log.w(TAG, "Opened " + mName + " in read-only mode"); mDatabase = db;// 为mDatabase指定新打开的数据库 return mDatabase;// 返回打开的数据库 } finally { mIsInitializing = false; if (db != null && db != mDatabase) db.close(); } }在getReadableDatabase()方法中,首先判断是否已存在数据库实例并且是打开状态,如果是,则直接返回该实例,否则试图获取一个可读写模式的数据库实例,如果遇到磁盘空间已满等情况获取失败的话,再以只读模式打开数据库,获取数据库实例并返回,然后为mDatabase赋值为最新打开的数据库实例。既然有可能调用到getWritableDatabase()方法,我们就要看一下了:public synchronized SQLiteDatabase getWritableDatabase() { if (mDatabase != null && mDatabase.isOpen() && !mDatabase.isReadOnly()) { // 如果mDatabase不为空已打开并且不是只读模式 则返回该实例 return mDatabase; } if (mIsInitializing) { throw new IllegalStateException("getWritableDatabase called recursively"); } // If we have a read-only database open, someone could be using it // (though they shouldn"t), which would cause a lock to be held on // the file, and our attempts to open the database read-write would // fail waiting for the file lock. To prevent that, we acquire the // lock on the read-only database, which shuts out other users. boolean success = false; SQLiteDatabase db = null; // 如果mDatabase不为空则加锁 阻止其他的操作 if (mDatabase != null) mDatabase.lock(); try { mIsInitializing = true; if (mName == null) { db = SQLiteDatabase.create(null); } else { // 打开或创建数据库 db = mContext.openOrCreateDatabase(mName, 0, mFactory); } // 获取数据库版本(如果刚创建的数据库,版本为0) int version = db.getVersion(); // 比较版本(我们代码中的版本mNewVersion为1) if (version != mNewVersion) { db.beginTransaction();// 开始事务 try { if (version == 0) { // 执行我们的onCreate方法 onCreate(db); } else { // 如果我们应用升级了mNewVersion为2,而原版本为1则执行onUpgrade方法 onUpgrade(db, version, mNewVersion); } db.setVersion(mNewVersion);// 设置最新版本 db.setTransactionSuccessful();// 设置事务成功 } finally { db.endTransaction();// 结束事务 } } onOpen(db); success = true; return db;// 返回可读写模式的数据库实例 } finally { mIsInitializing = false; if (success) { // 打开成功 if (mDatabase != null) { // 如果mDatabase有值则先关闭 try { mDatabase.close(); } catch (Exception e) { } mDatabase.unlock();// 解锁 } mDatabase = db;// 赋值给mDatabase } else { // 打开失败的情况:解锁、关闭 if (mDatabase != null) mDatabase.unlock(); if (db != null) db.close(); } } }大家可以看到,几个关键步骤是,首先判断mDatabase如果不为空已打开并不是只读模式则直接返回,否则如果mDatabase不为空则加锁,然后开始打开或创建数据库,比较版本,根据版本号来调用相应的方法,为数据库设置新版本号,最后释放旧的不为空的mDatabase并解锁,把新打开的数据库实例赋予mDatabase,并返回最新实例。public class SQLiteActivity extends Activity {public DiaryDao diaryDao;//因为getWritableDatabase内部调用了mContext.openOrCreateDatabase(mName, 0, mFactory); //所以要确保context已初始化,我们可以把实例化Dao的步骤放在Activity的onCreate里@Overrideprotected void onCreate(Bundle savedInstanceState) {diaryDao = new DiaryDao(SQLiteActivity.this);initDatabase();}class ViewOcl implements View.OnClickListener {@Overridepublic void onClick(View v) {String strSQL;boolean flag;String message;switch (v.getId()) {case R.id.btnAdd:String title = txtTitle.getText().toString().trim();String weather = txtWeather.getText().toString().trim();;String context = txtContext.getText().toString().trim();;String publish = new SimpleDateFormat("yyyy-MM-dd HH:mm:ss").format(new Date());// 动态组件SQL语句strSQL = "insert into diary values(null,"" + title + "",""+ weather + "","" + context + "","" + publish + "")";flag = diaryDao.execOther(strSQL);//返回信息message = flag?"添加成功":"添加失败";Toast.makeText(getApplicationContext(), message, Toast.LENGTH_LONG).show();break;case R.id.btnDelete:strSQL = "delete from diary where tid = 1";flag = diaryDao.execOther(strSQL);//返回信息message = flag?"删除成功":"删除失败";Toast.makeText(getApplicationContext(), message, Toast.LENGTH_LONG).show();break;case R.id.btnQuery:strSQL = "select * from diary order by publish desc";String data = diaryDao.execQuery(strSQL);Toast.makeText(getApplicationContext(), data, Toast.LENGTH_LONG).show();break;case R.id.btnUpdate:strSQL = "update diary set title = "测试标题1-1" where tid = 1";flag = diaryDao.execOther(strSQL);//返回信息message = flag?"更新成功":"更新失败";Toast.makeText(getApplicationContext(), message, Toast.LENGTH_LONG).show();break;}}}private void initDatabase() {// 创建数据库对象SqliteDBHelper sqliteDBHelper = new SqliteDBHelper(SQLiteActivity.this);sqliteDBHelper.getWritableDatabase();System.out.println("数据库创建成功");}}Android sqlite3数据库管理工具