

一、PopupMenu实现:
PopupMenu实现起来比较简单,主要用来实现根据按钮附近弹出的对话框。
首先定义一个menu文件
esmenuheadmenu.xml:
<menu xmlns:android="http://schemas.android.com/apk/res/android" xmlns:app="http://schemas.android.com/apk/res-auto" xmlns:tools="http://schemas.android.com/tools" tools:context="com.arbo.hero.LoginActivity"> <item android:id="@+id/camera" android:title="拍照" android:orderInCategory="100" app:showAsAction="never" /> <item android:id="@+id/gallery" android:title="从相册中选取" android:orderInCategory="100" app:showAsAction="never" /> <item android:id="@+id/cancel" android:title="取消" android:orderInCategory="100" app:showAsAction="never" /></menu>创建一个PopupMenu并添加点击事件:
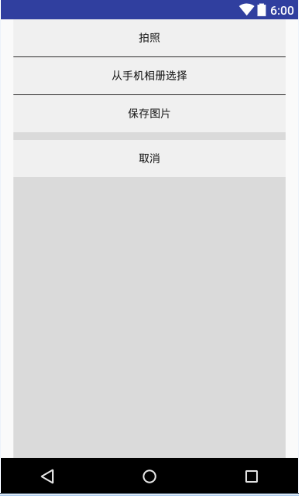
private void showPopmenu(View view){ popupMenu = new PopupMenu(this,view); popupMenu.getMenuInflater().inflate(R.menu.headmenu,popupMenu.getMenu()); popupMenu.setOnMenuItemClickListener(new PopupMenu.OnMenuItemClickListener() {@Overridepublic boolean onMenuItemClick(MenuItem item) {switch(item.getItemId()){ case R.id.camera: Toast.makeText(HeadPortrait.this,"Click camera",Toast.LENGTH_SHORT).show(); break; case R.id.gallery: Toast.makeText(HeadPortrait.this,"Click gallery",Toast.LENGTH_SHORT).show(); break; case R.id.cancel: Toast.makeText(HeadPortrait.this,"Click cancel",Toast.LENGTH_SHORT).show(); break;}return false;} }); popupMenu.show(); }MainActivity很简单,点击按钮调用showPopmenu()方法即可:public class MainActivity extends Activity{ @Override protected void onCreate(Bundle savedInstanceState) { super.onCreate(savedInstanceState); //main.xml页面主布局只有一个按钮,这里就不贴代码了 setContentView(R.layout.main); Button button = (Button) findViewById(R.id.button); button.setOnClickListener(new View.OnClickListener() {@Overridepublic void onClick(View view) {//点击按钮就创建并显示一个popupMenushowPopmenu(btnmenu);} } }}以上,就实现了利用PopupMenu在按钮附近弹出一个选择框。 <?xml version="1.0" encoding="utf-8"?><LinearLayout xmlns:android="http://schemas.android.com/apk/res/android" android:layout_width="match_parent" android:layout_height="match_parent" android:layout_marginLeft="@dimen/activity_horizontal_margin" android:layout_marginRight="@dimen/activity_horizontal_margin" android:background="#dadada" android:orientation="vertical"> <LinearLayout android:layout_width="match_parent" android:layout_height="wrap_content" android:orientation="vertical"> <Buttonandroid:id="@+id/camera"android:layout_width="match_parent"android:layout_height="wrap_content"android:text="拍照"android:background="#f0f0f0"/> <TextViewandroid:layout_width="match_parent"android:layout_height="1dp"android:background="#2d2c2c"/> <Buttonandroid:background="#f0f0f0"android:id="@+id/gallery"android:layout_width="match_parent"android:layout_height="wrap_content"android:text="从手机相册选择"/> <TextViewandroid:layout_width="match_parent"android:layout_height="1dp"android:background="#2d2c2c"/> <Buttonandroid:background="#f0f0f0"android:id="@+id/savepicture"android:layout_width="match_parent"android:layout_height="wrap_content"android:text="保存图片"/> </LinearLayout> <LinearLayout android:layout_width="match_parent" android:layout_height="wrap_content" android:layout_marginTop="10dp" android:orientation="vertical"> <Buttonandroid:background="#f0f0f0"android:id="@+id/cancel"android:layout_width="match_parent"android:layout_height="wrap_content"android:text="取消"/> </LinearLayout></LinearLayout>布局的效果图:
创建popupWindow并为其添加点击事件:
void bottomwindow(View view) { if (popupWindow != null && popupWindow.isShowing()) {return; } LinearLayout layout = (LinearLayout) getLayoutInflater().inflate(R.layout.window_popup, null); popupWindow = new PopupWindow(layout,ViewGroup.LayoutParams.MATCH_PARENT,ViewGroup.LayoutParams.WRAP_CONTENT); //点击空白处时,隐藏掉pop窗口 popupWindow.setFocusable(true); popupWindow.setBackgroundDrawable(new BitmapDrawable()); //添加弹出、弹入的动画 popupWindow.setAnimationStyle(R.style.Popupwindow); int[] location = new int[2]; view.getLocationOnScreen(location); popupWindow.showAtLocation(view, Gravity.LEFT | Gravity.BOTTOM, 0, -location[1]); //添加按键事件监听 setButtonListeners(layout); //添加pop窗口关闭事件,主要是实现关闭时改变背景的透明度 popupWindow.setOnDismissListener(new poponDismissListener()); backgroundAlpha(1f); }事件监听的函数setButtonListeners() :private void setButtonListeners(LinearLayout layout) { Button camera = (Button) layout.findViewById(R.id.camera); Button gallery = (Button) layout.findViewById(R.id.gallery); Button savepicture = (Button) layout.findViewById(R.id.savepicture); Button cancel = (Button) layout.findViewById(R.id.cancel); camera.setOnClickListener(new View.OnClickListener() {@Overridepublic void onClick(View view) {if (popupWindow != null && popupWindow.isShowing()) { //在此处添加你的按键处理 xxx popupWindow.dismiss();}} }); gallery.setOnClickListener(new View.OnClickListener() {@Overridepublic void onClick(View view) {if (popupWindow != null && popupWindow.isShowing()) { //在此处添加你的按键处理 xxx popupWindow.dismiss();}} }); savepicture.setOnClickListener(new View.OnClickListener() {@Overridepublic void onClick(View view) {if (popupWindow != null && popupWindow.isShowing()) { //在此处添加你的按键处理 xxx popupWindow.dismiss();}} }); cancel.setOnClickListener(new View.OnClickListener() {@Overridepublic void onClick(View view) {if (popupWindow != null && popupWindow.isShowing()) { popupWindow.dismiss();}} }); }弹出、收回的动画:<?xml version="1.0" encoding="utf-8"?><translate xmlns:android="http://schemas.android.com/apk/res/android" android:interpolator="@android:anim/decelerate_interpolator" android:fromYDelta="100%" android:toYDelta="0" android:duration="300"/>收回 window_back.xml:
<?xml version="1.0" encoding="utf-8"?><translate xmlns:android="http://schemas.android.com/apk/res/android" android:interpolator="@android:anim/accelerate_interpolator" android:fromYDelta="0" android:toYDelta="100%" android:duration="200"/>然后在style.xml中添加我们的这两个动画:
<style name="Popupwindow"> <item name="android:windowEnterAnimation">@anim/window_out</item> <item name="android:windowExitAnimation">@anim/window_back</item> </style>还是上面的同一个MainActivity,把按钮点击事件的处理函数换成popupwindow的即可:
btnmenu.setOnClickListener(new View.OnClickListener() {@Overridepublic void onClick(View view) {bottomwindow(btnmenu);} }以上,就可以实现这样的点击按钮从屏幕底部弹出window窗口的效果,如下:
底部弹出
但是,这样的效果并不好,我们希望弹出windows的时候,其他背景可以变成半透明,这样可以突出重点。网上的方法是通过这段代码来改变背景的透明度的:
/** * 设置添加屏幕的背景透明度 * @param bgAlpha */ public void backgroundAlpha(float bgAlpha) { WindowManager.LayoutParams lp = getWindow().getAttributes(); lp.alpha = bgAlpha; //0.0-1.0 getWindow().setAttributes(lp);getWindow().addFlags(WindowManager.LayoutParams.FLAG_DIM_BEHIND); }然后在弹出的时候将背景设为半透明:
我希望是弹出的过程中,慢慢变暗。是有一个过程的,而不是一下子就暗下来了。这里利用延时和Handler来动态地改变背景的透明度。
//在调用弹出的方法后,开启一个子线程@Overridepublic void onClick(View view) {bottomwindow(btnmenu);new Thread(new Runnable(){ @Override public void run() { while(alpha>0.5f){try {//4是根据弹出动画时间和减少的透明度计算Thread.sleep(4);} catch (InterruptedException e) {e.printStackTrace();}Message msg =mHandler.obtainMessage();msg.what = 1;//每次减少0.01,精度越高,变暗的效果越流畅alpha-=0.01f;msg.obj =alpha ;mHandler.sendMessage(msg); } }}).start();}同理,返回的时候把透明度跳回来:/** * 返回或者点击空白位置的时候将背景透明度改回来 */ class poponDismissListener implements PopupWindow.OnDismissListener{ @Override public void onDismiss() {// TODO Auto-generated method stubnew Thread(new Runnable(){@Overridepublic void run() { //此处while的条件alpha不能<= 否则会出现黑屏 while(alpha<1f){ try {Thread.sleep(4); } catch (InterruptedException e) {e.printStackTrace(); } Log.d("HeadPortrait","alpha:"+alpha); Message msg =mHandler.obtainMessage(); msg.what = 1; alpha+=0.01f; msg.obj =alpha ; mHandler.sendMessage(msg); }}}).start(); } }在Handler里面我们调用改变背景透明的方法即可:Handler mHandler = new Handler(){ @Override public void handleMessage(Message msg) {switch (msg.what){case 1: backgroundAlpha((float)msg.obj); break;} } };这样修改以后,效果是这样的: 
以上,基本达到了逐渐变暗、变量的目的。
以上就是本文的全部内容,希望对大家的学习有所帮助,也希望大家多多支持脚本之家。