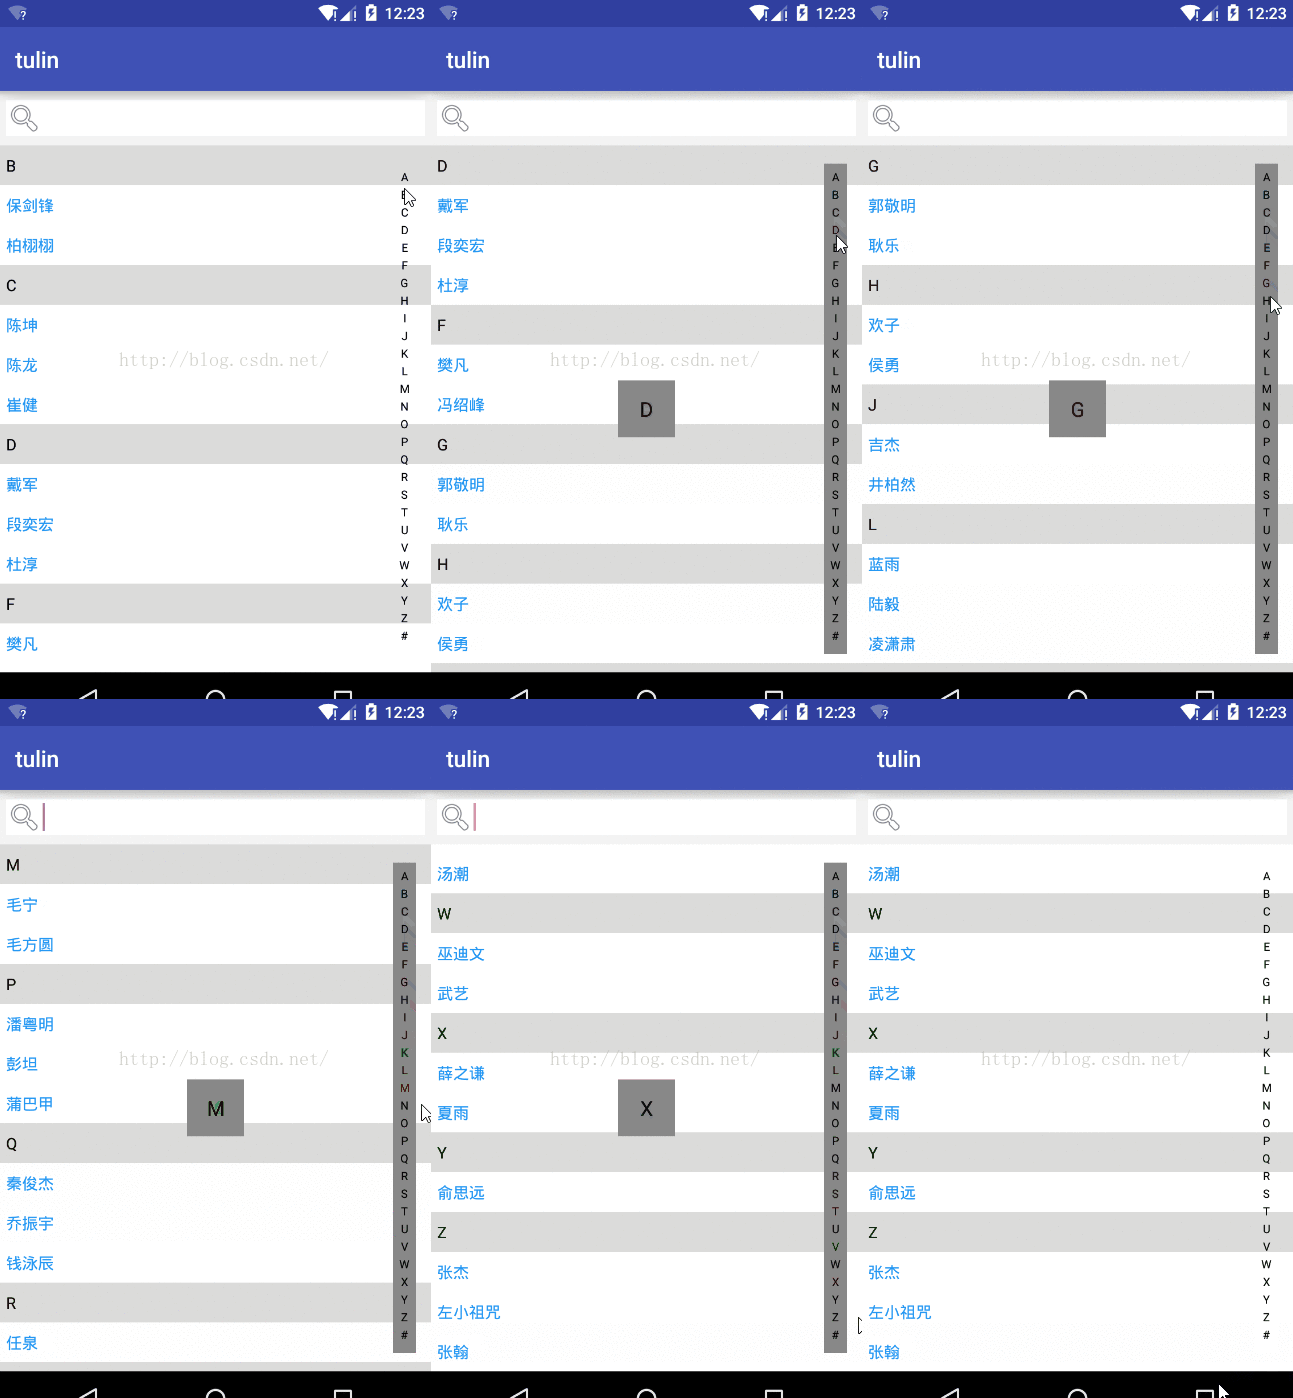
很多的Android入门程序猿来说对于Android自定义View,可能都是比较恐惧的,但是这又是高手进阶的必经之路,所有准备在自定义View上面花一些功夫,多写一些文章。
思路分析:
1、自定义View实现字母导航栏
2、ListView实现联系人列表
3、字母导航栏滑动事件处理
4、字母导航栏与中间字母的联动
5、字母导航栏与ListView的联动
效果图:

首先,我们先甩出主布局文件,方便后面代码的说明
<!--?xml version="1.0" encoding="utf-8"?--><linearlayout android:layout_height="match_parent" android:layout_width="match_parent" android:orientation="vertical" xmlns:android="http://schemas.android.com/apk/res/android"><edittext android:background="@drawable/search_border" android:drawableleft="@android:drawable/ic_menu_search" android:layout_height="wrap_content" android:layout_width="match_parent" android:padding="8dp"><relativelayout android:layout_height="match_parent" android:layout_width="match_parent"><listview android:divider="@null" android:id="@+id/lv" android:layout_height="match_parent" android:layout_width="match_parent"><textview android:background="#888888" android:gravity="center" android:id="@+id/tv" android:layout_centerinparent="true" android:layout_height="50dp" android:layout_width="50dp" android:textcolor="#000000" android:textsize="18dp" android:visibility="gone"><com.handsome.tulin.view.navview android:id="@+id/nv" android:layout_alignparentright="true" android:layout_height="match_parent" android:layout_margin="16dp" android:layout_width="20dp"> </com.handsome.tulin.view.navview></textview></listview></relativelayout></edittext></linearlayout>
步骤一:分析自定义字母导航栏
思路分析:
1、我们在使用的时候把宽设置为20dp,高设置为填充父控件,所以这里获取的宽度为20dp
2、通过循环,画出竖直的字母,每画一次得重新设置一下颜色,因为我们需要一个选中的字母颜色和默认不一样
public class NavView extends View { private Paint textPaint = new Paint(); private String[] s = new String[]{ "A", "B", "C", "D", "E", "F", "G", "H", "I", "J", "K", "L", "M", "N", "O", "P", "Q", "R", "S", "T", "U", "V","W", "X", "Y", "Z", "#"}; //鼠标点击、滑动时选择的字母 private int choose = -1; //中间的文本 private TextView tv; public NavView(Context context, AttributeSet attrs) {super(context, attrs); } public NavView(Context context) {super(context); }public NavView(Context context, AttributeSet attrs, int defStyleAttr) {super(context, attrs, defStyleAttr); }private void initPaint() {textPaint.setTextSize(20);textPaint.setAntiAlias(true);textPaint.setColor(Color.BLACK); }@Override protected void onDraw(Canvas canvas) {super.onDraw(canvas);//画字母drawText(canvas); } /*** 画字母** @param canvas*/ private void drawText(Canvas canvas) {//获取View的宽高int width = getWidth();int height = getHeight();//获取每个字母的高度int singleHeight = height / s.length;//画字母for (int i = 0; i < s.length; i++) { //画笔默认颜色 initPaint(); //高亮字母颜色 if (choose == i) {textPaint.setColor(Color.RED); } //计算每个字母的坐标 float x = (width - textPaint.measureText(s[i])) / 2; float y = (i + 1) * singleHeight; canvas.drawText(s[i], x, y, textPaint); //重置颜色 textPaint.reset();} }}步骤二:ListView实现联系人列表
思路分析:
1、在主Activity中,定义一个数据数组,使用工具类获取数组的第一个字母,使用Collections根据第一个字母进行排序,由于工具类有点长,就不贴出来了。
2、创建一个ListView子布局,创建一个Adapter进行填充。
主布局:
public class MainActivity extends AppCompatActivity { private TextView tv; private ListView lv; private NavView nv; private List<user> list; private UserAdapter adapter; private String[] name = new String[]{ "潘粤明", "戴军", "薛之谦", "蓝雨", "任泉", "张杰", "秦俊杰", "陈坤", "田亮", "夏雨", "保剑锋", "陆毅", "乔振宇", "吉杰", "郭敬明", "巫迪文", "欢子", "井柏然", "左小祖咒", "段奕宏", "毛宁", "樊凡", "汤潮", "山野", "陈龙", "侯勇", "俞思远", "冯绍峰", "崔健", "杜淳", "张翰", "彭坦", "柏栩栩", "蒲巴甲", "凌潇肃", "毛方圆", "武艺", "耿乐", "钱泳辰"}; @Override protected void onCreate(Bundle savedInstanceState) {super.onCreate(savedInstanceState);setContentView(R.layout.activity_main);initView();initData(); } private void initView() {tv = (TextView) findViewById(R.id.tv);lv = (ListView) findViewById(R.id.lv);nv = (NavView) findViewById(R.id.nv);nv.setTextView(tv); } private void initData() {//初始化数据list = new ArrayList<>();for (int i = 0; i < name.length; i++) { list.add(new User(name[i], CharacterUtils.getFirstSpell(name[i]).toUpperCase()));}//将拼音排序Collections.sort(list, new Comparator<user>() { @Override public int compare(User lhs, User rhs) {return lhs.getFirstCharacter().compareTo(rhs.getFirstCharacter()); }});//填充ListViewadapter = new UserAdapter(this, list);lv.setAdapter(adapter); }}</user></user>ListView子布局:
<!--?xml version="1.0" encoding="utf-8"?--><linearlayout android:background="#ffffff" android:layout_height="match_parent" android:layout_width="match_parent" android:orientation="vertical" xmlns:android="http://schemas.android.com/apk/res/android"><textview android:background="#DBDBDA" android:id="@+id/tv_firstCharacter" android:layout_height="wrap_content" android:layout_width="match_parent" android:padding="8dp" android:text="A" android:textcolor="#000000" android:textsize="14dp"><textview android:background="#ffffff" android:id="@+id/tv_name" android:layout_height="wrap_content" android:layout_width="match_parent" android:padding="8dp" android:text="张栋梁" android:textcolor="#2196F3" android:textsize="14dp"> </textview></textview></linearlayout>
Adapter:
public class UserAdapter extends BaseAdapter { private List<user> list; private User user; private LayoutInflater mInflater; private Context context; public UserAdapter(Context context, List<user> list) {this.list = list;mInflater = LayoutInflater.from(context);this.context = context; } @Override public int getCount() {return list.size(); } @Override public Object getItem(int position) {return list.get(position); } @Override public long getItemId(int position) {return position; } @Override public View getView(int position, View convertView, ViewGroup parent) {if (convertView == null) { convertView = mInflater.inflate(R.layout.adapter_user, null);}ViewHolder holder = getViewHolder(convertView);user = list.get(position);if (position == 0) { //第一个数据要显示字母和姓名 holder.tv_firstCharacter.setVisibility(View.VISIBLE); holder.tv_firstCharacter.setText(user.getFirstCharacter()); holder.tv_name.setText(user.getUsername());} else { //其他数据判断是否为同个字母,这里使用Ascii码比较大小 if (CharacterUtils.getCnAscii(list.get(position - 1).getFirstCharacter().charAt(0)) < CharacterUtils.getCnAscii(user.getFirstCharacter().charAt(0))) {//后面字母的值大于前面字母的值,需要显示字母holder.tv_firstCharacter.setVisibility(View.VISIBLE);holder.tv_firstCharacter.setText(user.getFirstCharacter());holder.tv_name.setText(user.getUsername()); } else {//后面字母的值等于前面字母的值,不显示字母holder.tv_firstCharacter.setVisibility(View.GONE);holder.tv_name.setText(user.getUsername()); }}return convertView; } /*** 获得控件管理对象** @param view* @return*/ private ViewHolder getViewHolder(View view) {ViewHolder holder = (ViewHolder) view.getTag();if (holder == null) { holder = new ViewHolder(view); view.setTag(holder);}return holder; } /*** 控件管理类*/ private class ViewHolder { private TextView tv_firstCharacter, tv_name; ViewHolder(View view) { tv_firstCharacter = (TextView) view.findViewById(R.id.tv_firstCharacter); tv_name = (TextView) view.findViewById(R.id.tv_name);} }/*** 通过字符查找位置** @param s* @return*/ public int getSelectPosition(String s) {for (int i = 0; i < getCount(); i++) { String firChar = list.get(i).getFirstCharacter(); if (firChar.equals(s)) {return i; }}return -1; }}</user></user>步骤三:字母导航栏滑动事件处理、字母导航栏与中间字母的联动
思路分析:
1、在自定义View中重写dispatchTouchEvent处理滑动事件,最后返回true。
2、在主Activity传进来一个TextView,在我们滑动的时候设置Text,松开的时候消失Text。设置Text的时候需要计算Text的位置,并且滑过多的话会出现数组越界的问题,所以我们在里面处理数组越界问题。
3、最后,提供一个接口,记录我们滑到的字母,为了后面可以和ListView联动。
@Overridepublic boolean dispatchTouchEvent(MotionEvent event) { //计算选中字母 int index = (int) (event.getY() / getHeight() * s.length); //防止脚标越界 if (index >= s.length) {index = s.length - 1; } else if (index < 0) {index = 0; } switch (event.getAction()) {case MotionEvent.ACTION_DOWN:case MotionEvent.ACTION_MOVE: setBackgroundColor(Color.GRAY); //选中字母高亮 choose = index; //出现中间文字 tv.setVisibility(VISIBLE); tv.setText(s[choose]); //调用ListView连动接口 if (listener != null) {listener.touchCharacterListener(s[choose]); } //重绘 invalidate(); break;default: setBackgroundColor(Color.TRANSPARENT); //取消选中字母高亮 choose = -1; //隐藏中间文字 tv.setVisibility(GONE); //重绘 invalidate(); break; } return true;}public onTouchCharacterListener listener;public interface onTouchCharacterListener { void touchCharacterListener(String s);} public void setListener(onTouchCharacterListener listener) { this.listener = listener;} /** * 传进来一个TextView * * @param tv */public void setTextView(TextView tv) { this.tv = tv;}步骤四:字母导航栏和ListView的联动
思路分析:
1、我们已经通过接口传递过去了一个选择的字母,和在adapter写好了根据字母查询position的方法,这个时候只要主Activity对自定义View设置监听,判断即可。
//ListView连动接口nv.setListener(new NavView.onTouchCharacterListener() { @Override public void touchCharacterListener(String s) {int position = adapter.getSelectPosition(s);if (position != -1) { lv.setSelection(position);} }});以上就是本文的全部内容,希望对大家的学习有所帮助,也希望大家多多支持脚本之家。
