本文实例为大家分享了Chronometer实现倒计时功能,Android提供了实现按照秒计时的API,供大家参考,具体内容如下
一、自定义ChronometerView 继续自TextView
主要原理:先设置一个基准倒计时时间mBaseSeconds,内置handler 每隔1s发送一个空消息,mRemainSeconds--,同时刷新界面视图,回调给外部调用者,只到为零。外部调用者可通过start()/pause()/stop()来控制计时器的工作状态。
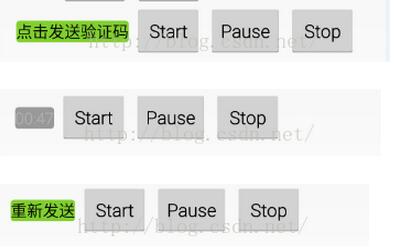
可以app中发送短信验证码的场景为例,做了一个很粗糙的界面,但功能都实现了。
/*** @name 倒计时器(类似妙表倒数计时,支持暂停、停止、重新开始)* @author Fanjb* @date 2015年11月6日*/ public class ChronometerView extends TextView { /*** A callback that notifies when the chronometer has decremented on its own.** @author Fanjb*/public interface OnTickChangeListener { /** * remain seconds changed * * @param view * @param remainSeconds */public void onTickChanged(ChronometerView view, long remainSeconds);} private long mBase;private long mRemainSeconds;private boolean mStarted;private boolean mReStart;private boolean mVisible;private boolean mIsEnable; private OnTickChangeListener mTickListener; public ChronometerView(Context context) {this(context, null);} public ChronometerView(Context context, AttributeSet attrs) {super(context, attrs, 0);} public ChronometerView(Context context, AttributeSet attrs, int defStyleAttr) {super(context, attrs, defStyleAttr);updateText(mRemainSeconds);} @Overrideprotected void onWindowVisibilityChanged(int visibility) {super.onWindowVisibilityChanged(visibility);mVisible = visibility == VISIBLE;updateStatus();} @Overrideprotected void onDetachedFromWindow() {super.onDetachedFromWindow();mVisible = false;updateStatus();} /*** 启动计时器*/public void start() {if (mReStart && !mStarted) { mRemainSeconds = mBase;}mStarted = true;updateStatus();} /*** 暂停计时器*/public void pause() {if (mStarted) { mStarted = mReStart = false; updateStatus();}} /*** 停止计时器,再次调用 start()重新启动*/public void stop() {mStarted = false;mReStart = true;updateStatus();updateText(mRemainSeconds = 0);dispatchTickListener();} /*** 刷新内部状态*/private void updateStatus() {boolean isEnable = mVisible && mStarted;if (mIsEnable != isEnable) { if (isEnable) { mHandler.sendMessage(Message.obtain(mHandler, TICK_WHAT)); } else { mHandler.removeMessages(TICK_WHAT); } mIsEnable = isEnable;}} private static final int TICK_WHAT = 1; private Handler mHandler = new Handler() {public void handleMessage(android.os.Message msg) { if (mRemainSeconds > 0) { updateText(--mRemainSeconds); dispatchTickListener(); sendMessageDelayed(Message.obtain(this, TICK_WHAT), 1000); }}}; private void updateText(long now) {String text = DateUtils.formatElapsedTime(now);setText(text);} /*** 在未启动状态下设置开始倒计时时间** @param baseSeconds*/public void setBaseSeconds(long baseSeconds) {if (baseSeconds > 0 && baseSeconds != mBase && !mStarted) { mBase = mRemainSeconds = baseSeconds; updateText(mRemainSeconds);}} /*** 剩余时间** @return*/public long getRemainSeconds() {return mRemainSeconds;} public void setOnTickChangeListener(OnTickChangeListener listener) {mTickListener = listener;} public OnTickChangeListener getTickListener() {return mTickListener;} private void dispatchTickListener() {if (mTickListener != null) { mTickListener.onTickChanged(this, getRemainSeconds());}} @Overridepublic void onInitializeAccessibilityEvent(AccessibilityEvent event) {super.onInitializeAccessibilityEvent(event);event.setClassName(ChronometerView.class.getName());} @Overridepublic void onInitializeAccessibilityNodeInfo(AccessibilityNodeInfo info) {super.onInitializeAccessibilityNodeInfo(info);info.setClassName(Chronometer.class.getName());} } 二、xml 中没有加入自定义的控件属性,同TextView<LinearLayoutandroid:layout_width="wrap_content"android:layout_height="wrap_content"android:orientation="horizontal" > <com.freedoman.widgets.calendar.ChronometerView android:id="@+id/chronometer_view" android:layout_width="wrap_content" android:layout_height="wrap_content" android:layout_marginLeft="5dp" android:background="@drawable/chronometer_view_bg" android:enabled="true" android:text="00:00" /> <Button android:id="@+id/start_chronometer_view_btn" android:layout_width="wrap_content" android:layout_height="wrap_content" android:layout_marginLeft="5dp" android:text="Start" /> <Button android:id="@+id/pause_chronometer_view_btn" android:layout_width="wrap_content" android:layout_height="wrap_content" android:layout_marginLeft="5dp" android:text="Pause" /> <Button android:id="@+id/stop_chronometer_view_btn" android:layout_width="wrap_content" android:layout_height="wrap_content" android:layout_marginLeft="5dp" android:text="Stop" /></LinearLayout>
三、在Activity中做一个简单的测试(可以发送短信验证码的实际应用场景为例)
public class ChronometerActivity extends Activity { private ChronometerView mChronometerView; @Overrideprotected void onCreate(Bundle savedInstanceState) {super.onCreate(savedInstanceState);setContentView(R.layout.activity_clock); // 自定义计时器if (mChronometerView == null) { mChronometerView = (ChronometerView) findViewById(R.id.chronometer_view); mChronometerView.setBaseSeconds(60); mChronometerView.setOnTickChangeListener(new OnTickChangeListener() { @Override public void onTickChanged(ChronometerView view, long curTimeMills) {System.out.println(curTimeMills);view.setEnabled(curTimeMills == 0 || curTimeMills == 60);if (curTimeMills == 0) {mChronometerView.setText("重新发送");} } }); mChronometerView.setText("点击发送验证码");}findViewById(R.id.start_chronometer_view_btn).setOnClickListener(mClickListener);findViewById(R.id.pause_chronometer_view_btn).setOnClickListener(mClickListener);findViewById(R.id.stop_chronometer_view_btn).setOnClickListener(mClickListener);} private View.OnClickListener mClickListener = new OnClickListener() { @Overridepublic void onClick(View v) { switch (v.getId()) {case R.id.start_chronometer_view_btn: if (mChronometerView != null) {mChronometerView.start(); } break;case R.id.pause_chronometer_view_btn: if (mChronometerView != null) {mChronometerView.pause(); } break;case R.id.stop_chronometer_view_btn: if (mChronometerView != null) {mChronometerView.stop(); } break; }}}; } 以上就是本文的全部内容,希望对大家的学习有所帮助,也希望大家多多支持脚本之家。