相信大家对于mvc的三层架构已经灰常熟悉了,在这就不细讲了,个人感觉ssi的框架结构还是比较典型的mvc三层架构,还是比较容易上手的。关于这块的入门我想特别感谢下FrankHui童鞋,在他的帮助下,我才能比较快滴熟悉了这个架构,对我学习ssi的框架还是很有帮助滴。ssi的框架主要是由struts2,spring以及ibatis组成,他们负责各层之间的交互与协作,从而实现整个web端的功能实现与整合。Struts目前主要负责数据传递和控制方面,spring则依靠其强大的依赖注入技术实现了类似bean托管和整合等功能,当然这只是spring功能中的冰山一角,而ibatis作为一种轻量级的OR Mapping框架,提供了半自动化对象关系映射的实现,自由度相对于hibernate更高。
框架结构:这是我在网上找到的一张关于ssi框架的结构图,个人感觉画的还是蛮不错的,对于入门者来说,层次机构很清晰,比较实用(感谢这位大大的分享):
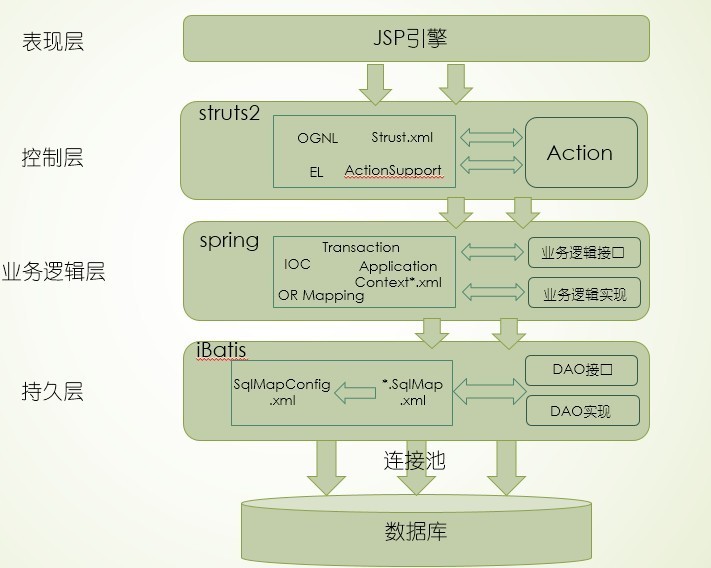
在这里可以很明显的看出ssi框架的大体结构以及各层之间的交互情况,顶层表现层的话,就java而言主要是jsp,html等视图层技术的编写,其中涉及我们熟悉的javascript,jquery以及extjs等。在控制层来说的话,主要是利用strust2标签功能实现action与视图层的数据交互,当然也可以使用ajax的技术实现同样的功能,这个就按个人喜好而来了。在业务逻辑层。主要是利用spring的依赖注入实现对业务逻辑类和dao类的实例托管,当然各类的实例都可以托管在spring中进行统一管理和关联,包括事务,数据源等等。在持久层,利用ibatis提供的半自动化对象关系映射的实现,开发人员可以根据需要编写具体的sql语句,通过相应的xml的配置实现对数据库的操作。
总之,SSI框架能够降低我们代码的耦合度,增强了代码的健壮性和可重用性,加快了开发速度,但是也有一些不足之处,比如由于三种框架的配置文件较多,也给我们带来了一些不便,特别是对于较小的应用来说更是如此。
相关demo介绍:基于之前对ssi框架的学习,我也不能免俗滴选择了做一个用户管理的web实现,项目的大致框架如下:
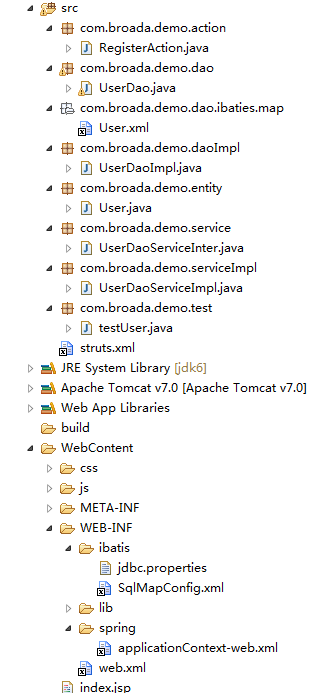
大体上还是按照三层的分层模型来是分的,具体就不详细说了,相信大家也应该很了解整个结构的。
Ø 开发环境简介:
工具:eclipse3.6+tomcat7+mysql5.1
框架:struts2,spring3.0.5,ibatis2.3.4.726
开发步骤及配置简介:
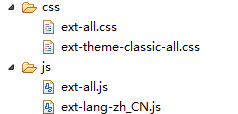
第一步,众所周知肯定是导入相关的lib库啦,由于我使用的前端是extjs,所以还需要导入extjs相关的js以及css依赖文件。由于lib库太多就不截图了,只截取extjs的相关依赖文件:
这样基本的环境就有了,数据库的设计则需要根据model层的对象来确定。
第二步,建立相关的model层,代码如下:
User.java:
package com.broada.demo.entity;/** ** @author smm * */public class User { private int id; //用户idprivate String name;//用户名称private String password;//用户密码private String username;//用户昵称private String address;//地址 public String getUsername() {return username;} public void setUsername(String username) {this.username = username;} public String getAddress() {return address;} public void setAddress(String address) {this.address = address;} public int getId() {return id;} public void setId(int id) {this.id = id;} public String getName() {return name;} public void setName(String name) {this.name = name;} public String getPassword() {return password;} public void setPassword(String password) {this.password = password;} }第三步,
strust的相关配置,这里就不详细讲述
strust的单独配置及原理了,直接上实例中的相关配置文件,主要是
strust.xml以及
web.xml的相关配置,部分主要配置如下:
Web.xml:<!-- struts2模块 --><filter><filter-name>struts2</filter-name><!-- 这个就是struts2的核心过滤器 --><filter-class>org.apache.struts2.dispatcher.FilterDispatcher</filter-class></filter><filter-mapping><filter-name>struts2</filter-name><url-pattern>/*</url-pattern></filter-mapping>
strust.xml:
<?xml version="1.0" encoding="UTF-8"?><!DOCTYPE struts PUBLIC "-//Apache Software Foundation//DTD Struts Configuration 2.0//EN""http://struts.apache.org/dtds/struts-2.0.dtd"><struts><!-- 这是一个重要的地方,很多人在使用<s:include>子页面后,发现子页面乱码,怎么改都不行,原因就在次,struts2的默认编码为UTF-8,乱码的同志请看看你的jsp页面上的编码是不是和这个不一致呢。只要把这里和jsp编码改一致就行了 --><constant name="struts.i18n.encoding" value="UTF-8" /><!-- 告诉struts2,我要用spring装配工厂,其实默认就是这个了-_-!!! --><constant name="struts.objectFactory" value="spring" /><!-- struts2的扩展名,比如struts1的时候,用的.do,struts2默认为.action,可以改成其它的,比如.dxd --><constant name="struts.action.extension" value="action" /><!-- 资源文件 --><constant name="struts.custom.i18n.resources"value="messageResource"></constant><!-- 用户注册类 --><!-- abstract属性就说明了该action继承自自己定义的基础action,而class采用的registerAction是由spring产生的 --><package name="register" extends="struts-default"><action name="register" class="registerAction" method="addUser"><!-- 注册成功 --><result name="success">success.jsp</result><!-- 注册失败 --><result name="input">error.jsp</result></action><action name="login" class="registerAction" method="loginUser"><!-- 注册成功 --><result name="success">success.jsp</result><!-- 注册失败 --><result name="error">error.jsp</result></action></package> </struts>
这样
strust的配置大致就完成了。
第四步:配置
ibatis的相关配置文件,主要是
jdbc.properties,
SqlMapConfig.xml以及
User.xml的配置,
jdbc.properties主要用于配置数据库的数据源参数,会在加载
spring的时候自动初始化,
ibatis数据源的配置到时可以托管给
spring初始化,所以这里就不细讲了。
SqlMapConfig.xml主要是配置
ibatis的配置文件的位置,
User.xml则用于编写相关的数据库语句等,配置大致如下:
jdbc.properties:
jdbc.driverClass=com.mysql.jdbc.Driverjdbc.url=jdbc:mysql://localhost:3306/userinfojdbc.user=rootjdbc.password=123456jdbc.minPoolSize=5jdbc.maxPoolSize=20jdbc.maxIdleTime=1800jdbc.acquireIncrement=5jdbc.maxStatements=50jdbc.initialPoolSize=10jdbc.idleConnectionTestPeriod=1800jdbc.acquireRetryAttempts=30
详细的参数含义在
spring的配置文件会提及,就不细说了。
SqlMapConfig.xml:
<?xml version="1.0" encoding="UTF-8" ?><!DOCTYPE sqlMapConfig PUBLIC "-//ibatis.apache.org//DTD SQL Map Config 2.0//EN""http://ibatis.apache.org/dtd/sql-map-config-2.dtd"><sqlMapConfig><!-- 用户信息表 --><sqlMap resource="com/broada/demo/dao/ibaties/map/User.xml" /></sqlMapConfig>
User.xml:
<?xml version="1.0" encoding="UTF-8" ?><!DOCTYPE sqlMap PUBLIC "-//ibatis.apache.org//DTD SQL Map 2.0//EN" "http://ibatis.apache.org/dtd/sql-map-2.dtd"><sqlMap><typeAlias alias="User" type="com.broada.demo.entity.User" /><!-- 保存注册信息 --><insert id="insertUser" parameterClass="User">insert intouser (name,password,username,address)values(#name#,#password#,#username#,#address#)</insert><select id="selsectUser" parameterClass="java.lang.String" resultClass="User">select * from userwhere name = #name#;</select></sqlMap>
这样,ibatis的配置大致就完成。
第五步:配置spring的相关配置文件,主要是整合ibatis以及strust中用到的bean,需要配置web.xml以及applicationContext-web.xml两个配置文件:
web.xml:
<listener><!-- 这个就是今后用到的WebApplicationUtilContent --><listener-class>org.springframework.web.context.ContextLoaderListener</listener-class></listener><!-- springframework config files --><context-param><param-name>contextConfigLocation</param-name><!-- 把spring的配置文件放到了/WEB-INF/下的springframework包里,方便统一管理,命名规则是以applicationContent-开头的xml文件,初始化时会自动搜索所有符合规则的配置文件 --><param-value>/WEB-INF/spring/applicationContext-*.xml</param-value></context-param>
applicationContext-web.xml:
<?xml version="1.0" encoding="UTF-8"?><beans xmlns="http://www.springframework.org/schema/beans"xmlns:xsi="http://www.w3.org/2001/XMLSchema-instance"xsi:schemaLocation="http://www.springframework.org/schema/beans http://www.springframework.org/schema/beans/spring-beans-2.0.xsd"><!-- 配置数据源,连接池采用的是c3p0,具体各参数代表意义参看c3p0自带的doc,非常详细。 --><bean id="dataSource"class="com.mchange.v2.c3p0.ComboPooledDataSource"destroy-method="close"><property name="driverClass" value="${jdbc.driverClass}" /><property name="jdbcUrl" value="${jdbc.url}" /><property name="user" value="${jdbc.user}" /><property name="password" value="${jdbc.password}" /><property name="minPoolSize" value="${jdbc.minPoolSize}" /><property name="maxPoolSize" value="${jdbc.maxPoolSize}" /><property name="maxIdleTime" value="${jdbc.maxIdleTime}" /><property name="acquireIncrement"value="${jdbc.acquireIncrement}" /><property name="maxStatements" value="${jdbc.maxStatements}" /><property name="initialPoolSize"value="${jdbc.initialPoolSize}" /><property name="idleConnectionTestPeriod"value="${jdbc.idleConnectionTestPeriod}" /><property name="acquireRetryAttempts"value="${jdbc.acquireRetryAttempts}" /></bean> <!-- 上面的数据源的value值用的是表达式,原因就在这里,这将配置文件放到了iBatis目录下,也就是jdbc.properties,设置了c3p0的各项参数 --><bean id="propertyConfig"class="org.springframework.beans.factory.config.PropertyPlaceholderConfigurer"><property name="location"><value>/WEB-INF/ibatis/jdbc.properties</value></property></bean> <!-- 配置iBatis的sqlMapClient,这里当然是交给了spring去处理,其中,将SqlMapConfig文件放到了WEB-INF的iBatis目录下,也是便于管理 --><bean id="sqlMapClient"class="org.springframework.orm.ibatis.SqlMapClientFactoryBean"><property name="configLocation"><value>/WEB-INF/ibatis/SqlMapConfig.xml</value></property><!-- 这里使用的数据源就是上面配置的数据源 --><property name="dataSource"><ref bean="dataSource" /></property></bean><bean id="userdaoId" class="com.broada.demo.daoImpl.UserDaoImpl"> <property name="sqlMapClient" ref="sqlMapClient"></property></bean> <bean id="userDaoServiceId" class="com.broada.demo.serviceImpl.UserDaoServiceImpl"> <property name="userdao" ref="userdaoId"></property></bean><!-- 用户注册action--> <bean id="registerAction" name="registerAction" class="com.broada.demo.action.RegisterAction" scope="prototype"> <property name="userdaoServiceInter" ref="userDaoServiceId"></property></bean> </beans>这样,ssi框架的大致配置就完成了。
最后编写相关的dao层,service层,action层以及jsp等等,我就不详细说明了,直接上相关代码:
RegisterAction.java:
package com.broada.demo.action; /** * @author smm */ import com.broada.demo.entity.User;import com.broada.demo.service.UserDaoServiceInter;import com.opensymphony.xwork2.ActionSupport; public class RegisterAction extends ActionSupport {private static final long serialVersionUID = 1L;private UserDaoServiceInter userdaoServiceInter; public UserDaoServiceInter getUserdaoServiceInter() {return userdaoServiceInter;} public void setUserdaoServiceInter(UserDaoServiceInter userdaoServiceInter) {this.userdaoServiceInter = userdaoServiceInter;} private String name;//用户名private String password;//密码private String username;//昵称private String address;//地址 public String getUsername() {return username;} public void setUsername(String username) {this.username = username;} public String getAddress() {return address;} public void setAddress(String address) {this.address = address;} public String getName() {return name;} public void setName(String name) {this.name = name;} public String getPassword() {return password;} public void setPassword(String password) {this.password = password;} public String addUser() {System.out.println("添加成功!");User user = new User();String name = this.name;String password = this.password;String username = this.username;String address = this.address;user.setName(name);user.setPassword(password);user.setUsername(username);user.setAddress(address);boolean b = userdaoServiceInter.insertUser(user);if (b==true) {return SUCCESS;} elsereturn INPUT;}public String loginUser(){System.out.println("登陆=======");String name = this.name;String password = this.password;User user = userdaoServiceInter.querybyname(name);if(user != null && password.equals(user.getPassword())){return SUCCESS;} else return ERROR; }}UserDao.java:
package com.broada.demo.dao; /** * @author smm */ import java.util.List; import com.broada.demo.entity.User; public interface UserDao {/** * 用户注册 * @param user * @return */public boolean insertUser(User user);/** * 根据用户名获取用户信息 * @param name * @return */public User queryByname(String name);}UserDaoImpl.java:
package com.broada.demo.daoImpl;/** * @author smm */import org.springframework.orm.ibatis.support.SqlMapClientDaoSupport; import com.broada.demo.dao.UserDao;import com.broada.demo.entity.User; public class UserDaoImpl extends SqlMapClientDaoSupport implements UserDao{ @Overridepublic boolean insertUser(User user) {try {getSqlMapClientTemplate().insert("insertUser", user);return true;} catch (Exception e) {e.printStackTrace();return false;}} @Overridepublic User queryByname(String name) {// TODO Auto-generated method stubtry {User user =(User) getSqlMapClientTemplate().queryForObject("selsectUser", name);return user;} catch (Exception e) {e.printStackTrace();return null;}}}UserDaoServiceInter.java:
package com.broada.demo.service; /** * @author smm */ import com.broada.demo.entity.User; public interface UserDaoServiceInter {/** * 用户注册服务接口 * @param user * @return */public boolean insertUser(User user);/** * 根据用户名获取用户信息接口 * @param name * @return */public User querybyname(String name);}UserDaoServiceImpl.java:
package com.broada.demo.serviceImpl; /** * @author smm */ import com.broada.demo.dao.UserDao;import com.broada.demo.entity.User;import com.broada.demo.service.UserDaoServiceInter; public class UserDaoServiceImpl implements UserDaoServiceInter { private UserDao userdao;public UserDao getUserdao() {return userdao;}public void setUserdao(UserDao userdao) {this.userdao = userdao;}@Overridepublic boolean insertUser(User user) {return userdao.insertUser(user);}@Overridepublic User querybyname(String name) {// TODO Auto-generated method stubreturn userdao.queryByname(name);} }Index.jsp:
<%@ page language="java" contentType="text/html; charset=utf8"pageEncoding="utf8"%><%@ taglib prefix="s" uri="/struts-tags"%><!DOCTYPE html PUBLIC "-//W3C//DTD HTML 4.01 Transitional//EN" "http://www.w3.org/TR/html4/loose.dtd"><html><head><meta http-equiv="Content-Type" content="text/html; charset=utf8"><link rel="stylesheet" type="text/css" href="css/ext-all.css" /><link rel="stylesheet" type="text/css"href="css/ext-theme-classic-all.css" /><script type="text/javascript" src="js/ext-all.js"></script><title>用户登陆</title><script type="text/javascript">Ext.onReady(function(){initPanel(); });initPanel=function(){ var formPanel = new Ext.FormPanel({id: "loginPanel",labelWidth: 75, frame:true,bodyStyle:"margin:0 auto",width: 350,defaults: {width: 250},defaultType: "textfield",items: [{id: "username",fieldLabel: "用户名",name:"name",allowBlank: false,blankText: "账号不能为空"},{id: "password", fieldLabel: "密 码",name:"password",inputType: "password",allowBlank: false,blankText: "密码不能为空"}] });var win = new Ext.Window({title:"登陆界面", width:380,autoHeight: "true",resizable: false,modal:true,closeAction: "hide",buttonAlign:"center",items:formPanel,buttons:[{text: "登陆",handler: function(){land();}},{text: "重置",handler: function(){Ext.getCmp("username").setValue("");Ext.getCmp("password").setValue("");}},{text: "注册",handler: function(){register();}}] }); win.show();};var win1;register = function(){var registerPanel = new Ext.FormPanel({id: "registerPanel",labelWidth: 75, frame:true,bodyStyle:"margin:0 auto",width: 350,defaults: {width: 250},defaultType: "textfield",items: [{id: "registername",fieldLabel: "用户名",name:"name1",allowBlank: false,blankText: "账号不能为空"},{id: "registerpassword", fieldLabel: "登陆密 码",name:"password1",inputType: "password",allowBlank: false,blankText: "密码不能为空"},{id: "registerpassword2", fieldLabel: "密码确认",name:"password2",inputType: "password",allowBlank: false,blankText: "密码不能为空"},{id: "nichen",fieldLabel: "昵称",name:"nichen1"},{id: "address",fieldLabel: "地址",name:"address1"}] });win1 = new Ext.Window({title:"注册界面", width:380,autoHeight: "true",resizable: false,modal:true,buttonAlign:"center",items:registerPanel,buttons:[{text: "提交",handler: function(){login();}},{text: "取消",handler: function(){win1.close();}}] }); win1.show();};login=function(){var name = Ext.getCmp("registername").getValue(); var password = Ext.getCmp("registerpassword").getValue();var password2 = Ext.getCmp("registerpassword2").getValue();var nichen = Ext.getCmp("nichen").getValue();var address = Ext.getCmp("address").getValue();if(name==" "|| password==" " || password2==""){Ext.MessageBox.alert("提示","账号或密码不能为空!");}else if(password != password2){Ext.MessageBox.alert("提示","两次密码输入不一致!");}else{ Ext.Ajax.request({ url: "<s:url value="/register.action"/>", method: "post",params:{name:name,password:password,username:nichen,address:address}, success: function (response, options) {Ext.MessageBox.alert("提示","注册成功",function(e){if(e == "ok"){win1.close();}}); }, failure: function (response, options) { Ext.MessageBox.alert("注册失败", "请检查您的注册信息!"); } });}};land=function(){var name = Ext.getCmp("username").getValue(); var password = Ext.getCmp("password").getValue();if(name == " " || password == ""){ Ext.MessageBox.alert("提示", "账号或密码不能为空!");}else{ Ext.Ajax.request({ url: "<s:url value="/login.action"/>", method: "post",params:{name:name,password:password}, success: function (response, options) {Ext.MessageBox.alert("提示","登陆成功!"); }, failure: function (response, options) { Ext.MessageBox.alert("登陆失败", "您输入的账号或密码错误!"); } });}};</script> </head><body></body></html>大致的步骤就是这样,个人觉得ssi的框架还是蛮不错的,起码定制和自由度都比较好。