Android CalendarView,DatePicker,TimePicker,以及NumberPicker的使用简单复习下基础UI组件,做个简单的总结,Android的这些组件封装的特别好,基本套上就能使用,当然,这个减轻了开发者的负担!不过如果想要深入研究,这里面还是有很大的空间值得深度分析!简单的几个例子!仅供参考:
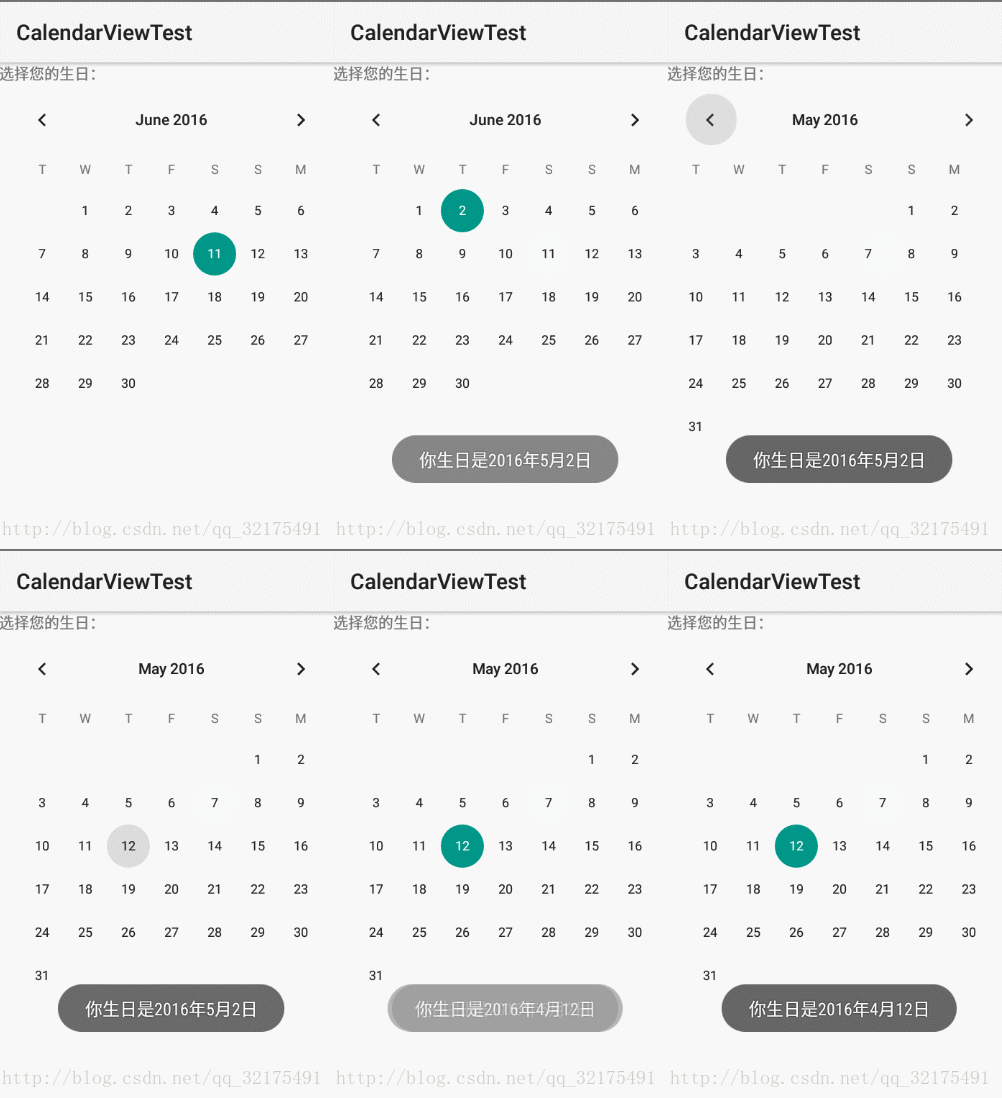
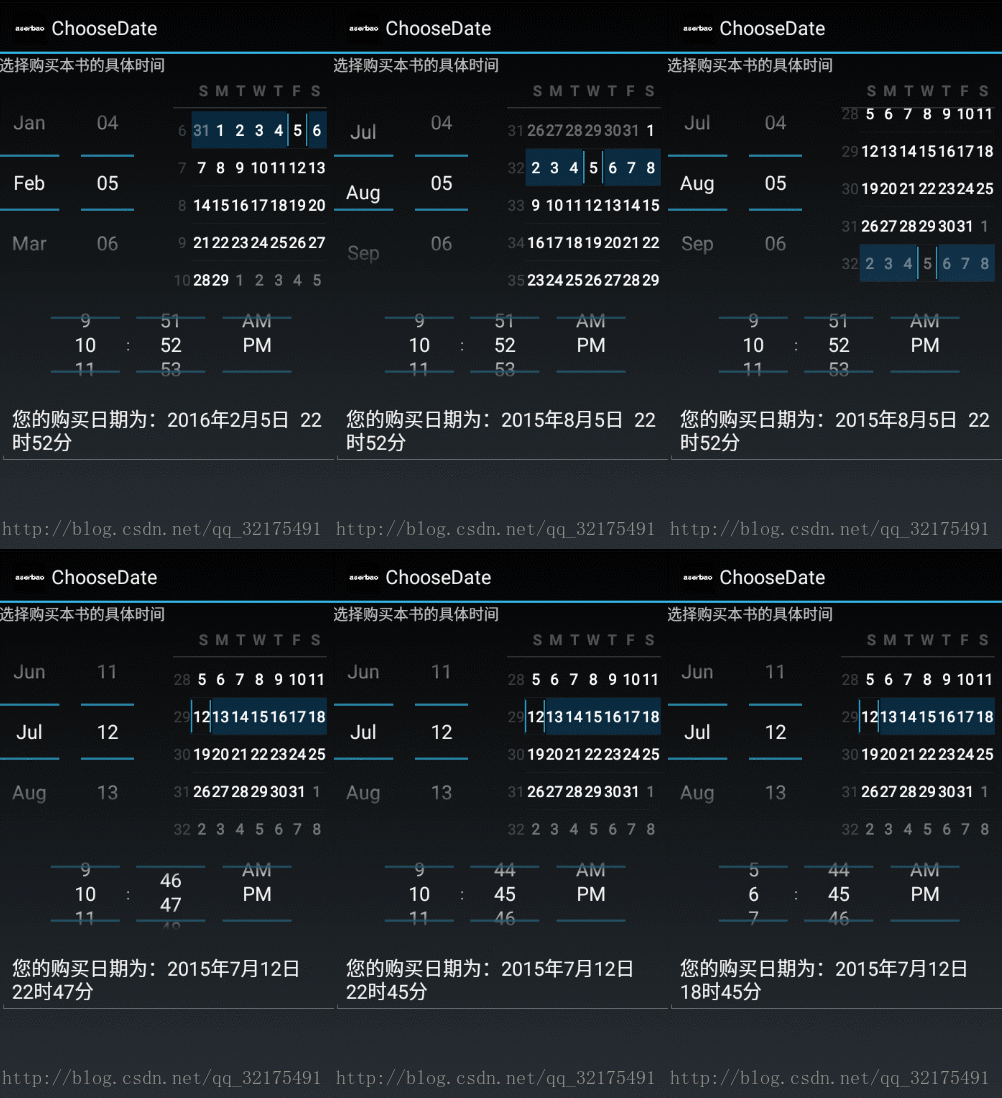
不多说,先上效果图:

CalendarView

ChooseView

NumberPicker
CalendarView代码区 :
main.xml代码区:CalendarView组件的使用加上一些简单的属性即可!
<LinearLayoutxmlns:android="http://schemas.android.com/apk/res/android"android:orientation="vertical"android:layout_width="match_parent"android:layout_height="match_parent"><TextViewandroid:layout_width="match_parent"android:layout_height="wrap_content"android:text="选择您的生日:"/><!-- 设置以星期二作为每周第一天设置该组件总共显示4个星期并对该组件的日期时间进行了定制 --><CalendarViewandroid:layout_width="match_parent"android:layout_height="match_parent"android:firstDayOfWeek="3"android:shownWeekCount="4"android:selectedWeekBackgroundColor="#aff"android:focusedMonthDateColor="#f00"android:weekSeparatorLineColor="#ff0"android:unfocusedMonthDateColor="#f9f"android:id="@+id/calendarView" /></LinearLayout>
Activity区代码:
public class MainActivity extends Activity{CalendarView cv;@Overrideprotected void onCreate(Bundle savedInstanceState){super.onCreate(savedInstanceState);setContentView(R.layout.main);cv = (CalendarView)findViewById(R.id.calendarView);// 为CalendarView组件的日期改变事件添加事件监听器cv.setOnDateChangeListener(new OnDateChangeListener(){@Overridepublic void onSelectedDayChange(CalendarView view, int year,int month, int dayOfMonth){// 使用Toast显示用户选择的日期Toast.makeText(MainActivity.this,"你生日是" + year + "年" + month + "月"+ dayOfMonth + "日",Toast.LENGTH_SHORT).show();}});}}DatePicker,TimePicker,结合Calerdar的使用,可以供用户选择日期时使用:
代码区:
main.xml代码:
<?xml version="1.0" encoding="utf-8"?><LinearLayout xmlns:android="http://schemas.android.com/apk/res/android"android:orientation="vertical"android:layout_width="match_parent"android:layout_height="match_parent"><TextViewandroid:layout_width="match_parent"android:layout_height="wrap_content"android:text="选择购买本书的具体时间"/><!-- 定义一个DatePicker组件 --><DatePicker android:id="@+id/datePicker"android:layout_width="wrap_content"android:layout_height="200dp"android:layout_gravity="center_horizontal"android:startYear="2000"android:endYear="2016"android:calendarViewShown="true"android:spinnersShown="true"/><!-- 定义一个TimePicker组件 --><TimePicker android:id="@+id/timePicker"android:layout_width="wrap_content"android:layout_height="100dp"android:layout_gravity="center_horizontal"/><!-- 显示用户输入日期、时间的控件 --><EditText android:id="@+id/show"android:layout_width="match_parent"android:layout_height="wrap_content"android:editable="false"android:cursorVisible="false"/></LinearLayout>
Activity代码:
public class MainActivity extends Activity{// 定义5个记录当前时间的变量private int year;private int month;private int day;private int hour;private int minute;@Overridepublic void onCreate(Bundle savedInstanceState){super.onCreate(savedInstanceState);setContentView(R.layout.main);DatePicker datePicker = (DatePicker)findViewById(R.id.datePicker);TimePicker timePicker = (TimePicker)findViewById(R.id.timePicker);// 获取当前的年、月、日、小时、分钟Calendar c = Calendar.getInstance();year = c.get(Calendar.YEAR);month = c.get(Calendar.MONTH);day = c.get(Calendar.DAY_OF_MONTH);hour = c.get(Calendar.HOUR);minute = c.get(Calendar.MINUTE);// 初始化DatePicker组件,初始化时指定监听器datePicker.init(year, month, day, new OnDateChangedListener(){@Overridepublic void onDateChanged(DatePicker arg0, int year, int month, int day){MainActivity.this.year = year;MainActivity.this.month = month;MainActivity.this.day = day;// 显示当前日期、时间showDate(year, month, day, hour, minute);}});timePicker.setEnabled(true);// 为TimePicker指定监听器timePicker.setOnTimeChangedListener(new OnTimeChangedListener(){@Overridepublic void onTimeChanged(TimePicker view, int hourOfDay, int minute){MainActivity.this.hour = hourOfDay;MainActivity.this.minute = minute;// 显示当前日期、时间showDate(year, month, day, hour, minute);}});}// 定义在EditText中显示当前日期、时间的方法private void showDate(int year, int month, int day, int hour, int minute){EditText show = (EditText) findViewById(R.id.show);show.setText("您的购买日期为:" + year + "年"+ (month + 1) + "月" + day + "日 "+ hour + "时" + minute + "分");}}NumberPicker主要使用在给用户提供数字选择时使用。
main.xml代码:
<TableLayoutxmlns:android="http://schemas.android.com/apk/res/android"android:layout_width="match_parent"android:layout_height="wrap_content"><TableRowandroid:layout_width="match_parent"android:layout_height="wrap_content"><TextViewandroid:text="选择低价:"android:layout_width="120dp"android:layout_height="wrap_content" /><NumberPickerandroid:id="@+id/np1"android:layout_width="match_parent"android:layout_height="80dp"android:focusable="true"android:focusableInTouchMode="true" /></TableRow><TableRowandroid:layout_width="match_parent"android:layout_height="wrap_content"><TextViewandroid:text="选择高价:"android:layout_width="120dp"android:layout_height="wrap_content" /><NumberPickerandroid:id="@+id/np2"android:layout_width="match_parent"android:layout_height="80dp"android:focusable="true"android:focusableInTouchMode="true" /></TableRow></TableLayout>
Activity代码:
public class MainActivity extends Activity{NumberPicker np1, np2;// 定义最低价格、最高价格的初始值int minPrice = 25, maxPrice = 75;@Overrideprotected void onCreate(Bundle savedInstanceState){super.onCreate(savedInstanceState);setContentView(R.layout.main);np1 = (NumberPicker) findViewById(R.id.np1);// 设置np1的最小值和最大值np1.setMinValue(10);np1.setMaxValue(50);// 设置np1的当前值np1.setValue(minPrice);np1.setOnValueChangedListener(new OnValueChangeListener(){// 当NumberPicker的值发生改变时,将会激发该方法@Overridepublic void onValueChange(NumberPicker picker,int oldVal, int newVal){minPrice = newVal;showSelectedPrice();}});np2 = (NumberPicker) findViewById(R.id.np2);// 设置np2的最小值和最大值np2.setMinValue(60);np2.setMaxValue(100);// 设置np2的当前值np2.setValue(maxPrice);np2.setOnValueChangedListener(new OnValueChangeListener(){// 当NumberPicker的值发生改变时,将会激发该方法@Overridepublic void onValueChange(NumberPicker picker, int oldVal, int newVal){maxPrice = newVal;showSelectedPrice();}});}private void showSelectedPrice(){Toast.makeText(this, "您选择最低价格为:" + minPrice+ ",最高价格为:" + maxPrice, Toast.LENGTH_SHORT).show();}} 感谢阅读,希望能帮助到大家,谢谢大家对本站的支持!


