第一步:找到ueditor.config.js文件中的toolbars数组,增加一个“hougelou”字符串,然后找到labelMap数组,对应着添加一个labelMap,用于鼠标移上按钮时的提示。
复制代码 代码如下:
//工具栏上的所有的功能按钮和下拉框,可以在new编辑器的实例时选择自己需要的从新定义
, toolbars:[
["fullscreen", "source", "|", "undo", "redo", "|",
"bold", "italic", "underline", "fontborder", "strikethrough", "superscript", "subscript", "removeformat", "formatmatch", "hougelou", "autotypeset", "blockquote", "pasteplain", "|", "forecolor", "backcolor", "insertorderedlist", "insertunorderedlist", "selectall", "cleardoc", "|",
"rowspacingtop", "rowspacingbottom", "lineheight", "|",
"customstyle", "paragraph", "fontfamily", "fontsize", "|",
"directionalityltr", "directionalityrtl", "indent", "|",
"justifyleft", "justifycenter", "justifyright", "justifyjustify", "|", "touppercase", "tolowercase", "|",
"link", "unlink", "anchor", "|", "imagenone", "imageleft", "imageright", "imagecenter", "|",
"insertimage", "emotion", "scrawl", "insertvideo", "music", "attachment", "map", "gmap", "insertframe","insertcode", "webapp", "pagebreak", "template", "background", "|",
"horizontal", "date", "time", "spechars", "snapscreen", "wordimage", "|",
"inserttable", "deletetable", "insertparagraphbeforetable", "insertrow", "deleterow", "insertcol", "deletecol", "mergecells", "mergeright", "mergedown", "splittocells", "splittorows", "splittocols", "|",
"print", "preview", "searchreplace", "help"]
]
//当鼠标放在工具栏上时显示的tooltip提示,留空支持自动多语言配置,否则以配置值为准
,labelMap:{
"hougelou": "hello,后阁楼"
}
第二步:找到你所引用的ueditor.all.js文件中的btnCmds数组,在其中同样增加一个“hougelou”字符串。
第三步:清空缓存刷新下页面吧!工具栏的对应位置是否出现了一个自己定义的按钮呢?如下图所示:
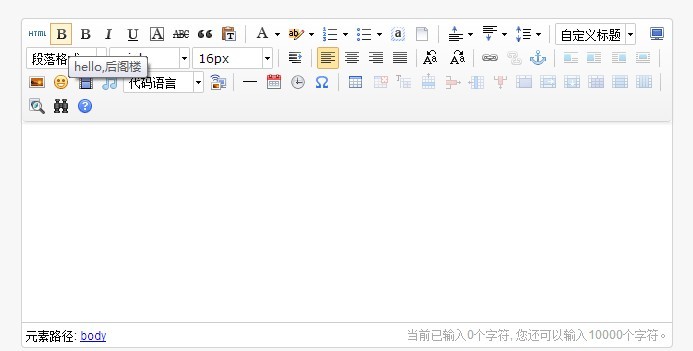
由于此时未设置对应按钮的图片样式,所以会显示默认的“B”字符。要想让其显示成自己需要的图标样式,接着按照下面的步骤动手吧。
第四步:找到themes/default/css/ueditor.css文件,增加一条样式定义:
复制代码 代码如下:
.edui-for-hougelou .edui-icon {
background-position: -700px -40px;
}
此处的样式定义了showmsg图标在UEditor默认的精灵Icon图片(themes/default/images/icons.png)中的位置偏移。如需更改成另外图标,只需添加图标到该图片文件中,然后设置偏移值即可。
第五步:到此为止,在UI层面已经完成了一个工具栏图标的显示和各种状态变化的逻辑,但是我们发现点击按钮之后毫无反应。那是必然的,我们还必须为该按钮绑定属于它自己的事件处理方法。
实质上,此时一个默认的事件处理方法已经被UEditor绑定到按钮上了,只不过由于我们还没有定义该方法的具体内容,所以点击之后无任何变化。
下面我们就来定义该方法的具体内容:
在初始化编辑器的时候,加上自己的事件处理(插入一张图片),如下代码:
复制代码 代码如下:
ueditor = UE.getEditor("txtContent", {
"initialFrameHeight": "200",
toolbars: [["fullscreen", "source", "hougelou", "bold", "italic", "underline", "fontborder", "strikethrough", "blockquote", "pasteplain", "|", "forecolor", "backcolor", "insertorderedlist", "insertunorderedlist", "selectall", "cleardoc", "|", "rowspacingtop", "rowspacingbottom", "lineheight", "|", "customstyle", "paragraph", "fontfamily", "fontsize", "|", "indent", "|", "justifyleft", "justifycenter", "justifyright", "justifyjustify", "|", "touppercase", "tolowercase", "|", "link", "unlink", "anchor", "|", "imagenone", "imageleft", "imageright", "imagecenter", "|", "insertimage", "emotion", "insertvideo", "music", "insertcode", "background", "|", "horizontal", "date", "time", "spechars", "|", "inserttable", "deletetable", "insertparagraphbeforetable", "insertrow", "deleterow", "insertcol", "deletecol", "mergecells", "mergeright", "mergedown", "splittocells", "splittorows", "splittocols", "|", "preview", "searchreplace", "help"]],
enterTag: " "
}); //回车的时候用换行不用段落标签
//实现插件的功能代码
baidu.editor.commands["hougelou"] = { execCommand: function() { this.execCommand("insertHtml", "<img src="http://www.xxx.com/images/logo.png" />"); return true; }, queryCommandState: function() { } };
End
-------------------------------------------------------------------------------
在images.ashx里发现百度编辑器返回图片路径是用分隔符“ue_separate_ue”连起来的。