<div ng-controller="CounterCtrl"><span ng-bind="counter"></span><button ng-click="counter++">increase</button></div>function CounterCtrl($scope) {$scope.counter = 1;}这个例子很简单,每当点击一次按钮,界面上的数字就增加一。Search: <input ng-model="query">Sort by:<select ng-model="orderProp"> <option value="name">Alphabetical</option> <option value="age">Newest</option></select><ul class="phones"> <li ng-repeat="phone in phones | filter:query | orderBy:orderProp">{{phone.name}}<p>{{phone.snippet}}</p> </li></ul>在index.html中做了如下更改:
然后,在filter过滤器后面添加一个orderBy过滤器用其来处理进入迭代器的数据。orderBy过滤器以一个数组作为输入,复制一份副本,然后把副本重排序再输出到迭代器。
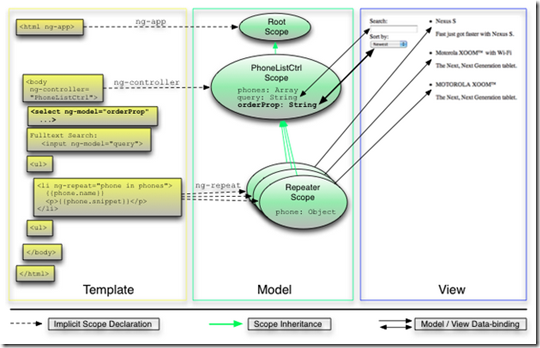
AngularJS在select元素和orderProp模型之间创建了一个双向绑定。而后,orderProp会被用作orderBy过滤器的输入。
什么时候数据模型发生了改变(比如用户在下拉菜单中选了不同的顺序),AngularJS的数据绑定会让视图自动更新。没有任何笨拙的DOM操作。
控制器(app/js/controllers.js)
function PhoneListCtrl($scope) { $scope.phones = [{"name": "Nexus S", "snippet": "Fast just got faster with Nexus S.", "age": 0},{"name": "Motorola XOOM™ with Wi-Fi", "snippet": "The Next, Next Generation tablet.", "age": 1},{"name": "MOTOROLA XOOM™", "snippet": "The Next, Next Generation tablet.", "age": 2} ]; $scope.orderProp = "age";}修改了phones模型—— 手机的数组 ——为每一个手机记录其增加了一个age属性。根据age属性来对手机进行排序。function DataBinder( object_id ) { // Use a jQuery object as simple PubSub var pubSub = jQuery({});// We expect a `data` element specifying the binding // in the form: data-bind-<object_id>="<property_name>" var data_attr = "bind-" + object_id, message = object_id + ":change";// Listen to change events on elements with the data-binding attribute and proxy // them to the PubSub, so that the change is "broadcasted" to all connected objects jQuery( document ).on( "change", "[data-" + data_attr + "]", function( evt ) {var $input = jQuery( this ); pubSub.trigger( message, [ $input.data( data_attr ), $input.val() ] ); });// PubSub propagates changes to all bound elements, setting value of // input tags or HTML content of other tags pubSub.on( message, function( evt, prop_name, new_val ) {jQuery( "[data-" + data_attr + "=" + prop_name + "]" ).each( function() { var $bound = jQuery( this );if ( $bound.is("input, textarea, select") ) {$bound.val( new_val ); } else {$bound.html( new_val ); }}); });return pubSub;}对于上面这个实现来说,下面是一个User模型的最简单的实现方法:function User( uid ) { var binder = new DataBinder( uid ),user = {attributes: {}, // The attribute setter publish changes using the DataBinder PubSubset: function( attr_name, val ) { this.attributes[ attr_name ] = val; binder.trigger( uid + ":change", [ attr_name, val, this ] );}, get: function( attr_name ) { return this.attributes[ attr_name ];}, _binder: binder };// Subscribe to the PubSub binder.on( uid + ":change", function( evt, attr_name, new_val, initiator ) {if ( initiator !== user ) { user.set( attr_name, new_val );} });return user;}现在我们如果想要将User模型属性绑定到UI上,我们只需要将适合的数据特性绑定到对应的HTML元素上。// javascriptvar user = new User( 123 );user.set( "name", "Wolfgang" ); // html<input type="number" data-bind-123="name" />这样输入值会自动映射到user对象的name属性,反之亦然。到此这个简单实现就完成了。
app.controller("MainCtrl", function() { $scope.name = "Foo"; $scope.changeFoo = function() { $scope.name = "Bar"; }});{{ name }}<button ng-click="changeFoo()">Change the name</button>这里我们有一个$watch因为ng-click不生成$watch(函数是不会变的)。test/scope_spec.js -------/* jshint globalstrict: true *//* global Scope: false */"use strict";describe("Scope", function() {it("can be constructed and used as an object", function() { var scope = new Scope();scope.aProperty = 1;expect(scope.aProperty).toBe(1); });});这个测试用来创建一个Scope,并在它上面赋一个任意值。我们可以轻松的让这个测试通过:创建src/scope.js文件然后在其中添加以下内容:------/* jshint globalstrict: true */"use strict"; function Scope() {}在这个测试中,我们将一个属性(aProperty)赋值给了这个scope。这正是Scope上的属性运行的方式。它们就是正常的JavaScript属性,并没有什么特别之处。这里你完全不需要去调用一个特别的setter,也不需要对你赋值的类型进行什么限制。真正的魔法在于两个特别的函数:watch和digest。我们现在就来看看这两个函数。------ describe("Scope", function() {it("can be constructed and used as an object", function() { var scope = new Scope();scope.aProperty = 1;expect(scope.aProperty).toBe(1); });describe("digest", function() {var scope;beforeEach(function() { scope = new Scope();});it("calls the listener function of a watch on first $digest", function() { var watchFn = function() { return "wat"; };var listenerFn = jasmine.createSpy();scope.$watch(watchFn, listenerFn); scope.$digest(); expect(listenerFn).toHaveBeenCalled();}); });});在上面的这个测试中我们调用了watch来在这个scope上注册一个监视器。我们现在对于监视函数本身并没有什么兴趣,因此我们随便提供了一个函数来返回一个常数值。作为监听函数,我们提供了一个JasmineSpy。接着我们调用了digest并检查这个监听器是否真正被调用。-----function Scope(){this.$$watchers = [];}上面代码中的$$前缀在AngularJS框架中被认为是私有变量,它们不应该在应用的外部被调用。src/scope.js-----Scope.prototype.$watch = function(watchFn, listenerFn) { var watcher = {watchFn: watchFn,listenerFn: listenerFn };this.$$watchers.unshift(watcher); };最后我们应该有一个digest函数。现在,我们来定义一个digest函数的简化版本,它仅仅只是会迭代所有的注册监视器并调用它们的监听函数:----Scope.prototype.$$digestOnce = function(){var length = this.$$watchers.length;var watcher, newValue, oldValue, dirty;while(length--){watcher = this.$$watchers[length];newValue = watcher.watchFn(this);oldValue= watcher.last;if(newValue !== oldValue){watcher.last == newValue;watcher.listenerFn(newValue, oldValue, this);dirty = true;}} return dirty;};接着,我们重定义digest以便它能够运行“外循环”,在变化发生时调用$digestOnce:-----Scope.prototype.$digest = function(){var dirty;do {dirty = this.$$digestOnce();} while (dirty);};以上就是Angular数据双向绑定的相关介绍,希望对大家的学习有所帮助。