(1)首先是页面的结构部分
对于我这种左右切换式
1.首先是个外围部分(其实也就是最外边的整体wrapper)
2.接着就是你设置图片轮播的地方(也就是一个banner吧)
3.然后是一个图片组(可以用新的div 也可以直接使用 ul-->li形式)
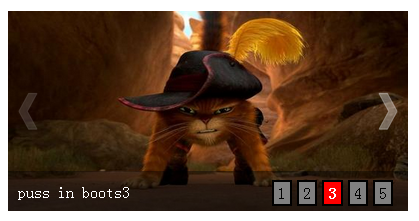
4.然后是图片两端的左箭头和右箭头
5.然后是一个透明背景层,放在图片底部
6.然后是一个图片描述info层,放在透明背景层的左下角(div 或 ul-->li)
7.然后是一个按钮层,用来定位图片组的index吧,放在透明背景层的右下角(div 或 ul-->li)
由此,可以先构造出html结构
<div id="wrapper"><!-- 最外层部分 --><div id="banner"><!-- 轮播部分 --><ul class="imgList"><!-- 图片部分 --><li><a href="#"><img src="./img/test1.jpg" width="400px" height="200px" alt="puss in boots1"></a></li><li><a href="#"><img src="./img/test2.jpg" width="400px" height="200px" alt="puss in boots2"></a></li><li><a href="#"><img src="./img/test3.jpg" width="400px" height="200px" alt="puss in boots3"></a></li><li><a href="#"><img src="./img/test4.jpg" width="400px" height="200px" alt="puss in boots4"></a></li><li><a href="#"><img src="./img/test5.jpg" width="400px" height="200px" alt="puss in boots5"></a></li></ul><img src="./img/prev.png" width="20px" height="40px" id="prev"><img src="./img/next.png" width="20px" height="40px" id="next"><div class="bg"></div> <!-- 图片底部背景层部分--><ul class="infoList"><!-- 图片左下角文字信息部分 --><li class="infoOn">puss in boots1</li><li>puss in boots2</li><li>puss in boots3</li><li>puss in boots4</li><li>puss in boots5</li></ul><ul class="indexList"><!-- 图片右下角序号部分 --><li class="indexOn">1</li><li>2</li><li>3</li><li>4</li><li>5</li></ul></div></div>相对于之前,知识增多了两个箭头img标签
<style type="text/css">body,div,ul,li,a,img{margin: 0;padding: 0;}ul,li{list-style: none;}a{text-decoration: none;}#wrapper{position: relative;margin: 30px auto;width: 400px;height: 200px;}#banner{position:relative;width: 400px;height: 200px;overflow: hidden;}.imgList{position:relative;width:2000px;height:200px;z-index: 10;overflow: hidden;}.imgList li{float:left;display: inline;}#prev,#next{position: absolute;top:80px;z-index: 20;cursor: pointer;opacity: 0.2;filter:alpha(opacity=20);}#prev{left: 10px;}#next{right: 10px;}#prev:hover,#next:hover{opacity: 0.5;filter:alpha(opacity=50);}.bg{position: absolute;bottom: 0;width: 400px;height: 40px;z-index:20;opacity: 0.4;filter:alpha(opacity=40);background: black;}.infoList{position: absolute;left: 10px;bottom: 10px;z-index: 30;}.infoList li{display: none;}.infoList .infoOn{display: inline;color: white;}.indexList{position: absolute;right: 10px;bottom: 5px;z-index: 30;}.indexList li{float: left;margin-right: 5px;padding: 2px 4px;border: 2px solid black;background: grey;cursor: pointer;}.indexList .indexOn{background: red;font-weight: bold;color: white;}</style>(3)页面基本已经构建好久可以进行js的处理了var curIndex = 0, //当前indeximgLen = $(".imgList li").length; //图片总数2.自动切换定时器处理
// 定时器自动变换2.5秒每次var autoChange = setInterval(function(){ if(curIndex < imgLen-1){ curIndex ++; }else{ curIndex = 0;}//调用变换处理函数changeTo(curIndex); },2500);3.为左右箭头添加事件处理//左箭头滑入滑出事件处理$("#prev").hover(function(){ //滑入清除定时器clearInterval(autoChange);},function(){ //滑出则重置定时器autoChangeAgain();});//左箭头点击处理$("#prev").click(function(){ //根据curIndex进行上一个图片处理curIndex = (curIndex > 0) ? (--curIndex) : (imgLen - 1);changeTo(curIndex);});右箭头 //右箭头滑入滑出事件处理$("#next").hover(function(){ //滑入清除定时器clearInterval(autoChange);},function(){ //滑出则重置定时器autoChangeAgain();});//右箭头点击处理$("#next").click(function(){ curIndex = (curIndex < imgLen - 1) ? (++curIndex) : 0;changeTo(curIndex);});其中autoChangeAgain()就是一个重置定时器函数//清除定时器时候的重置定时器--封装function autoChangeAgain(){ autoChange = setInterval(function(){ if(curIndex < imgLen-1){ curIndex ++;}else{ curIndex = 0;}//调用变换处理函数changeTo(curIndex); },2500);}其中changeTo()就是一个图片切换的处理函数function changeTo(num){ var goLeft = num * 400;$(".imgList").animate({left: "-" + goLeft + "px"},500);$(".infoList").find("li").removeClass("infoOn").eq(num).addClass("infoOn");$(".indexList").find("li").removeClass("indexOn").eq(num).addClass("indexOn");}每传入一个图片序号,则按理进行goLeft//对右下角按钮index进行事件绑定处理等$(".indexList").find("li").each(function(item){ $(this).hover(function(){ clearInterval(autoChange);changeTo(item);curIndex = item;},function(){ autoChangeAgain();});});jq就是这样,简便,原生代码量就有些多了<!DOCTYPE html PUBLIC "-//W3C//DTD XHTML 1.0 Transitional//EN" "http://www.w3.org/TR/xhtml1/DTD/xhtml1-transitional.dtd"><html xmlns="http://www.w3.org/1999/xhtml"><head><meta http-equiv="Content-Type" content="text/html; charset=utf-8" /><title>图片轮播 jq(左右切换)</title><style type="text/css">body,div,ul,li,a,img{margin: 0;padding: 0;}ul,li{list-style: none;}a{text-decoration: none;}#wrapper{position: relative;margin: 30px auto;width: 400px;height: 200px;}#banner{position:relative;width: 400px;height: 200px;overflow: hidden;}.imgList{position:relative;width:2000px;height:200px;z-index: 10;overflow: hidden;}.imgList li{float:left;display: inline;}#prev,#next{position: absolute;top:80px;z-index: 20;cursor: pointer;opacity: 0.2;filter:alpha(opacity=20);}#prev{left: 10px;}#next{right: 10px;}#prev:hover,#next:hover{opacity: 0.5;filter:alpha(opacity=50);}.bg{position: absolute;bottom: 0;width: 400px;height: 40px;z-index:20;opacity: 0.4;filter:alpha(opacity=40);background: black;}.infoList{position: absolute;left: 10px;bottom: 10px;z-index: 30;}.infoList li{display: none;}.infoList .infoOn{display: inline;color: white;}.indexList{position: absolute;right: 10px;bottom: 5px;z-index: 30;}.indexList li{float: left;margin-right: 5px;padding: 2px 4px;border: 2px solid black;background: grey;cursor: pointer;}.indexList .indexOn{background: red;font-weight: bold;color: white;}</style></head><body><div id="wrapper"><!-- 最外层部分 --><div id="banner"><!-- 轮播部分 --><ul class="imgList"><!-- 图片部分 --><li><a href="#"><img src="./img/test1.jpg" width="400px" height="200px" alt="puss in boots1"></a></li><li><a href="#"><img src="./img/test2.jpg" width="400px" height="200px" alt="puss in boots2"></a></li><li><a href="#"><img src="./img/test3.jpg" width="400px" height="200px" alt="puss in boots3"></a></li><li><a href="#"><img src="./img/test4.jpg" width="400px" height="200px" alt="puss in boots4"></a></li><li><a href="#"><img src="./img/test5.jpg" width="400px" height="200px" alt="puss in boots5"></a></li></ul><img src="./img/prev.png" width="20px" height="40px" id="prev"><img src="./img/next.png" width="20px" height="40px" id="next"><div class="bg"></div> <!-- 图片底部背景层部分--><ul class="infoList"><!-- 图片左下角文字信息部分 --><li class="infoOn">puss in boots1</li><li>puss in boots2</li><li>puss in boots3</li><li>puss in boots4</li><li>puss in boots5</li></ul><ul class="indexList"><!-- 图片右下角序号部分 --><li class="indexOn">1</li><li>2</li><li>3</li><li>4</li><li>5</li></ul></div></div><script type="text/javascript" src="./js/jquery.min.js"></script><script type="text/javascript">var curIndex = 0, //当前indeximgLen = $(".imgList li").length; //图片总数 // 定时器自动变换2.5秒每次var autoChange = setInterval(function(){ if(curIndex < imgLen-1){ curIndex ++; }else{ curIndex = 0;}//调用变换处理函数changeTo(curIndex); },2500); //左箭头滑入滑出事件处理$("#prev").hover(function(){ //滑入清除定时器clearInterval(autoChange);},function(){ //滑出则重置定时器autoChangeAgain();});//左箭头点击处理$("#prev").click(function(){ //根据curIndex进行上一个图片处理curIndex = (curIndex > 0) ? (--curIndex) : (imgLen - 1);changeTo(curIndex);});//右箭头滑入滑出事件处理$("#next").hover(function(){ //滑入清除定时器clearInterval(autoChange);},function(){ //滑出则重置定时器autoChangeAgain();});//右箭头点击处理$("#next").click(function(){ curIndex = (curIndex < imgLen - 1) ? (++curIndex) : 0;changeTo(curIndex);});//对右下角按钮index进行事件绑定处理等$(".indexList").find("li").each(function(item){ $(this).hover(function(){ clearInterval(autoChange);changeTo(item);curIndex = item;},function(){ autoChangeAgain();});});//清除定时器时候的重置定时器--封装function autoChangeAgain(){ autoChange = setInterval(function(){ if(curIndex < imgLen-1){ curIndex ++;}else{ curIndex = 0;}//调用变换处理函数changeTo(curIndex); },2500);}function changeTo(num){ var goLeft = num * 400;$(".imgList").animate({left: "-" + goLeft + "px"},500);$(".infoList").find("li").removeClass("infoOn").eq(num).addClass("infoOn");$(".indexList").find("li").removeClass("indexOn").eq(num).addClass("indexOn");}</script></body></html>二、js 原生实现var curIndex = 0, //当前indeximgArr = getElementsByClassName("imgList")[0].getElementsByTagName("li"), //获取图片组imgLen = imgArr.length,infoArr = getElementsByClassName("infoList")[0].getElementsByTagName("li"), //获取图片info组indexArr = getElementsByClassName("indexList")[0].getElementsByTagName("li"); //获取控制index组2.自动切换定时器处理
// 定时器自动变换2.5秒每次var autoChange = setInterval(function(){ if(curIndex < imgLen -1){ curIndex ++; }else{ curIndex = 0;}//调用变换处理函数changeTo(curIndex); },2500);同样的,有一个重置定时器的函数 //清除定时器时候的重置定时器--封装function autoChangeAgain(){ autoChange = setInterval(function(){ if(curIndex < imgLen -1){ curIndex ++;}else{ curIndex = 0;}//调用变换处理函数changeTo(curIndex); },2500);}3.因为有一些class呀,所以来几个class函数的模拟也是需要的 //通过class获取节点function getElementsByClassName(className){ var classArr = [];var tags = document.getElementsByTagName("*");for(var item in tags){ if(tags[item].nodeType == 1){ if(tags[item].getAttribute("class") == className){ classArr.push(tags[item]);}}}return classArr; //返回}// 判断obj是否有此classfunction hasClass(obj,cls){//class位于单词边界return obj.className.match(new RegExp("(\s|^)" + cls + "(\s|$)")); } //给 obj添加classfunction addClass(obj,cls){ if(!this.hasClass(obj,cls)){obj.className += cls;}}//移除obj对应的classfunction removeClass(obj,cls){ if(hasClass(obj,cls)){ var reg = new RegExp("(\s|^)" + cls + "(\s|$)"); obj.className = obj.className.replace(reg,"");}}4.要左右切换,就得模拟jq的animate-->left . //图片组相对原始左移dist px距离function goLeft(elem,dist){ if(dist == 400){ //第一次时设置left为0px 或者直接使用内嵌法 style="left:0;"elem.style.left = "0px";}var toLeft; //判断图片移动方向是否为左dist = dist + parseInt(elem.style.left); //图片组相对当前移动距离if(dist<0){toLeft = false;dist = Math.abs(dist);}else{ toLeft = true;}for(var i=0;i<= dist/20;i++){ //这里设定缓慢移动,10阶每阶40px(function(_i){ var pos = parseInt(elem.style.left); //获取当前leftsetTimeout(function(){ pos += (toLeft)? -(_i * 20) : (_i * 20); //根据toLeft值指定图片组位置改变//console.log(pos);elem.style.left = pos + "px";},_i * 25); //每阶间隔50毫秒})(i);}}上头也看到了,我初始了left的值为0px//左右切换处理函数function changeTo(num){ //设置imagevar imgList = getElementsByClassName("imgList")[0];goLeft(imgList,num*400); //左移一定距离//设置image 的 infovar curInfo = getElementsByClassName("infoOn")[0];removeClass(curInfo,"infoOn");addClass(infoArr[num],"infoOn");//设置image的控制下标 indexvar _curIndex = getElementsByClassName("indexOn")[0];removeClass(_curIndex,"indexOn");addClass(indexArr[num],"indexOn");}6.然后再给左右箭头还有右下角那堆index绑定事件处理 //给左右箭头和右下角的图片index添加事件处理 function addEvent(){for(var i=0;i<imgLen;i++){ //闭包防止作用域内活动对象item的影响(function(_i){ //鼠标滑过则清除定时器,并作变换处理indexArr[_i].onmouseover = function(){ clearTimeout(autoChange);changeTo(_i);curIndex = _i;};//鼠标滑出则重置定时器处理indexArr[_i].onmouseout = function(){ autoChangeAgain();}; })(i);}//给左箭头prev添加上一个事件var prev = document.getElementById("prev");prev.onmouseover = function(){ //滑入清除定时器clearInterval(autoChange);};prev.onclick = function(){ //根据curIndex进行上一个图片处理curIndex = (curIndex > 0) ? (--curIndex) : (imgLen - 1);changeTo(curIndex);};prev.onmouseout = function(){ //滑出则重置定时器autoChangeAgain();}; //给右箭头next添加下一个事件var next = document.getElementById("next");next.onmouseover = function(){ clearInterval(autoChange);};next.onclick = function(){ curIndex = (curIndex < imgLen - 1) ? (++curIndex) : 0;changeTo(curIndex);};next.onmouseout = function(){ autoChangeAgain();};}7.最后的最后,没啥了. 噢好像还要调用一下下那个 addEvent() ..<!DOCTYPE html PUBLIC "-//W3C//DTD XHTML 1.0 Transitional//EN" "http://www.w3.org/TR/xhtml1/DTD/xhtml1-transitional.dtd"><html xmlns="http://www.w3.org/1999/xhtml"><head><meta http-equiv="Content-Type" content="text/html; charset=utf-8" /><title>图片轮播 js原生(左右切换)</title><style type="text/css">body,div,ul,li,a,img{margin: 0;padding: 0;}ul,li{list-style: none;}a{text-decoration: none;}#wrapper{position: relative;margin: 30px auto;width: 400px;height: 200px;}#banner{position:relative;width: 400px;height: 200px;overflow: hidden;}.imgList{position:relative;width:2000px;height:200px;z-index: 10;overflow: hidden;}.imgList li{float:left;display: inline;}#prev,#next{position: absolute;top:80px;z-index: 20;cursor: pointer;opacity: 0.2;filter:alpha(opacity=20);}#prev{left: 10px;}#next{right: 10px;}#prev:hover,#next:hover{opacity: 0.5;filter:alpha(opacity=50);}.bg{position: absolute;bottom: 0;width: 400px;height: 40px;z-index:20;opacity: 0.4;filter:alpha(opacity=40);background: black;}.infoList{position: absolute;left: 10px;bottom: 10px;z-index: 30;}.infoList li{display: none;}.infoList .infoOn{display: inline;color: white;}.indexList{position: absolute;right: 10px;bottom: 5px;z-index: 30;}.indexList li{float: left;margin-right: 5px;padding: 2px 4px;border: 2px solid black;background: grey;cursor: pointer;}.indexList .indexOn{background: red;font-weight: bold;color: white;}</style></head><body><div id="wrapper"><!-- 最外层部分 --><div id="banner"><!-- 轮播部分 --><ul class="imgList"><!-- 图片部分 --><li><a href="#"><img src="./img/test1.jpg" width="400px" height="200px" alt="puss in boots1"></a></li><li><a href="#"><img src="./img/test2.jpg" width="400px" height="200px" alt="puss in boots2"></a></li><li><a href="#"><img src="./img/test3.jpg" width="400px" height="200px" alt="puss in boots3"></a></li><li><a href="#"><img src="./img/test4.jpg" width="400px" height="200px" alt="puss in boots4"></a></li><li><a href="#"><img src="./img/test5.jpg" width="400px" height="200px" alt="puss in boots5"></a></li></ul><img src="./img/prev.png" width="20px" height="40px" id="prev"><img src="./img/next.png" width="20px" height="40px" id="next"><div class="bg"></div> <!-- 图片底部背景层部分--><ul class="infoList"><!-- 图片左下角文字信息部分 --><li class="infoOn">puss in boots1</li><li>puss in boots2</li><li>puss in boots3</li><li>puss in boots4</li><li>puss in boots5</li></ul><ul class="indexList"><!-- 图片右下角序号部分 --><li class="indexOn">1</li><li>2</li><li>3</li><li>4</li><li>5</li></ul></div></div><script type="text/javascript">var curIndex = 0, //当前indeximgArr = getElementsByClassName("imgList")[0].getElementsByTagName("li"), //获取图片组imgLen = imgArr.length,infoArr = getElementsByClassName("infoList")[0].getElementsByTagName("li"), //获取图片info组indexArr = getElementsByClassName("indexList")[0].getElementsByTagName("li"); //获取控制index组 // 定时器自动变换2.5秒每次var autoChange = setInterval(function(){ if(curIndex < imgLen -1){ curIndex ++; }else{ curIndex = 0;}//调用变换处理函数changeTo(curIndex); },2500);//清除定时器时候的重置定时器--封装function autoChangeAgain(){ autoChange = setInterval(function(){ if(curIndex < imgLen -1){ curIndex ++;}else{ curIndex = 0;}//调用变换处理函数changeTo(curIndex); },2500);}//调用添加事件处理addEvent();//给左右箭头和右下角的图片index添加事件处理 function addEvent(){for(var i=0;i<imgLen;i++){ //闭包防止作用域内活动对象item的影响(function(_i){ //鼠标滑过则清除定时器,并作变换处理indexArr[_i].onmouseover = function(){ clearTimeout(autoChange);changeTo(_i);curIndex = _i;};//鼠标滑出则重置定时器处理indexArr[_i].onmouseout = function(){ autoChangeAgain();}; })(i);}//给左箭头prev添加上一个事件var prev = document.getElementById("prev");prev.onmouseover = function(){ //滑入清除定时器clearInterval(autoChange);};prev.onclick = function(){ //根据curIndex进行上一个图片处理curIndex = (curIndex > 0) ? (--curIndex) : (imgLen - 1);changeTo(curIndex);};prev.onmouseout = function(){ //滑出则重置定时器autoChangeAgain();}; //给右箭头next添加下一个事件var next = document.getElementById("next");next.onmouseover = function(){ clearInterval(autoChange);};next.onclick = function(){ curIndex = (curIndex < imgLen - 1) ? (++curIndex) : 0;changeTo(curIndex);};next.onmouseout = function(){ autoChangeAgain();};}//左右切换处理函数function changeTo(num){ //设置imagevar imgList = getElementsByClassName("imgList")[0];goLeft(imgList,num*400); //左移一定距离//设置image 的 infovar curInfo = getElementsByClassName("infoOn")[0];removeClass(curInfo,"infoOn");addClass(infoArr[num],"infoOn");//设置image的控制下标 indexvar _curIndex = getElementsByClassName("indexOn")[0];removeClass(_curIndex,"indexOn");addClass(indexArr[num],"indexOn");}//图片组相对原始左移dist px距离function goLeft(elem,dist){ if(dist == 400){ //第一次时设置left为0px 或者直接使用内嵌法 style="left:0;"elem.style.left = "0px";}var toLeft; //判断图片移动方向是否为左dist = dist + parseInt(elem.style.left); //图片组相对当前移动距离if(dist<0){toLeft = false;dist = Math.abs(dist);}else{ toLeft = true;}for(var i=0;i<= dist/20;i++){ //这里设定缓慢移动,10阶每阶40px(function(_i){ var pos = parseInt(elem.style.left); //获取当前leftsetTimeout(function(){ pos += (toLeft)? -(_i * 20) : (_i * 20); //根据toLeft值指定图片组位置改变//console.log(pos);elem.style.left = pos + "px";},_i * 25); //每阶间隔50毫秒})(i);}}//通过class获取节点function getElementsByClassName(className){ var classArr = [];var tags = document.getElementsByTagName("*");for(var item in tags){ if(tags[item].nodeType == 1){ if(tags[item].getAttribute("class") == className){ classArr.push(tags[item]);}}}return classArr; //返回}// 判断obj是否有此classfunction hasClass(obj,cls){//class位于单词边界return obj.className.match(new RegExp("(\s|^)" + cls + "(\s|$)")); } //给 obj添加classfunction addClass(obj,cls){ if(!this.hasClass(obj,cls)){obj.className += cls;}}//移除obj对应的classfunction removeClass(obj,cls){ if(hasClass(obj,cls)){ var reg = new RegExp("(\s|^)" + cls + "(\s|$)"); obj.className = obj.className.replace(reg,"");}}</script></body></html>以上所述就是本文的全部内容了,希望大家能够喜欢。