
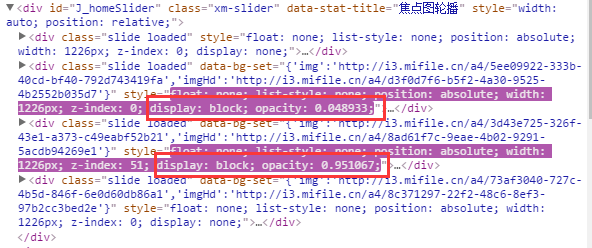
通过前端神器chrom的F12观察小米官网的html代码,不难看到他们使用5个div包裹图片并使用了定位通过z-index来控制div层级,通过控制每个div的opacity属性和display属性进行元素的显示、隐藏。
截图如下(红框内的opacity属性):
好的,实现的手段知道了,那么页面布局先搞出来。
<!DOCTYPE HTML PUBLIC "-//W3C//DTD HTML 4.01 Transitional//EN""http://www.w3.org/TR/html4/loose.dtd"><html><head> <meta http-equiv="Content-Type" content="text/html; charset=UTF-8"/> <title>Mking_js_</title> <script type="text/javascript" src="js/moveopacity_1.js"></script> <style type="text/css">#warp{ width:800px; height: 400px; margin: 20px auto;position: relative;}#imgWarp{ width:600px; height: 400px; position: absolute; top:0; left: 100px; display: inline-block;}.btn:hover{cursor: pointer;}.btn{line-height: 30px; text-align: center;font-size: 25px; font-weight: bold; color: #fff;width:80px; height: 30px;top:185px;background: #5f7c8a;position: absolute; border-radius: 3px;}.btn:nth-of-type(1){left: 0; }.btn:nth-of-type(2) { right: 0; }img{ position: absolute; width:600px; height: 400px; background-size:contain; opacity: 0; display: none; z-index: 0;}img:nth-of-type(1) {opacity: 1;display: block; z-index:5;}.links{ width:300px; height: 30px; position: absolute; right:100px; bottom: 10px; z-index: 10; }em{font-style: normal; display: inline-block; height: 30px; width: 30px; margin-right: 15px; border: 1px solid #000000; vertical-align: top; line-height: 30px; font-size: 20px; text-align: center;color: #fff; font-weight: bold; border-radius: 50%; background-color: #008000; border-color: #c0c0c0; box-sizing: border-box;} em.active{background-color: #fff;color: #000000; } </style></head><body> <div id="warp"><div id="imgWarp" > <img id="img1" src="product/1.jpg" TITLE="img1" /> <img id="img2" src="product/2.jpg" TITLE="img2"/> <img id="img3" src="product/3.jpg" TITLE="img3"/> <img id="img4" src="product/4.jpg" TITLE="img4"/> <img id="img5" src="product/5.jpg" TITLE="img5" /> </div><span class="btn" id="left">left</span><span class="btn" id="right">right</span><div class="links"> <em class="active"></em> <em></em> <em></em> <em></em> <em></em></div> </div></body></html>结构已经有了下面就是添加js让它动起来。window.onload = function(){var oLeft = document.getElementById("left");var oRight = document.getElementById("right");var oWarp = document.getElementById("imgWarp");var aImg = oWarp.getElementsByTagName("img");var aEm = document.getElementsByTagName("em"); var i = 5;btn = true;oLeft.onclick = function(){ clearInterval(autoTimer); if(btn){ btn=false;fnAutoLeft(); }};function fnAutoLeft(){ var a = i % 5; i-=1; var b = i % 5;startOpacMove(aImg[a],0,aImg[b],100); setStyle(b);}oRight.onclick = function(){if(btn){ //单位时间内只能触发一次元素的显示隐藏clearInterval(autoTimer);btn=false;fnAutoRight();}};var count =0;function fnAutoRight(){ var a = i % 5; i+=1; var b = i % 5;startOpacMove(aImg[a],0,aImg[b],100);setStyle(b); if(i==10){i=5;for(var j = 0;j<aImg.length;j++){ if(j==0){aImg[0].style.cssText ="opacity: 1; z-index: 5; display: block;"; } else{aImg[j].style.cssText ="opacity: 0; z-index: 0; display: none;"; }} }} var autoTimer = setInterval(fnAutoRight,5000);function setStyle(a){ for(var i=0;i<aEm.length;i++){ aEm[i].className=""; }aEm[a].className="active";} }运动的js:function startOpacMove(obj1,tag1,obj2,tag2) { var iCur1 = 0;var iCur2 = 0; var iTimer = null;var iSpeed1 = -2;var iSpeed2 = 2;clearInterval(iTimer); iTimer = setInterval(function(){ var iBtn = true; iCur1 = css(obj1,"opacity")*100; iCur2 = css(obj2,"opacity")*100; iCur1 = Math.floor(iCur1); iCur2 = Math.floor(iCur2);if(iCur1 != tag1 && iCur2 != tag2){iBtn = false;obj1.style.opacity = (iCur1+iSpeed1)/100;// console.log("隐藏元素时候的透明度值:"+(iCur1+iSpeed1)/100);obj1.style.filter = "alpha(opacity="+(iCur1+iSpeed1)+")";obj1.style.zIndex = 0;obj2.style.opacity = (iCur2+iSpeed2)/100;obj2.style.filter = "alpha(opacity="+(iCur2+iSpeed2)+")";obj2.style.zIndex = 5;obj2.style.display ="block"; } if(iBtn){clearInterval(iTimer);obj1.style.display ="none";obj1.style.opacity =0;obj2.style.opacity =1; btn = true; }},10);}function css(obj,attr){ if(obj.currentStyle){ //当前浏览器下存在currentStyle属性return obj.currentStyle[attr]; }else{return getComputedStyle(obj,false)[attr]; }} 看下js代码是如何让图画动起来的var i = 5; function fnAutoRight(){var a = i % 5;i+=1;var b = i % 5;}用变量 i 对5取余,得到的值是0-4的数,刚好是我们想要的结果,对应的a、b也刚好是想要隐藏、显示的图片的索引。再调用写好的运动js、下方显示当前图片位置函数,那么向右这一块就OK了。var i=5;function fnAutoLeft(){var a = i % 5;i-=1;var b = i % 5; }同样是i=5,然后对5取余,得到的a为当前需要隐藏的图片索引,让i减一之后再对5取余得到的是需要显示的图片索引。这样向左的问题也就解决了。