
最终效果
这里的关键主要是判断鼠标是从哪个方向进入和离开的
$("li").on("mouseenter mouseleave",function(e) { var w = this.offsetWidth; var h = this.offsetHeight; var x = e.pageX - this.getBoundingClientRect().left - w/2; var y = e.pageY - this.getBoundingClientRect().top - h/2; var direction = Math.round((((Math.atan2(y, x) * 180 / Math.PI) + 180) / 90) + 3) % 4; //direction的值为“0,1,2,3”分别对应着“上,右,下,左” var eventType = e.type; var res = Math.atan2(y, x) / (Math.PI / 180) + 180 ; $(".line").css("transform","rotate("+ res +"deg)"); // console.log(((Math.atan2(y, x) * 180 / Math.PI) + 180)); // console.log(Math.round((Math.atan2(y, x) / (Math.PI / 180) + 180) / 90 + 3) % 4); var dirName = new Array("上方","右侧","下方","左侧");$(".res").text(res + "deg"); if(eventType == "mouseenter"){$(".res").text(dirName[direction]+"进入");animationIn(direction); }else{$(".res").text(dirName[direction]+"离开");animationOut(direction); }});上面代码的重点主要是在direction的值的计算
从上图可以看出,当鼠标从右边进入的时候,角度是在-45°~45°之间的 底部是45~135 左边135~180&-180~-135 顶部是 -135 ~ -45
因为上面计算出来的结果不符合我们的习惯,并且负值在计算的时候会影响正确性,现在我们给这个结果加上180 让角度范围变成我们习惯的0~360°。当加上180之后 0°的位置就在左边的中间了

0度的位置
所以现在的范围变成了
0~44 & 360~315 左边
45~134 上边
135~224 右边
225~314 下边
我们再继续转换,现在我们把算出来的角度除以90,然后四舍五入,可以使得45°为分界线
上边算出来的结果为1

上边
右边算出来的结果为2
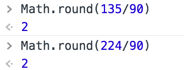
右边
下边算出来的结果为3
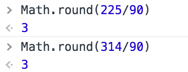
下边
左边算出来的结果有两种 0~44肯定是为0的 315~360 为4

左边
现在算出来的结果一共有5个值(左边2个,其他三个面各一个)。下面我们再精简一下结果,我们给每次的结果都加上3,然后和4取余
左边加3之后就是3和7,然后取余后为3
上边加3之后为4,取余后为0
右边加3为5,取余为1
下边加3为6,取余为2
我们最终的结果就是 0->上边 1->右边 2->下边 3->左边 然后我们通过控制left和top就可以实现上面的效果了
<!DOCTYPE html><html lang="en"> <head><meta charset="UTF-8"><title>Document</title><style type="text/css"> * {padding: 0;margin: 0; } html, body {width: 100%;height: 100%; } ul {list-style: none;position: relative;width: 600px;width: 100%; } ul> li {margin: 50px auto;position: relative;width: 300px;height: 300px;background-color: black;overflow: hidden; } ul> li .bg {position: absolute;width: 300px;height: 300px;left: -100%;top: 0;background-color: red;text-align: center;line-height: 300px;color: blue;font-size: 150px; } .line {position: absolute;width: 50%;height: 1px;background: red;right: 0;top: 50%;transition: all .3s;transform-origin: left; } .res {text-align: center; }</style> </head><body><ul> <li><div class="bg"> SB</div> </li></ul><div class="res"></div><script src="js/jquery-3.1.1.js"></script><script> $("li").on("mouseenter mouseleave", function(e) {var $bg = $(this).find(".bg");var w = this.offsetWidth; //获取元素宽度var h = this.offsetHeight; //获取元素高度var toTop = this.getBoundingClientRect().top + document.body.scrollTop; //兼容滚动条var x = e.pageX - this.getBoundingClientRect().left - w / 2; //获取当前鼠标的x轴位置(相对于这个li的中心点)var y = e.pageY - toTop - h / 2; ////获取当前鼠标的y轴位置(相对于这个li的中心点)var direction = Math.round((((Math.atan2(y, x) * 180 / Math.PI) + 180) / 90) + 3) % 4; //direction的值为“0,1,2,3”分别对应着“上,右,下,左”var eventType = e.type;var res = Math.atan2(y, x) / (Math.PI / 180) + 180;$(".line").css("transform", "rotate(" + res + "deg)");var dirName = new Array("上方", "右侧", "下方", "左侧");if(eventType == "mouseenter") { $(".res").text(dirName[direction] + "进入"); animationIn(direction, $bg);} else { $(".res").text(dirName[direction] + "离开"); animationOut(direction, $bg);} }); function animationIn(direction, ele) {switch(direction) { case 0:ele.css({ left: 0, top: "-100%"}).animate({ top: 0}, 300);break; case 1:ele.css({ left: "100%", top: 0}).animate({ left: 0}, 300);break; case 2:ele.css({ left: 0, top: "100%"}).animate({ top: 0}, 300);break; case 3:ele.css({ left: "-100%", top: 0}).animate({ left: 0}, 300);break;} } function animationOut(direction, ele) {switch(direction) { case 0:ele.animate({ top: "-100%"}, 300);break; case 1:ele.animate({ left: "100%"}, 300);break; case 2:ele.animate({ top: "100%"}, 300);break; case 3:ele.animate({ left: "-100%"}, 300);break;} }</script> </body></html>以上就是本文的全部内容,希望本文的内容对大家的学习或者工作能带来一定的帮助,同时也希望多多支持脚本之家!