简要介绍: 之前手头的一个项目需要去做一个左侧的树形菜单,右侧则是一个整体的iframe,从而构成一个整体的网站。一开始是打算用bootstrap的tree-view插件,直接把菜单的数据传过去就好了,结果后来项目又改了需求,菜单的内容和图表都是后台动态生成的,所以只能放弃使用bootstrap插件,自己着手写了一个树形菜单。本文主要分两部分讲,一个是对于bootstrap的treeview的实践,另一部分是介绍自己写的树形菜单。
bootstrap-treeview:
组件介绍:http://www.jb51.net/article/96222.htm
其实关于该组件在其他网站上已经讲得很详细了,我就不再赘述了,但是网上的应用还是有点问题,这里主要讲一下自己使用这个插件过程吧。
1. html引用及结构 引用css:文件本身的css文件、bootstrp.css文件
引用js:jquery、bootstrap-treeview.js、引用该组件的treeview.js文件
整体HTML结构主要分为了三个部分:头部、树状栏部分、iframe部分,使用组件的为树状栏部分:#tree
 2.引用组件js设置:
 具体设置代码如下:主要思路是用data传入菜单的数据和依靠关系,同时可以设置一些变量来控制改树状栏的样式和基本功能,如代码40-43行,具体变量对应的数值的意义可以参见之前链接中的表格
(function(win) {var data = [{text: "Parent 1",nodes: [{text: "Child 1",nodes: [ { text: "Grandchild 1" }, { text: "Grandchild 2" }]},{text: "Child 2"}]},{text: "Parent 2"},{text: "Parent 3"},{text: "Parent 4"},{text: "Parent 5"} ];var tree = function() { $("#tree").treeview({ data: data,backColor: "#293541",color: "white",onhoverColor:"#202a33;",showBorder: false});}var init = function() { tree(); }init();})(window) 设置完成之后树状栏的样式如下图所示,另外细节方面可以通过阅读相应参数来设置,值得一提的是树状栏的icon图标是通过bootstrap的glyphicon设置的,有兴趣的童鞋可以去看一下这个东西,来为菜单设置不同的icon,不过实际效果感觉不是特别好。这也是我决定自己去搞一个树状栏的原因。
 自定义树状菜单:
treeview的插件只能点击菜单前面的加号icon展开关闭,样式的变化有限,而且我们需要根据后台传入的数据来动态设置菜单的结构和内容,所以为了满足这几个需求,重新写了一个tree.js
js主要分成三个部分,第一个部分是为每个菜单和子菜单注册点击事件以及通过后台传来的数据为其绑定跳转链接;第二个部分是通过ajax获取后台传来的菜单数据,并将数据传入前台;第三个部分是通过underscore的template函数将前台页面进行渲染,达到动态实现树状栏的功能。、
相关js代码:
var tree = function() { //一级导航点击事件 $(".nodeBox").on("click", function(event) {var _this = $(this);var child = _this.parent().find(".nodechild_box");if (_this.attr("opened") == "opened") {_this.parent().find(".childnode").hide();child.hide();_this.attr("opened", "");}else{_this.parent().find(".childnode").show();child.show();_this.attr("opened", "opened");}; }); //二级导航点击事件 $(".nodechild_box").on("click", function(event) {var _this = $(this);var child = _this.parent().find(".gchild_box");if (_this.attr("opened") == "opened") {child.hide();_this.parent().find(".gchildnode").hide();_this.find(".add").attr("src", "images/icon_add.png");_this.attr("opened", "");}else{child.show();_this.parent().find(".gchildnode").show();_this.find(".add").attr("src", "images/icon_minus.png");_this.attr("opened", "opened");}; }); //三级导航点击事件 $(".gchild_box").on("click", function(event) {var _this = $(this);var child = _this.parent().find(".ggchild_box");if (_this.attr("opened") == "opened") {child.hide();_this.find(".add").attr("src", "images/icon_add.png");_this.attr("opened", "");}else{child.show();_this.find(".add").attr("src", "images/icon_minus.png");_this.attr("opened", "opened");}; }); //hover显示箭头及背景变化 $(".nodeBox").mouseover(function(event) {$(this).addClass("tree_hover");$(this).find(".arrow").show(); }); $(".nodeBox").mouseout(function(event) {$(this).removeClass("tree_hover");$(this).find(".arrow").hide(); }); $(".nodechild_box").mouseover(function(event) {$(this).addClass("box_hover");$(this).find(".arrow").show(); }); $(".nodechild_box").mouseout(function(event) {$(this).removeClass("box_hover");$(this).find(".arrow").hide(); }); $(".gchild_box").mouseover(function(event) {$(this).addClass("box_hover");$(this).find(".arrow").show(); }); $(".gchild_box").mouseout(function(event) {$(this).removeClass("box_hover");$(this).find(".arrow").hide(); }); $(".ggchild_box").mouseover(function(event) {$(this).addClass("box_hover");$(this).find(".arrow").show(); }); $(".ggchild_box").mouseout(function(event) {$(this).removeClass("box_hover");$(this).find(".arrow").hide(); }); };//链接函数 var tree_link = function() {var linkBox = $("[menurl]"); linkBox.each(function(i, ele) {var _ele = $(ele);var key = _ele.attr("menurl");if(key != "/"){$(this).on("click",function(){ $("#mainweb").attr("src", key); auto();}) } }); };//获取登陆用户数据 var getData = function() { var cond = sessionStorage.cond; $.post("XXXX", {}, function(json) {console.log(json)if(json.code == 200){data = json.data;fillUserName(data);fillTree(data);var length = $(".nodeBox").length ;for (var i = 0;i < length;i++) { var iconId = data.icons[i].iconId; $(".nodeBox").eq(i+1).attr("menuid",i); $(".nodeBox").eq(i+1).find("img").attr("src","images/"+ data.icons[iconId-1].name +"");}//为每个菜单添加链接tree_link()} }, function(xhr) {console.log(xhr) }); } var fillTree = function(data){ var tmplDom = $("#tree"); tmplDom.parent().html(eking.template.getHtml(tmplDom.html(),data)); tree(); }HTML渲染:
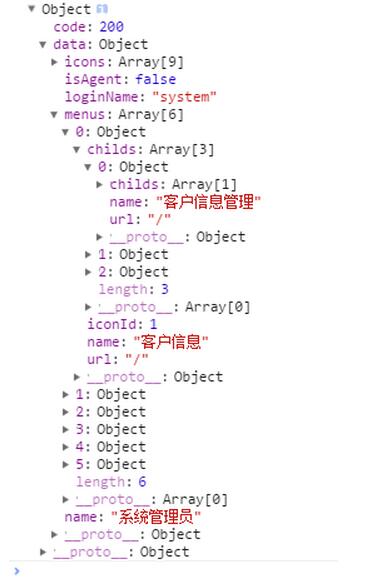
<div class="main w_1200"> <div class="tree"> <script type="text/html" id="tree"><div class="tree_box"><div class="nodeBox index" menurl="notice.html"> <span class="m_l_10"><img src="images/icon_home.png" alt=""></span> <span class="m_l_10">首页</span> <span class="arrow fr m_r_10"><img src="images/icon_arrow.png" alt=""></span></div></div><%var menus = data.menus;%><%for(var i = 0;i < menus.length;i++){%><div class="tree_box"><div class="nodeBox" menurl=<%=menus[i].url%> > <span class="m_l_10"><img src="" alt=""></span> <span class="m_l_10"><%=menus[i].name%></span></div><%var childmenus = menus[i].childs;%><%for(var j = 0;j < childmenus.length;j++){%><div class="childnode"> <div class="nodechild_box" menurl=<%=childmenus[j].url%> > <%if(childmenus[j].childs.length != 0){%> <span class="m_l_20"><img class="add" src="images/icon_add.png" alt=""></span> <span class="m_l_10"><%=childmenus[j].name%></span> <%}else{%> <span class="m_l_55"><%=childmenus[j].name%></span> <span class="arrow fr m_r_10"><img src="images/icon_arrow.png" alt=""></span> <%}%> </div> <%var cchildmenus = childmenus[j].childs;%> <%for(var k = 0;k < cchildmenus.length;k++){%> <div class="gchildnode"> <div class="gchild_box" menurl=<%=cchildmenus[k].url%> ><%if(cchildmenus[k].childs.length != 0){%><span class="m_l_30"><img class="add" src="images/icon_add.png" alt=""></span><span class="m_l_10"><%=cchildmenus[k].name%></span><%}else{%><span class="m_l_65"><%=cchildmenus[k].name%></span><span class="arrow fr m_r_10"><img src="images/icon_arrow.png" alt=""></span><%}%> </div> <%var ccchildmenus = cchildmenus[k].childs;%> <%for(var l = 0;l < ccchildmenus.length;l++){%> <div class="ggchild_box" menurl=<%=ccchildmenus[l].url%> ><span class="m_l_70"><%=ccchildmenus[l].name%></span><span class="arrow fr m_r_10"><img src="images/icon_arrow.png" alt=""></span> </div> <%}%> </div> <%}%></div><%}%></div> <%}%> </script> </div>后台传入的数据格式为
菜单效果如图:
 存在的不足和问题:
为了跟上项目进度,tree.js尚未组件化,等有时间了打算把这一块封装为一个js组件,通过设置参数完成树状栏的设置。
P.S.由于个人技术水平有限,难免出现错误,请多多指正 :)
以上就是本文的全部内容,希望对大家的学习有所帮助,也希望大家多多支持脚本之家。