这次介绍下小程序当中常用的图片上传。
前几天做了图片上传功能,被坑了一下。接下来我们来看一下微信的上传api。
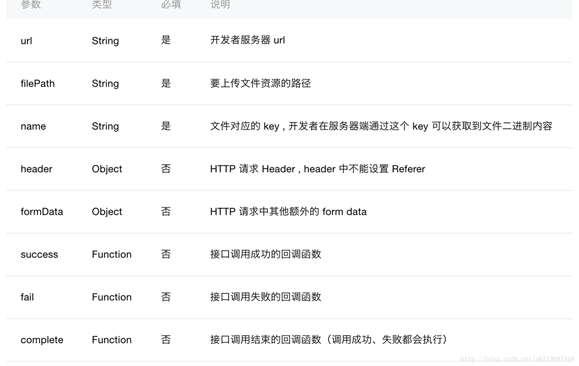
这里的filePath就是图片的存储路径,类型居然是个String,也就是 只能每次传一张图片,我以前的接口都是接收一个array,我本人又是一个半吊子的PHP,只能自己去改接收图片的接口。
看一下页面效果图
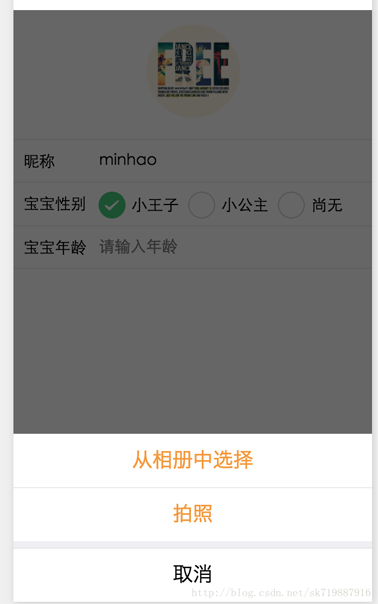
一个很常见的修改头像效果,选择图片(拍照),然后上传。
下面就是贴代码了
首先是小程序的wxml代码
<view class="xd-container"><form bindsubmit="bindSaveTap"><image class="xd-img-user1" catchtap="chooseImageTap" src="{{logo}}"></image><view class="xd-view-section"> <text class="xd-abs xd-flex-left xd-text-nick">昵称</text> <input name="nick_name" placeholder="请输入昵称" class="xd-input" value="{{userInfo.user_name}}"/></view><view class="xd-view-section1"> <text class="xd-abs xd-flex-left xd-text-nick">宝宝性别</text> <radio-group class="xd-abs xd-radio-group" name="baby_sex"> <label class="xd-label-radio" wx:for="{{sex_items}}" wx:key="item"> <radio color="#3cc975" value="{{item.name}}" wx:if="{{item.name==userInfo.baby_sex}}" checked="true"/> <radio color="#3cc975" value="{{item.name}}" wx:else checked="false"/> <text class="xd-radio-text">{{item.value}}</text> </label> </radio-group></view><view class="xd-view-section1"> <text class="xd-abs xd-flex-left xd-text-nick">宝宝年龄</text> <input placeholder="请输入年龄" wx:if="{{userInfo.baby_age != 0}}" value="{{userInfo.baby_age}}" class="xd-input"/> <input name="baby_age" placeholder="请输入年龄" wx:else value="" class="xd-input"/></view><button size="default" class="xd-abs xd-subBtn" formType="submit" hover-class="xd-subBtn-hover">保存</button></form></view>css代码我就不贴了,一些样式而已。
对应的JS代码
var util = require("../../../utils/util.js")var app = getApp()Page({ data: {sex_items: [ {name:"1", value:"小王子"}, {name:"2", value:"小公主"}, {name:"0", value:"尚无"}],logo:null,userInfo: {} }, //事件处理函数 bindViewTap: function() {wx.navigateTo({ // url: "../logs/logs"// url: "../load/load"}) }, onLoad: function () {console.log("onLoad")var that = this//调用应用实例的方法获取全局数据app.getUserInfo(function(userInfo){ //更新数据 console.log(userInfo); that.setData({ userInfo:userInfo, logo:userInfo.logo })}) }, bindSaveTap: function(e){console.log(e)var formData = { uid:util.getUserID(), user_name:e.detail.value.nick_name, baby_sex:e.detail.value.baby_sex, baby_age:e.detail.value.baby_age} console.log(formData)app.apiFunc.upload_file(app.apiUrl.modify_user, this.data.logo, "photos", formData, function(res){ console.log(res);},function(){}) },chooseImageTap: function(){let _this = this;wx.showActionSheet({ itemList: ["从相册中选择", "拍照"], itemColor: "#f7982a", success: function(res) { if (!res.cancel) { if(res.tapIndex == 0){ _this.chooseWxImage("album") }else if(res.tapIndex == 1){ _this.chooseWxImage("camera") } } }}) },chooseWxImage:function(type){let _this = this;wx.chooseImage({ sizeType: ["original", "compressed"], sourceType: [type], success: function (res) { console.log(res); _this.setData({ logo: res.tempFilePaths[0], }) } }) }})主要讲解一下JS代码
1、chooseImageTap方法 用来显示一个选择图片和拍照的弹窗,用到了微信的一个页面交互的api showActionSheet,点击查看详细使用
显示操作菜单
2、chooseWxImage方法 主要是用来选择图片以及接收图片路径回调的监听,点击查看详细使用
从本地相册选择图片或使用相机拍照
3、上传
在chooseWxImage方法的success回调中我们可以看到,我把返回的图片路径res.tempFilePaths[0] 赋值给了logo,下面我们只需要调用upload方法就ok了,微信的uploadFile方法被我封装了一下变成了upload_file。
uploadFile方法
//上传文件function upload_file(url, filePath, name, formData, success, fail) {console.log("a="+filePath)wx.uploadFile({ url: rootUrl + url, filePath:filePath, name:name, header: { "content-type":"multipart/form-data" }, // 设置请求的 header formData: formData, // HTTP 请求中其他额外的 form data success: function(res){ console.log(res); if(res.statusCode ==200 && !res.data.result_code){ typeof success == "function" && success(res.data); }else{ typeof fail == "function" && fail(res); } }, fail: function(res) { console.log(res); typeof fail == "function" && fail(res);} })}filePath就是upload_file中我们传进来的logo变量,也就是图片的绝对路径。
服务器的接收图片代码
看过我上篇文章登录流程的文章的都熟悉了我服务器用的是php框架是Laravel。
这里我只贴一下接收image的代码;
if(!empty($_FILES["photos"])){ $up_arr["logo"] = upload_logo("photos","manage/images/user","logo",$user_id,0); $up_arr["logo"] = $up_arr["logo"][0]; $user_info["logo"] = $Server_Http_Path . $up_arr["logo"]; }核心方法在upload_log中。
图片接收保存
if( !function_exists("upload_logo")){ function upload_logo( $key_name="photos", $logo_path="manage/images/nurse", $pre_name="logo", $salt="20160101",$encode = 1,$make=0 ){$result_arr = array();global $Server_Http_Path,$App_Error_Conf;//分文件夹保存 $date_info = getdate();$year = $date_info["year"];$mon = $date_info["mon"];$day = $date_info["mday"];$logo_path = sprintf("%s/%s/%s/%s",$logo_path,$year,$mon,$day);if(!is_dir($logo_path)){ $res=mkdir($logo_path,0777,true);}//图片上传//foreach($photos as $key => $photo ){$photo = $_FILES["photos"];$name = $key_name;$file_id = Input::file($name);if(!empty($file_id) && $file_id -> isValid()){ $entension = $file_id -> getClientOriginalExtension(); if($pre_name == "baby"){$new_name = $pre_name . "_" . intval($salt) ."_" .time() . "_" . salt_rand(2,2); }else {$new_name = $pre_name . "_" . intval($salt) ."_" . salt_rand(2,2); } $path_id = $file_id -> move($logo_path,$new_name."_b.".$entension); if(!empty($path_id)){$path_name = $path_id->getPathName();$image_size=getimagesize($path_name); $weight=$image_size["0"];////获取图片的宽 $height=$image_size["1"];///获取图片的高if($pre_name == "baby" || $pre_name == "video") {$photo_info["url"] = $path_name; $photo_info["width"] = $weight;$photo_info["height"] = $height; $result_arr[] = $photo_info; }else{ $result_arr[] = $path_name; } //处理图片if($make == 1){ $img = Image::make($path_name)->resize(200, $height*200/$weight);$img->save($logo_path ."/".$new_name."_s.".$entension); //dd($img); // return $img->response("jpg");} }if(empty($result_arr)){ $response["result_code"] = -1006; $response["result_msg"] = $App_Error_Conf[-1006];return response($response); } if($encode == 1){$result_arr = json_encode($result_arr); }}return $result_arr; } }这个代码格式真的很烦人啊,我就大概整理了一下。
这样我们就入门了小程序图片上传和接口功能了。
以上就是本文的全部内容,希望对大家的学习有所帮助,也希望大家多多支持脚本之家。