
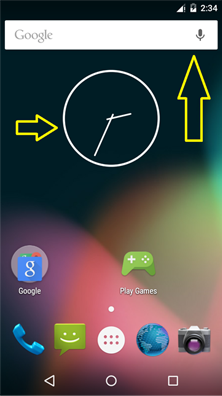

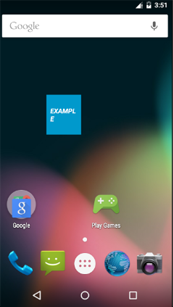
package com.example.joy.remoteviewstest;import android.appwidget.AppWidgetManager;import android.appwidget.AppWidgetProvider;import android.content.Context;import android.widget.RemoteViews;/** * Implementation of App Widget functionality. */public class MyAppWidgetProvider extends AppWidgetProvider { static void updateAppWidget(Context context, AppWidgetManager appWidgetManager,int appWidgetId) { CharSequence widgetText = context.getString(R.string.appwidget_text); // Construct the RemoteViews object RemoteViews views = new RemoteViews(context.getPackageName(), R.layout.my_app_widget_provider); views.setTextViewText(R.id.appwidget_text, widgetText); // Instruct the widget manager to update the widget appWidgetManager.updateAppWidget(appWidgetId, views); } @Override public void onUpdate(Context context, AppWidgetManager appWidgetManager, int[] appWidgetIds) { // There may be multiple widgets active, so update all of them for (int appWidgetId : appWidgetIds) {updateAppWidget(context, appWidgetManager, appWidgetId); } } @Override public void onEnabled(Context context) { // Enter relevant functionality for when the first widget is created } @Override public void onDisabled(Context context) { // Enter relevant functionality for when the last widget is disabled }}该类继承自 AppWidgetProvider ,AS默认帮我们重写 onUpdate() 方法,遍历 appWidgetIds, 调用了 updateAppWidget() 方法。再看 updateAppWidget() 方法,很简单,只有四行:<RelativeLayout xmlns:android="http://schemas.android.com/apk/res/android" android:layout_width="match_parent" android:layout_height="match_parent" android:background="#09C" android:padding="@dimen/widget_margin"> <TextView android:id="@+id/appwidget_text" android:layout_width="wrap_content" android:layout_height="wrap_content" android:layout_centerHorizontal="true" android:layout_centerVertical="true" android:layout_margin="8dp" android:background="#09C" android:contentDescription="@string/appwidget_text" android:text="@string/appwidget_text" android:textColor="#ffffff" android:textStyle="bold|italic" /></RelativeLayout>这个文件就是我们最后看到的桌面小部件的样子,布局文件中只有一个TextView。这是你可能会问,想要加图片可以吗?可以,就像正常的Activity布局一样添加 ImageView 就行了,聪明的你可能开始想自定义小部件的样式了,添加功能强大外观漂亮逼格高的自定义控件了,很遗憾,不可以。小部件布局文件可以添加的组件是有限制的,详细内容在下文介绍RemoteViews 时再说。
| void | updateAppWidget(ComponentName provider, RemoteViews views) Set the RemoteViews to use for all AppWidget instances for the supplied AppWidget provider. | |||||||||||||
| void | updateAppWidget(int[] appWidgetIds, RemoteViews views) Set the RemoteViews to use for the specified appWidgetIds. | |||||||||||||
| void | updateAppWidget(int appWidgetId, RemoteViews views) Set the RemoteViews to use for the specified appWidgetId. | |||||||||||||
<receiver android:name=".MyAppWidgetProvider"> <intent-filter> <action android:name="android.appwidget.action.APPWIDGET_UPDATE" /> </intent-filter> <meta-dataandroid:name="android.appwidget.provider"android:resource="@xml/my_app_widget_provider_info" /> </receiver>上面代码中有一个 Action,这个 Action 必须要加,且不能更改,属于系统规范,是作为小部件的标识而存在的。如果不加,这个 Receiver 就不会出现在小部件列表里面。然后看到小部件指定了 @xml/my_app_widget_provider_info 作为meta-data,细心的你发现了,在 res/ 目录下面建立了一个 xml 文件夹,下面新建了一个 my_app_widget_provider_info.xml 文件,内容如下:
<?xml version="1.0" encoding="utf-8"?><appwidget-provider xmlns:android="http://schemas.android.com/apk/res/android" android:initialKeyguardLayout="@layout/my_app_widget_provider" android:initialLayout="@layout/my_app_widget_provider" android:minHeight="40dp" android:minWidth="40dp" android:previewImage="@drawable/example_appwidget_preview" android:resizeMode="horizontal|vertical" android:updatePeriodMillis="86400000" android:widgetCategory="home_screen"></appwidget-provider>这里配置了一些小部件的基本信息,常用的属性有 initialLayout 就是小部件的初始化布局, minHeight 定义了小部件的最小高度,previewImage 指定了小部件在小部件列表里的预览图,updatePeriodMillis 指定了小部件更新周期,单位为毫秒。更多属性,可以查看API文档。
public void onReceive(Context context, Intent intent) { // Protect against rogue update broadcasts (not really a security issue, // just filter bad broacasts out so subclasses are less likely to crash). String action = intent.getAction(); if (AppWidgetManager.ACTION_APPWIDGET_UPDATE.equals(action)) {Bundle extras = intent.getExtras();if (extras != null) {int[] appWidgetIds = extras.getIntArray(AppWidgetManager.EXTRA_APPWIDGET_IDS);if (appWidgetIds != null && appWidgetIds.length > 0) { this.onUpdate(context, AppWidgetManager.getInstance(context), appWidgetIds);}} } else if (AppWidgetManager.ACTION_APPWIDGET_DELETED.equals(action)) {Bundle extras = intent.getExtras();if (extras != null && extras.containsKey(AppWidgetManager.EXTRA_APPWIDGET_ID)) {final int appWidgetId = extras.getInt(AppWidgetManager.EXTRA_APPWIDGET_ID);this.onDeleted(context, new int[] { appWidgetId });} } else if (AppWidgetManager.ACTION_APPWIDGET_OPTIONS_CHANGED.equals(action)) {Bundle extras = intent.getExtras();if (extras != null && extras.containsKey(AppWidgetManager.EXTRA_APPWIDGET_ID) && extras.containsKey(AppWidgetManager.EXTRA_APPWIDGET_OPTIONS)) {int appWidgetId = extras.getInt(AppWidgetManager.EXTRA_APPWIDGET_ID);Bundle widgetExtras = extras.getBundle(AppWidgetManager.EXTRA_APPWIDGET_OPTIONS);this.onAppWidgetOptionsChanged(context, AppWidgetManager.getInstance(context), appWidgetId, widgetExtras);} } else if (AppWidgetManager.ACTION_APPWIDGET_ENABLED.equals(action)) {this.onEnabled(context); } else if (AppWidgetManager.ACTION_APPWIDGET_DISABLED.equals(action)) {this.onDisabled(context); } else if (AppWidgetManager.ACTION_APPWIDGET_RESTORED.equals(action)) {Bundle extras = intent.getExtras();if (extras != null) {int[] oldIds = extras.getIntArray(AppWidgetManager.EXTRA_APPWIDGET_OLD_IDS);int[] newIds = extras.getIntArray(AppWidgetManager.EXTRA_APPWIDGET_IDS);if (oldIds != null && oldIds.length > 0) { this.onRestored(context, oldIds, newIds); this.onUpdate(context, AppWidgetManager.getInstance(context), newIds);}} } }AppWidget 练习<?xml version="1.0" encoding="utf-8"?><LinearLayout xmlns:android="http://schemas.android.com/apk/res/android" android:orientation="horizontal" android:layout_width="match_parent" android:layout_height="match_parent"> <LinearLayout android:layout_width="100dp" android:layout_height="200dp" android:orientation="vertical"> <ImageViewandroid:id="@+id/iv_test"android:layout_width="match_parent"android:layout_height="100dp"android:src="@mipmap/ic_launcher"/> <Buttonandroid:id="@+id/btn_test"android:layout_width="match_parent"android:layout_height="wrap_content"android:text="点击跳转"/> </LinearLayout> <TextView android:layout_width="1dp" android:layout_height="200dp" android:layout_marginLeft="5dp" android:layout_marginRight="5dp" android:background="#f00"/> <ListView android:id="@+id/lv_test" android:layout_width="100dp" android:layout_height="200dp"> </ListView></LinearLayout>小部件的配置信息 mul_app_widget_provider_info.xml 如下:
<?xml version="1.0" encoding="utf-8"?><appwidget-provider xmlns:android="http://schemas.android.com/apk/res/android" android:initialLayout="@layout/mul_app_widget_provider" android:minHeight="200dp" android:minWidth="200dp" android:previewImage="@mipmap/a1" android:updatePeriodMillis="86400000"></appwidget-provider>MulAppWidgetProvider.java:
package com.example.joy.remoteviewstest;import android.app.PendingIntent;import android.appwidget.AppWidgetManager;import android.appwidget.AppWidgetProvider;import android.content.ComponentName;import android.content.Context;import android.content.Intent;import android.os.Bundle;import android.text.TextUtils;import android.widget.RemoteViews;import android.widget.Toast;public class MulAppWidgetProvider extends AppWidgetProvider { public static final String CHANGE_IMAGE = "com.example.joy.action.CHANGE_IMAGE"; private RemoteViews mRemoteViews; private ComponentName mComponentName; private int[] imgs = new int[]{R.mipmap.a1,R.mipmap.b2,R.mipmap.c3,R.mipmap.d4,R.mipmap.e5,R.mipmap.f6 }; @Override public void onUpdate(Context context, AppWidgetManager appWidgetManager, int[] appWidgetIds) { mRemoteViews = new RemoteViews(context.getPackageName(), R.layout.mul_app_widget_provider); mRemoteViews.setImageViewResource(R.id.iv_test, R.mipmap.ic_launcher); mRemoteViews.setTextViewText(R.id.btn_test, "点击跳转到Activity"); Intent skipIntent = new Intent(context, MainActivity.class); PendingIntent pi = PendingIntent.getActivity(context, 200, skipIntent, PendingIntent.FLAG_CANCEL_CURRENT); mRemoteViews.setOnClickPendingIntent(R.id.btn_test, pi); // 设置 ListView 的adapter。 // (01) intent: 对应启动 ListViewService(RemoteViewsService) 的intent // (02) setRemoteAdapter: 设置 ListView 的适配器 // 通过setRemoteAdapter将 ListView 和ListViewService关联起来, // 以达到通过 GridWidgetService 更新 gridview 的目的 Intent lvIntent = new Intent(context, ListViewService.class); mRemoteViews.setRemoteAdapter(R.id.lv_test, lvIntent); mRemoteViews.setEmptyView(R.id.lv_test,android.R.id.empty); // 设置响应 ListView 的intent模板 // 说明:“集合控件(如GridView、ListView、StackView等)”中包含很多子元素,如GridView包含很多格子。 // 它们不能像普通的按钮一样通过 setOnClickPendingIntent 设置点击事件,必须先通过两步。 // (01) 通过 setPendingIntentTemplate 设置 “intent模板”,这是比不可少的! // (02) 然后在处理该“集合控件”的RemoteViewsFactory类的getViewAt()接口中 通过 setOnClickFillInIntent 设置“集合控件的某一项的数据”/** setPendingIntentTemplate 设置pendingIntent 模板* setOnClickFillInIntent 可以将fillInIntent 添加到pendingIntent中*/ Intent toIntent = new Intent(CHANGE_IMAGE); PendingIntent pendingIntent = PendingIntent.getBroadcast(context, 200, toIntent, PendingIntent.FLAG_UPDATE_CURRENT); mRemoteViews.setPendingIntentTemplate(R.id.lv_test, pendingIntent); mComponentName = new ComponentName(context, MulAppWidgetProvider.class); appWidgetManager.updateAppWidget(mComponentName, mRemoteViews); } @Override public void onReceive(Context context, Intent intent) { super.onReceive(context, intent); if(TextUtils.equals(CHANGE_IMAGE,intent.getAction())){Bundle extras = intent.getExtras();int position = extras.getInt(ListViewService.INITENT_DATA);mRemoteViews = new RemoteViews(context.getPackageName(), R.layout.mul_app_widget_provider);mRemoteViews.setImageViewResource(R.id.iv_test, imgs[position]);mComponentName = new ComponentName(context, MulAppWidgetProvider.class);AppWidgetManager.getInstance(context).updateAppWidget(mComponentName, mRemoteViews); } }}MainActivity.java:package com.example.joy.remoteviewstest;import android.support.v7.app.AppCompatActivity;import android.os.Bundle;public class MainActivity extends AppCompatActivity { @Override protected void onCreate(Bundle savedInstanceState) { super.onCreate(savedInstanceState); setContentView(R.layout.activity_main); }}下面重点是 ListView 在小部件中的用法:package com.example.joy.remoteviewstest;import android.content.Context;import android.content.Intent;import android.os.Bundle;import android.widget.RemoteViews;import android.widget.RemoteViewsService;import java.util.ArrayList;import java.util.List;public class ListViewService extends RemoteViewsService { public static final String INITENT_DATA = "extra_data"; @Override public RemoteViewsFactory onGetViewFactory(Intent intent) { return new ListRemoteViewsFactory(this.getApplicationContext(), intent); } private class ListRemoteViewsFactory implements RemoteViewsService.RemoteViewsFactory { private Context mContext; private List<String> mList = new ArrayList<>(); public ListRemoteViewsFactory(Context context, Intent intent) {mContext = context; } @Override public void onCreate() {mList.add("一");mList.add("二");mList.add("三");mList.add("四");mList.add("五");mList.add("六"); } @Override public void onDataSetChanged() { } @Override public void onDestroy() {mList.clear(); } @Override public int getCount() {return mList.size(); } @Override public RemoteViews getViewAt(int position) {RemoteViews views = new RemoteViews(mContext.getPackageName(), android.R.layout.simple_list_item_1);views.setTextViewText(android.R.id.text1, "item:" + mList.get(position));Bundle extras = new Bundle();extras.putInt(ListViewService.INITENT_DATA, position);Intent changeIntent = new Intent();changeIntent.setAction(MulAppWidgetProvider.CHANGE_IMAGE);changeIntent.putExtras(extras);/* android.R.layout.simple_list_item_1 --- id --- text1* listview的item click:将 changeIntent 发送,* changeIntent 它默认的就有action 是provider中使用 setPendingIntentTemplate 设置的action*/views.setOnClickFillInIntent(android.R.id.text1, changeIntent);return views; } /* 在更新界面的时候如果耗时就会显示 正在加载... 的默认字样,但是你可以更改这个界面* 如果返回null 显示默认界面* 否则 加载自定义的,返回RemoteViews*/ @Override public RemoteViews getLoadingView() {return null; } @Override public int getViewTypeCount() {return 1; } @Override public long getItemId(int position) {return position; } @Override public boolean hasStableIds() {return false; } }}最后看看清单文件:<?xml version="1.0" encoding="utf-8"?><manifest xmlns:android="http://schemas.android.com/apk/res/android" package="com.example.joy.remoteviewstest"> <application android:allowBackup="true" android:icon="@mipmap/ic_launcher" android:label="@string/app_name" android:supportsRtl="true" android:theme="@style/AppTheme"> <activity android:name=".MainActivity"><intent-filter><action android:name="android.intent.action.MAIN" /><category android:name="android.intent.category.LAUNCHER" /></intent-filter> </activity> <receiver android:name=".MulAppWidgetProvider"android:label="@string/app_name"><intent-filter><action android:name="com.example.joy.action.CHANGE_IMAGE"/><action android:name="android.appwidget.action.APPWIDGET_UPDATE"/></intent-filter><meta-dataandroid:name="android.appwidget.provider"android:resource="@xml/mul_app_widget_provider_info"></meta-data> </receiver> <service android:name=".ListViewService"android:permission="android.permission.BIND_REMOTEVIEWS"android:exported="false"android:enabled="true"/> </application></manifest>这个小部件添加到桌面后有一个 ImageView 显示小机器人,下面有一个 Button ,右边有一个ListView。
Intent skipIntent = new Intent(context, MainActivity.class); PendingIntent pi = PendingIntent.getActivity(context, 200, skipIntent, PendingIntent.FLAG_CANCEL_CURRENT); mRemoteViews.setOnClickPendingIntent(R.id.btn_test, pi);用到方法 setOnClickPendingIntent,PendingIntent 表示延迟的 Intent , 与通知中的用法一样。这里点击之后跳转到了 MainActivity。
public RemoteViews getViewAt(int position){}这个方法中指定了 ListView 的每一个 item 的布局以及内容,同时通过 setOnClickFillInIntent() 或者 setOnClickPendingIntent() 给 item 设置点击事件。这里我实现的点击 item,替换左边的 ImageView 的图片。重写了 MulAppWidgetProvider 类的 onReceiver 方法,处理替换图片的逻辑。